An AI chatbot is a step beyond the classic keyword-based bots you may already know. Instead of relying on fixed triggers, it understands natural language, interprets context, and responds in a way that feels more human. With BotCommerce, you can power your chatbot using OpenAI or DeepSeek, letting it handle conversations across WhatsApp, Facebook, Instagram, Telegram, and your website. You’re not just setting up replies—you’re shaping an assistant that can speak in your own tone, follow your brand’s style, and deliver a smooth, consistent experience to every customer.

You can train it in several ways—through URLs, files, and manual FAQs, or by using Google Sheets or an API connection. Training allows the AI to learn your business information and respond as if it were part of your team. Plus, advanced options like intent detection campaigns give it the ability to route conversations to human agents or even trigger automated flows when certain topics come up.
In this tutorial, we’ll cover the essentials to get started: creating an AI Assistant, and training it with URLs, files, and FAQs so your chatbot can be up and running in minutes. Note that before following these steps, you must add your OpenAI or DeepSeek API Keys to the app and provide them with at least 10 USD in credit for all the AI tools to work.
⚠️ IMPORTANT: If you train your AI using URLs, files, or FAQs, you won’t be able to use the Google Sheets or API methods in that same campaign. The same applies the other way around—Google Sheets training disables the other methods, and API training does as well. You can find guides for those alternatives, along with creating intent detection functions, in separate articles.
Creating an AI Assistant
Open your dashboard and go to the Bot Manager of any of the platforms. For example, here we are using Facebook.
Select an account and go to the AI Assistant section. Turn on the Enabled toggle to open its AI Assistant settings.

Click on the New button. This will send you to the AI Training Campaign section on the Integrations panel. Although the AI Assistant settings are configured within each individual account and social network, the AI Training Campaign you create here is reusable. Once uploaded, it can be applied across multiple accounts and platforms simply by selecting it from the list—no need to recreate it each time.
Create a New Campaign. Click on the Create button to start the process of setting up your customized training data.

Set up a system prompt for the AI Training Campaign. Before adding training data, you’ll be prompted to name your campaign and provide a system prompt for the AI. We recommend giving the AI an identity (e.g., ‘You are our support agent’) and outlining specific steps for interactions, including response generation guidelines. Keep it concise; your business information will be added to complete the prompt later. When ready, click on Save.

Click the “+” button to add the training data. It will open a new tab where you can provide files, URL, and manual FAQs to train your AI. Let’s see how each one works.

Adding Manual FAQs
The basic way to add more content to the AI training campaign is manually inputting FAQs. Write the question first, put a line break and add the answer. You can provide as many FAQs as you want by clicking the add more FAQs button.
Don’t forget to press Save when you are done.

Adding an URL
The URL input method gathers training data by extracting content from a specified website using a CSS selector. This approach requires basic knowledge of website structure.
To begin, navigate to the URL you want to use for training data in your browser. Open the developer tools (inspect element), and identify the specific element to extract data from.

Enter the CSS selector for that element in the Selector Name box. Similarly, you can exclude sections of the website by specifying their selectors.
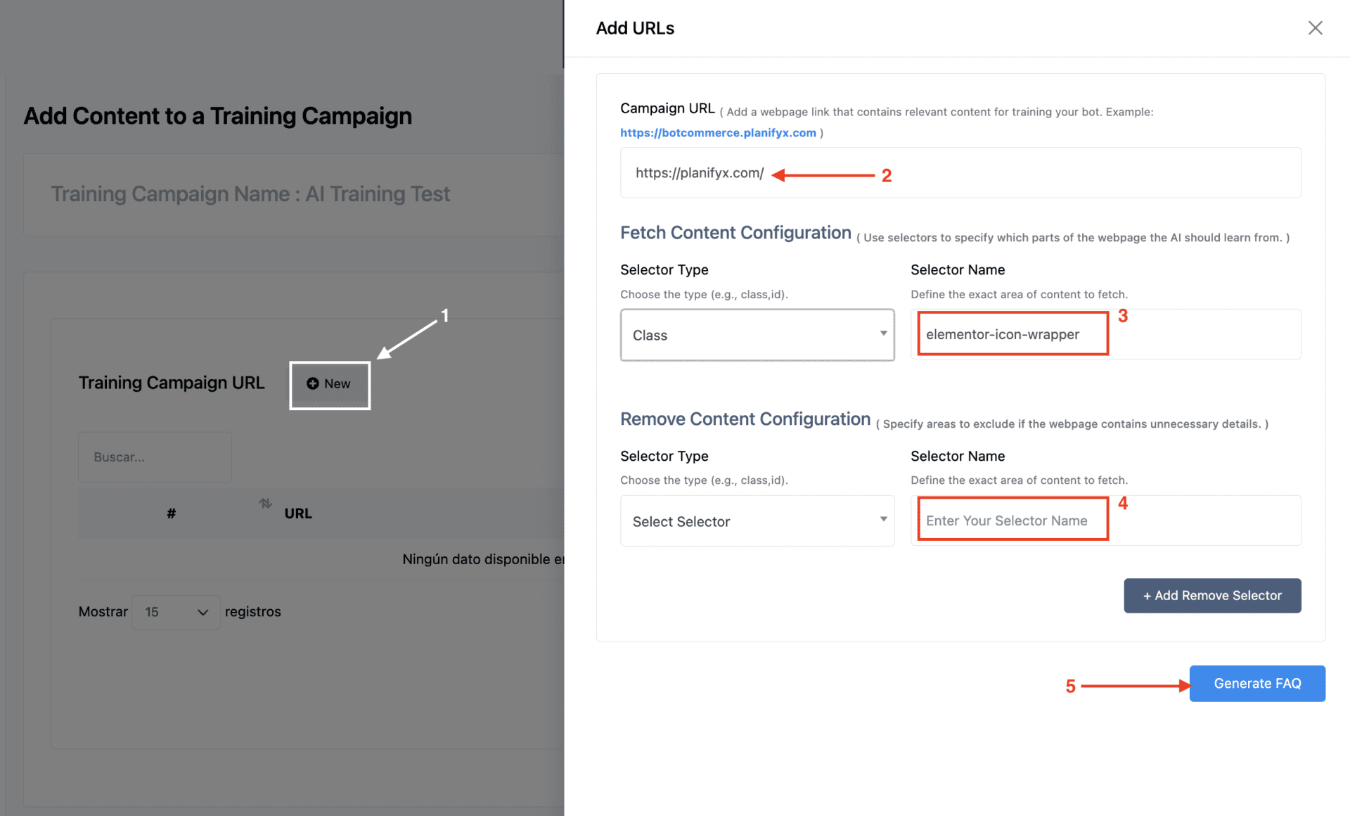
Revise the FAQs that will be generated automatically. Edit them if needed and save.
You can repeat this process to add as many URL elements as you need.

Adding Files
You can upload text, DOC, and PDF files (up to 2MB) to enhance your AI training.
Add a file. In the right panel, navigate to the Files section and click the (+) New button to upload a file from your computer. Once uploaded, click “Generate FAQ” to create FAQs.

Review and edit the FAQs as needed. Finally, save your changes. Repeat the process as many times as you need to.

Adding and configuring the trained AI campaign
Once you complete the training, you must add the your AI Assistant to your accounts, and configure its scope. Let’s see how.
Go back to the AI Assistant section. Select the AI Campaign you created before. Now, it’s time to configure it for this particular account.

Specify the restricted topics. These are keywords that the AI should avoid responding to. You can add several, separated with commas. You should also add a message to be sent when the AI detects restricted keywords in the query.
Enable contextual memory. This will allow the AI to remember the user’s messages for as many conversations as you indicate. Five is the recommended number.
Optionally, enable the typing indicator. When this is on, the AI will take a few seconds before responding and the user will see a “typing” indicator on the chat, creating a more human-like experience.
If needed, enable and add an intent detection campaign. This will allow your AI chatbot to understand the goal or purpose behind a user’s message and instead of simply answering questions, take an action — like assigning the conversation to a human agent or launching an input form. Read this article to learn how to create and use them.
Turn on the Do Not Assign Agent Off Business Hours toggle only if you have an intent detection campaign configured to send the user with a human agent. This will stop the AI from doing so when agents are not available. Learn more about this feature here.

Finally, you need to decide the scope of the AI. This is a crucial decision, since it will affect the whole dynamic of the chatbot. You have two possibilities:
- Set the AI Assistant for all queries: When this mode is selected, the AI will respond to all incoming user queries, regardless of whether they match predefined bot flows or templates. This is best for open exploratory interactions where users might ask a wide range of questions. Ensure your AI training is robust to handle a wide variety of issues; note that the No-Match template and any keyword-based flows will be ignored.
- Set the AI as a fallback only: When this mode is selected, the AI will respond only when the bot fails to to match any predefined flow or response template. It’s best for chatbots with well-defined keyword-based flows, where AI is used as a safety net for unexpected or out-of-scope queries. Use this mode to minimize AI interactions and maintain a structured chatbot experience. Note that if the No-Match template is turned on, it will have preference over the AI Assistant responses, so we recommend to leave it off when you are using this option.

Click on Save Settings. Your AI Assistant is almost ready! We just need an additional step to help it answer all messages.
Adding the AI Assistant to the No-Match Template
The No-Match Template is the message sent when the chatbot does not recognize any keyword in the user’s message. It was originally designed for keyword-based chatbots, but we can now use it to our advantage by connecting the AI to it:
- If you selected the “AI Assistant for all queries” scope, this ensures the AI responds to every message.
- If you selected the “AI as Fallback only” scope, it helps the AI handle messages that are not linked to any flow trigger.
To set it up, go to the Action buttons section. Make sure you select the account where you installed the AI.

Click on No-Match. The No-Match template flow will open. As you can see, right now it triggers a Text message. Delete that Text Component.
Now, drag an AI component into the dock and connect it to the Start Bot component. Double click on it to configure it.

Select your AI Training Campaign from the list. Leave the prompt box empty. Save.

Finally, we need to turn on the No-Match template. Go to Bot Manager > Settings.

Turn on the No Match Reply switch. Enable it for Every Time.

Done! Your AI must now be working for this account.
Add the same training to another account
If you want to share the same training on other channels or accounts, simply follow the steps below.
Go to the Bot Manager of the social network where you want to add the training. For example, here we selected WhatsApp. Indicate the account where you will set the AI Assistant up.
Go to the AI Assistant section. Enable the AI and select the campaign.
Now, simply configure the rest of the settings as before. You can adjust them as needed. Make sure to save.

Finally, repeat the process for setting up the No-Match Template on that account. That is, go to the action buttons, replace the No-Match text component with an AI component, select the campaign, and save.
Play with all the elements to build dynamic chatbots tailored to your needs. And if you require a little help, our experts can help you design the perfect chatbot here.
