In this tutorial, we’re going to conduct a bulk messaging campaign using an official WhatsApp Business account. I will show you part of the documentation to help us understand how it works, and then we’ll create a template to set up a bulk send through the official WhatsApp account.
Obtaining the language code
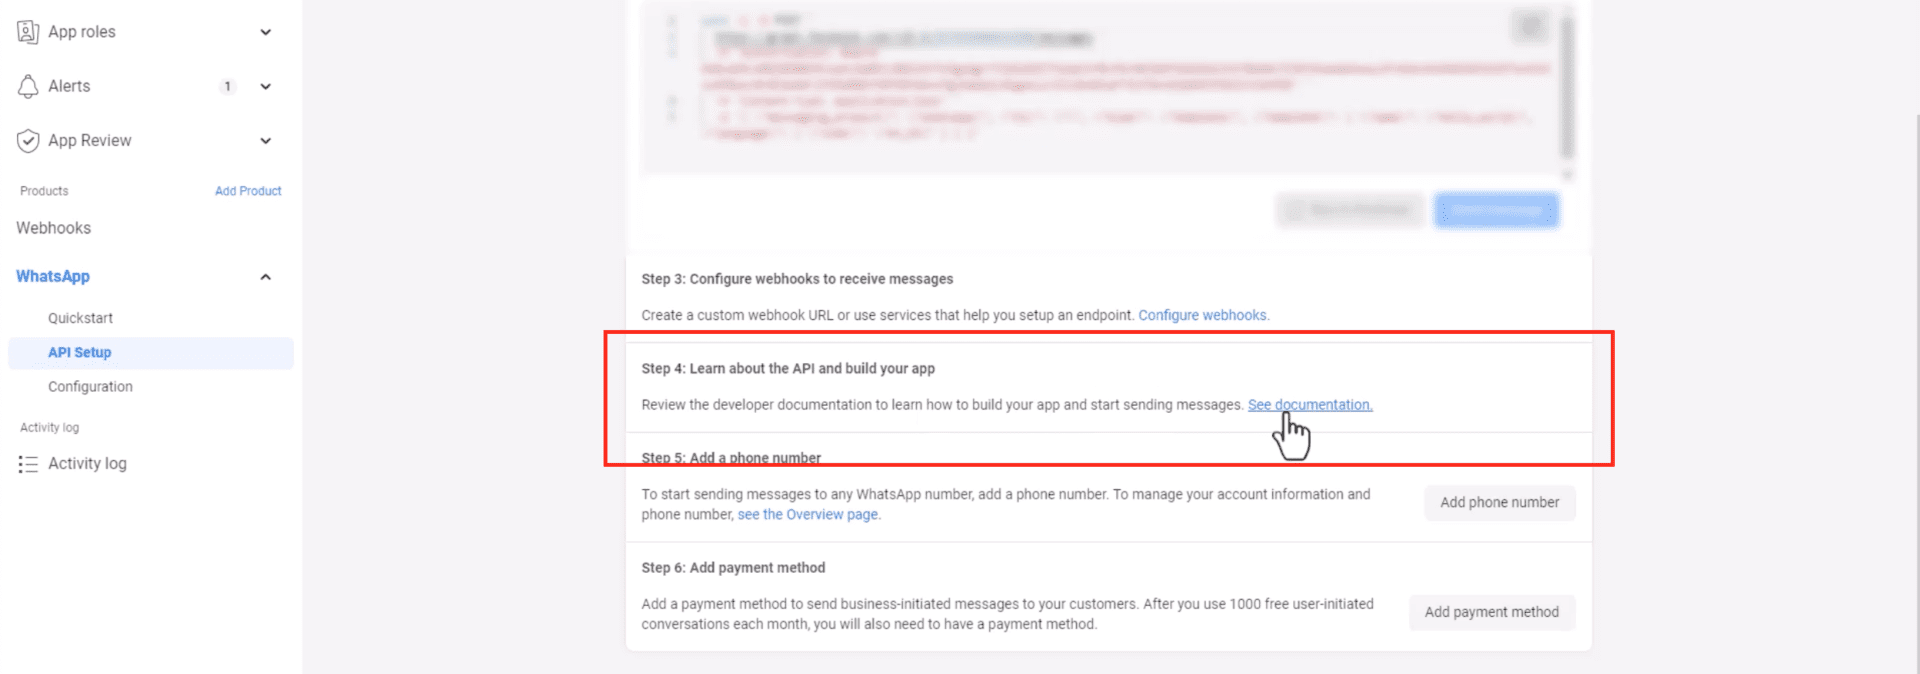
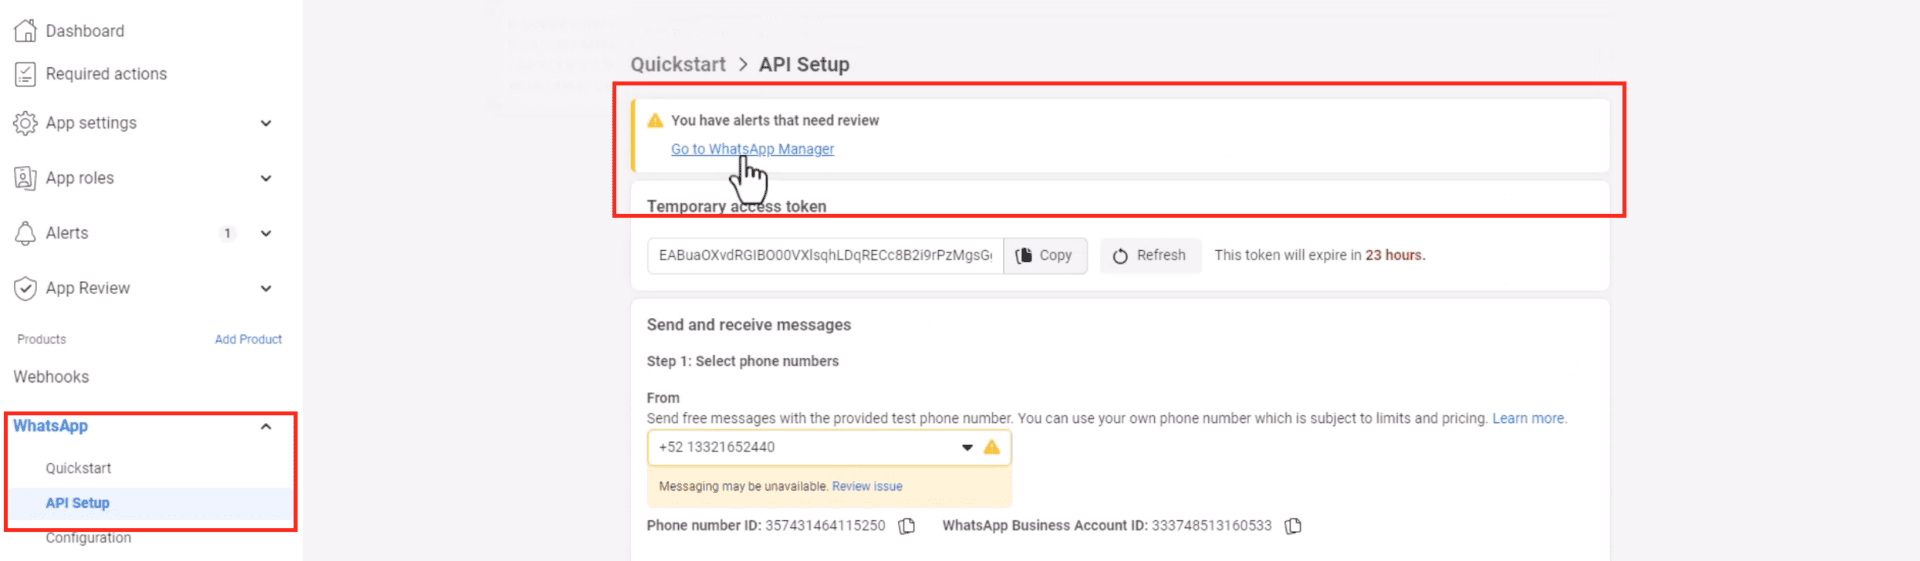
Open Your Meta Developers Account. Start by opening your Meta Developers Account, which you used to connect your WhatsApp account to our chatbot app. On the left sidebar, click on “WhatsApp” and then “API Setup.”
Find the Relevant Documentation. Scroll to Step 4: “Learn about the API and build your app,” and open the link provided in a new tab. You can also open it by clicking here. This documentation will guide us through the process.
Explore the Messages Section. In Meta’s documentation, navigate to the messages section, then to Templates. This section covers the basics of sending a template message through the app.
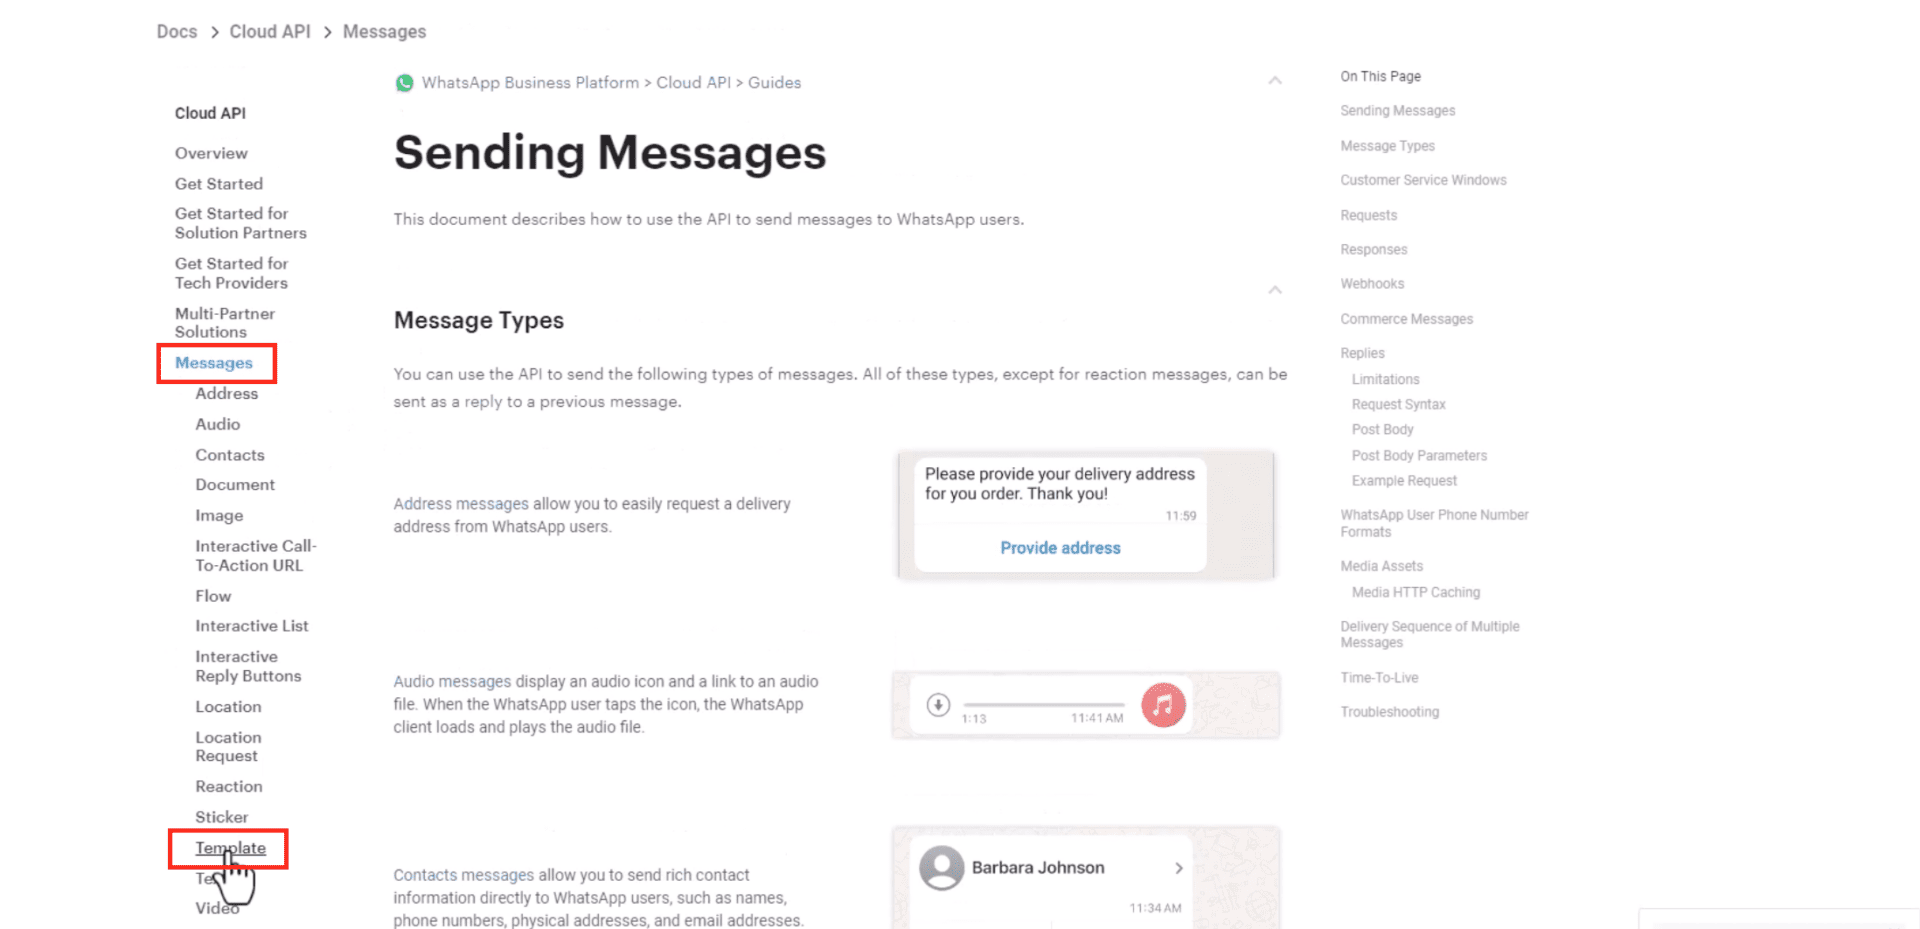
Identify Template Components. We will need the template name, template language, and components if variables are used within the template.

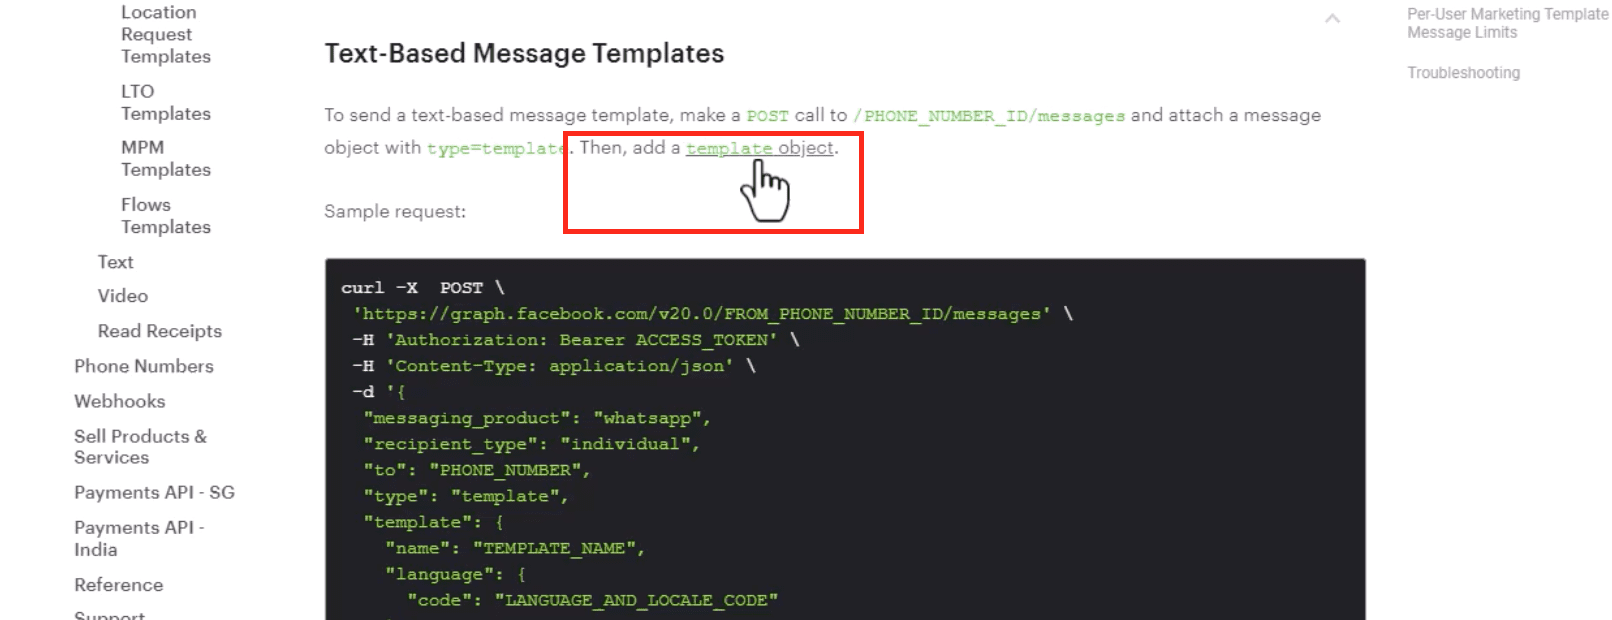
Access the Template Object. For the language section, a code will be required. Click on “Template Object” and open it in a new tab. This page shows the properties a template can have.
Locate Supported Languages. Click on the link for supported languages to see a list of codes and their corresponding languages.
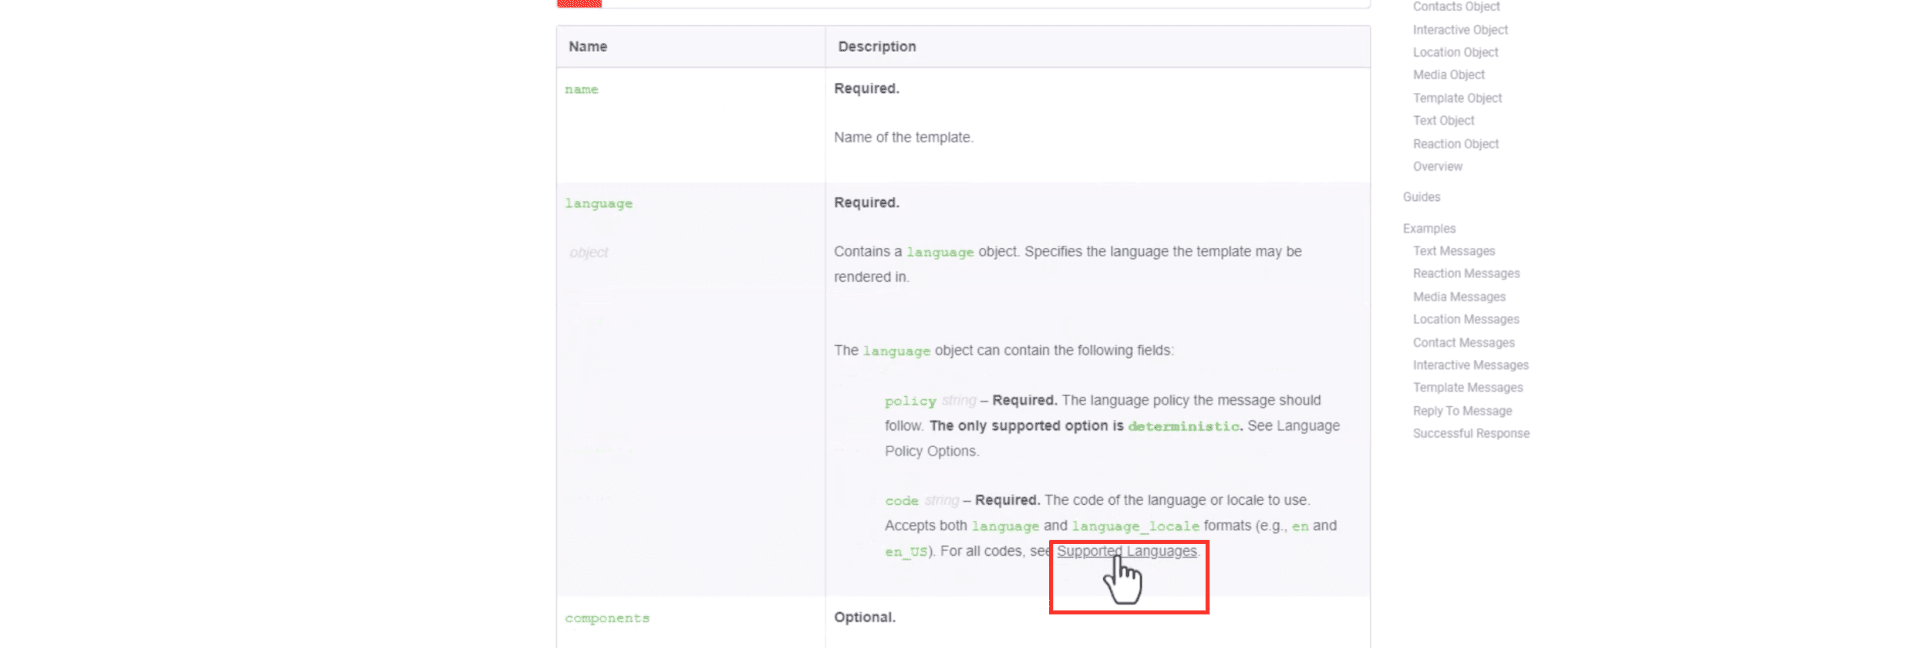
For example, use “en_US” for American English or “es” for General Spanish. It’s crucial to input the correct language code when creating the template.
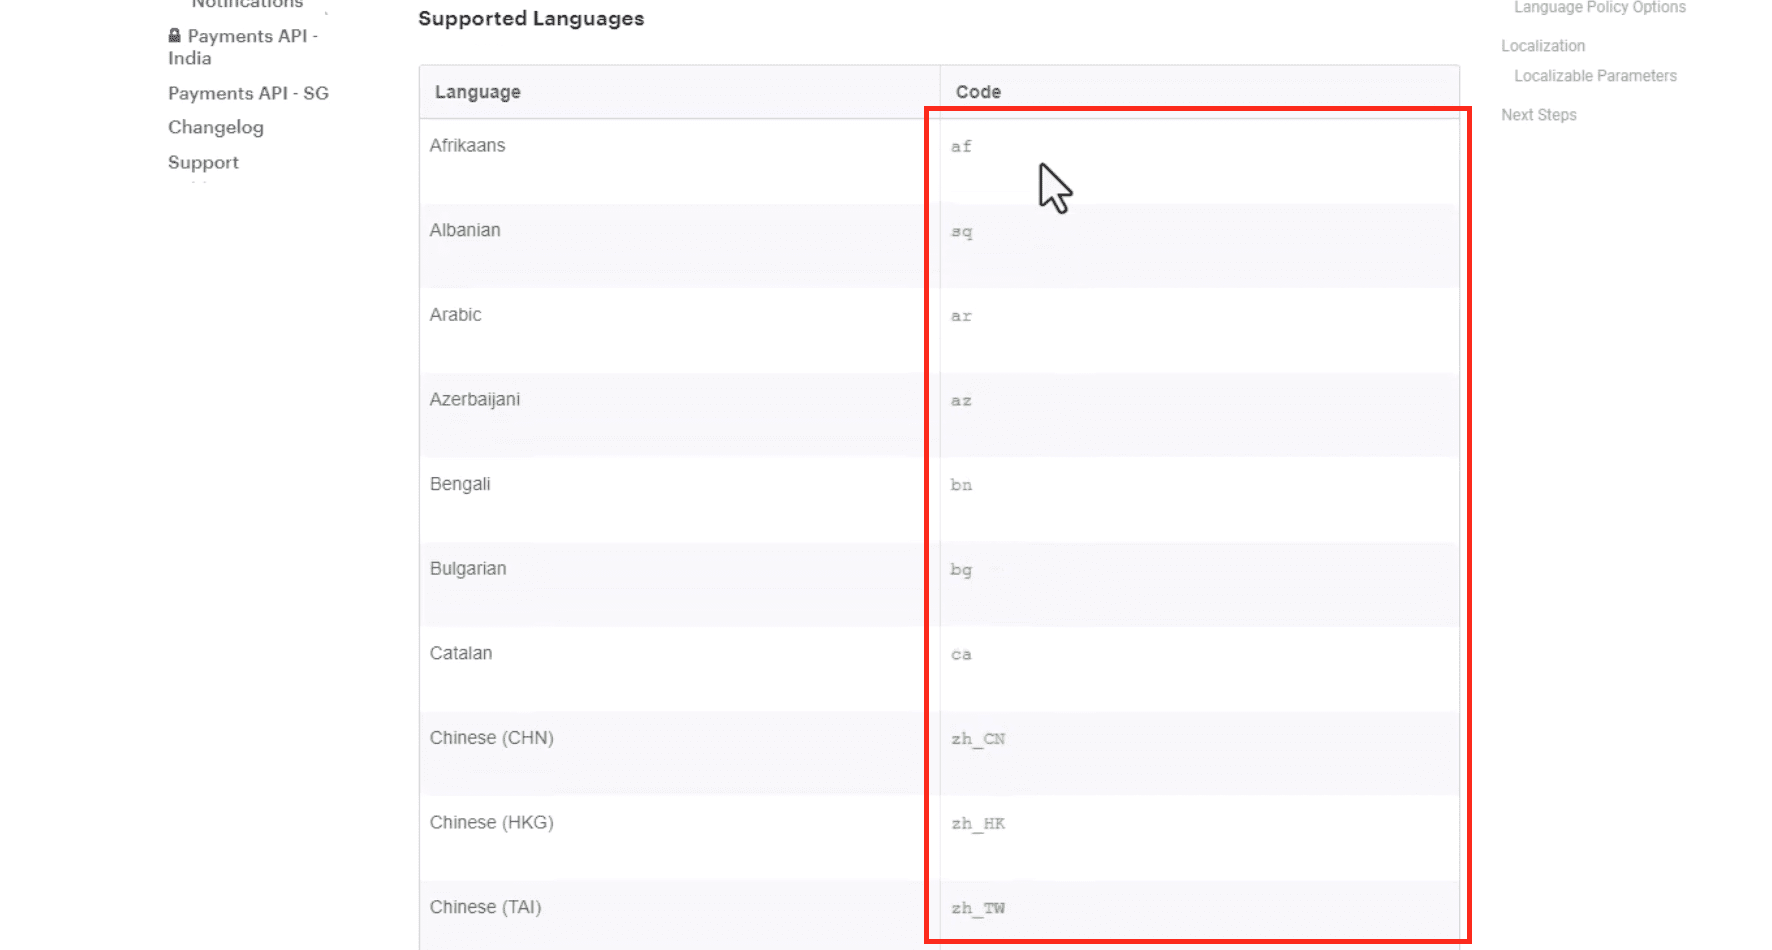
Copy the code and save it. We’ll use it shortly.

Sending templates without variables
Open the WhatsApp Manager. Go back to the API Setup section in your Meta Developers Account. Open the WhatsApp Manager as shown in the image below. If the button isn’t visible, use this link.
Open the WhatsApp Template Manager. Navigate to the template manager in the left sidebar.
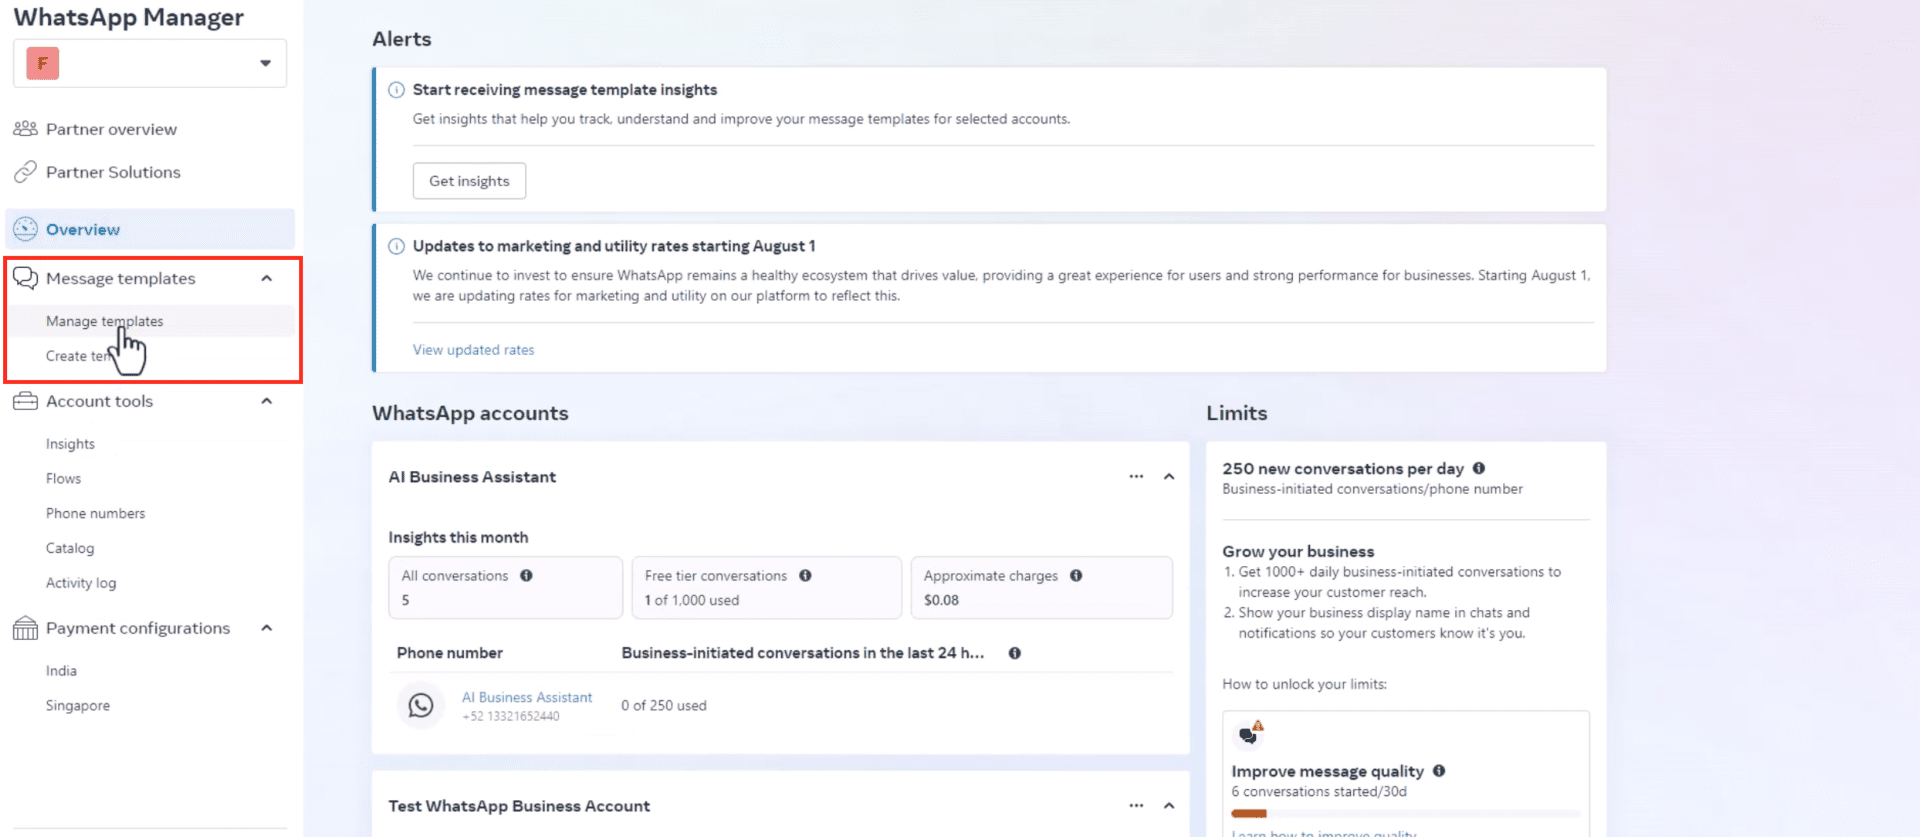
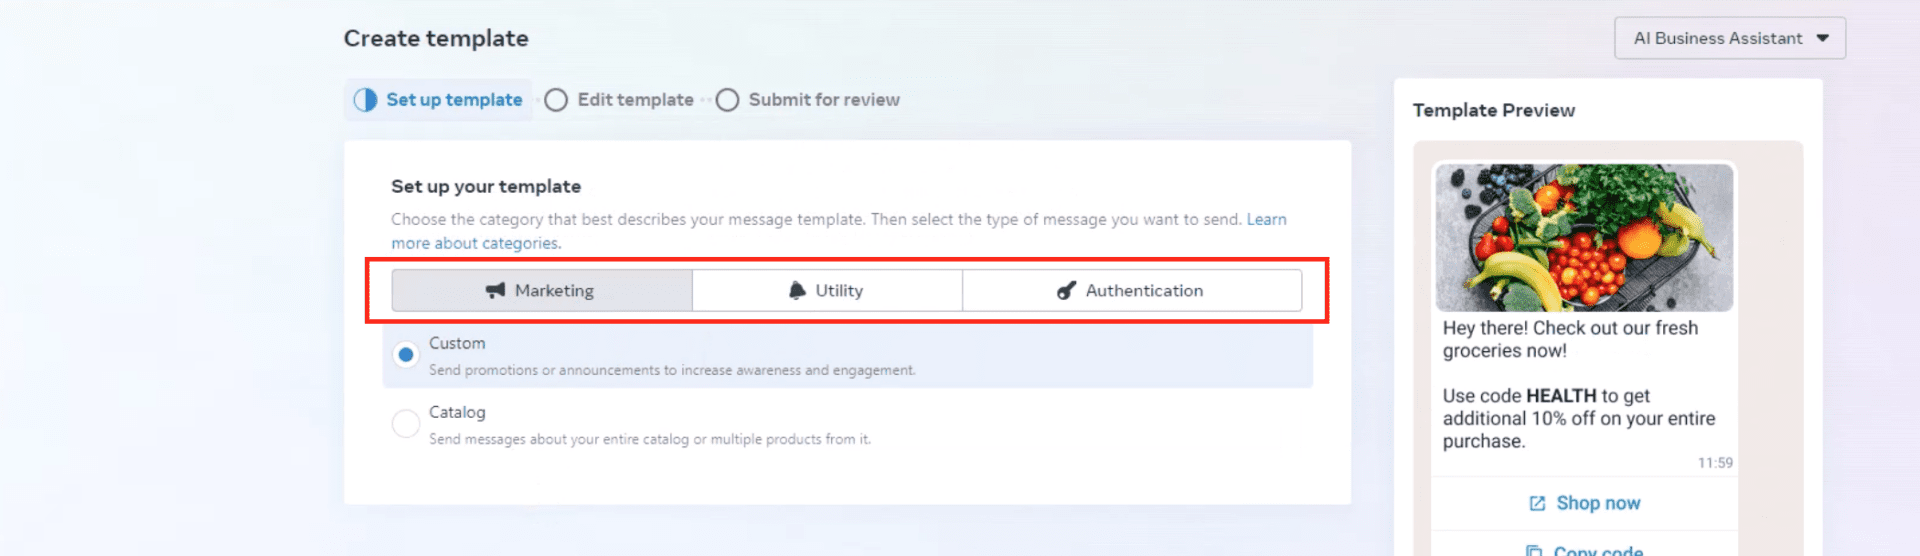
Initiate Template Creation. Click on “Create a template,” then “Create a new one.”
Choose the type of message. It can be utility or marketing. Note that Meta restricts marketing content in utility messages, so be honest.
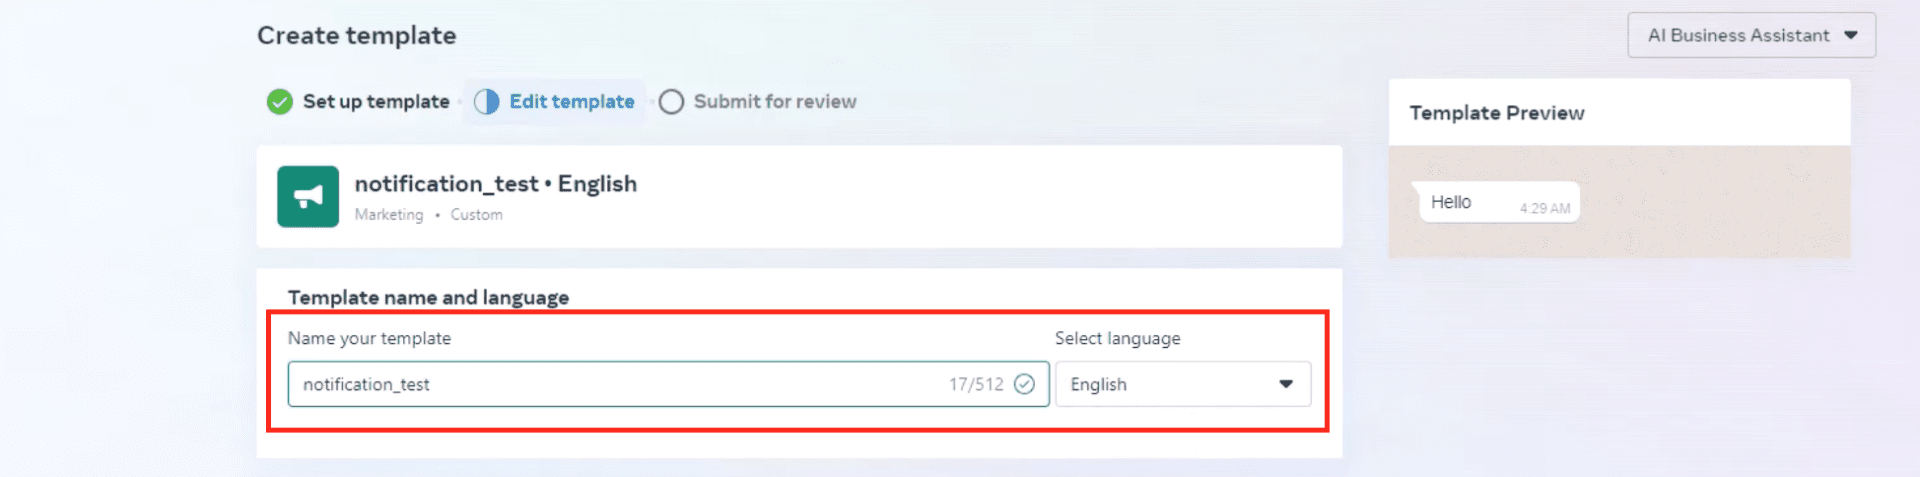
Set Template Details. Name the template, for example, “notification test,” and select the language—defaulting to English.
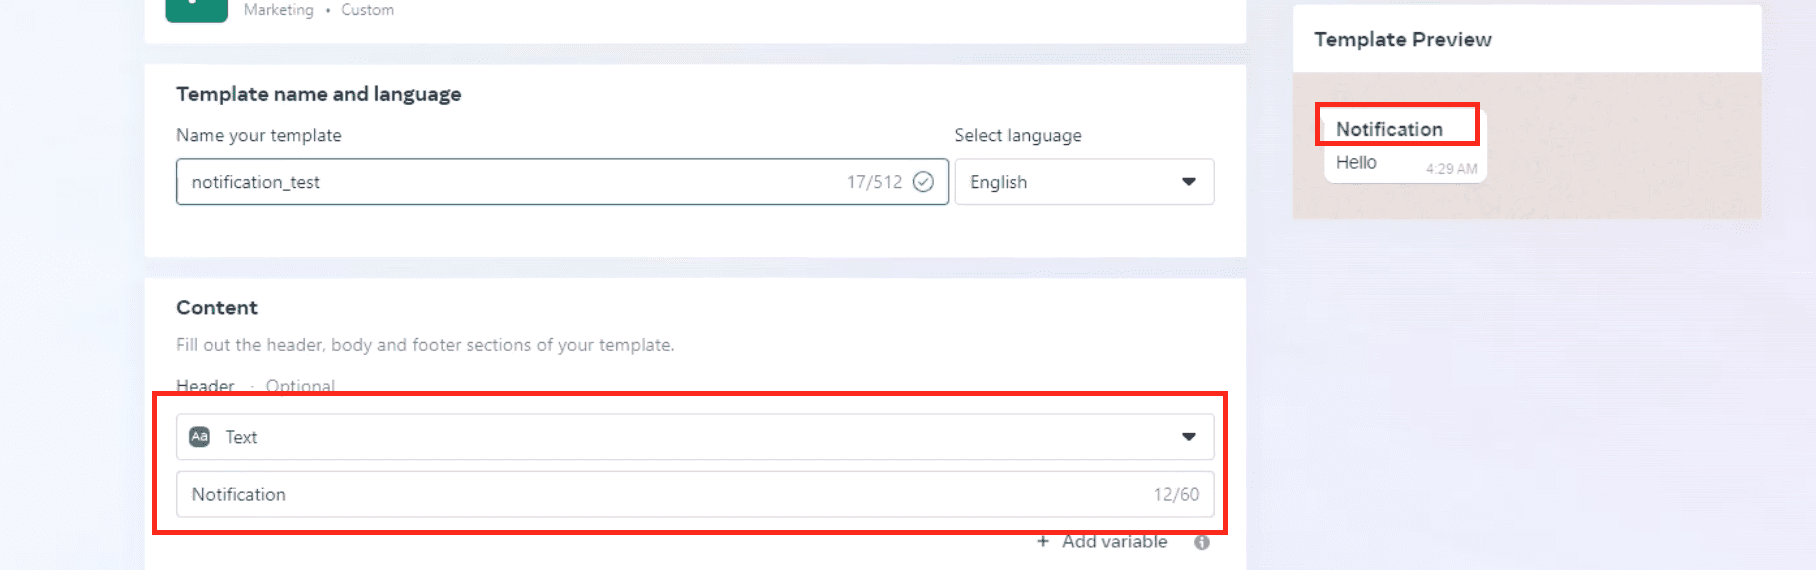
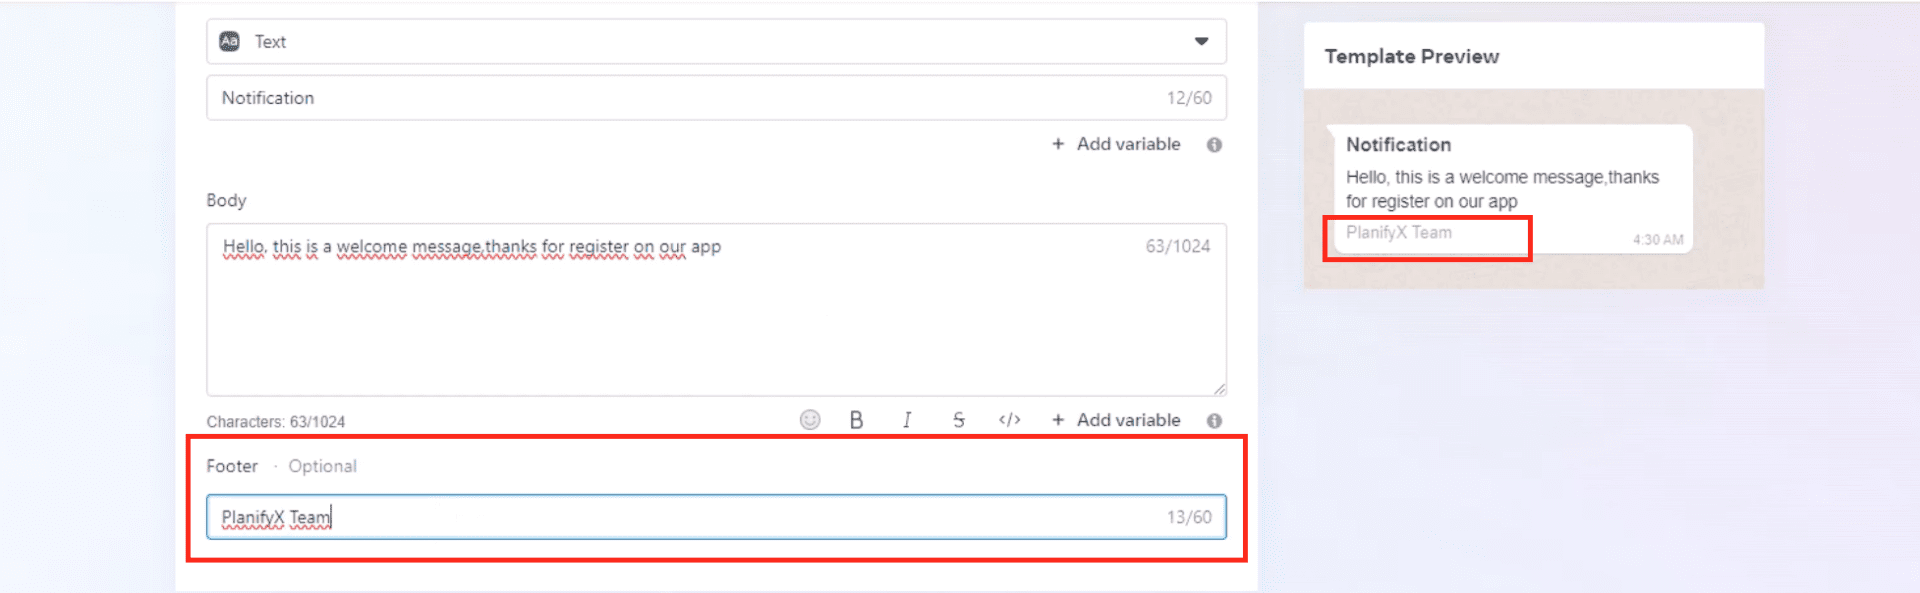
Optionally, add a header, like “notification.”
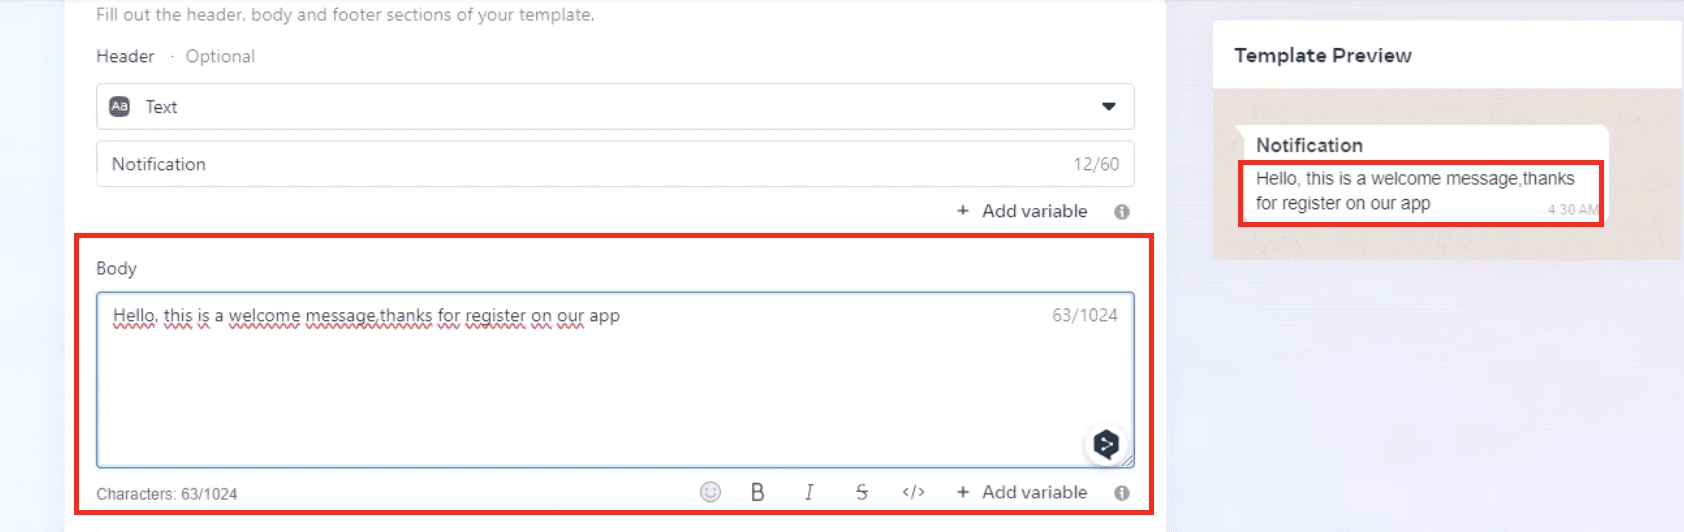
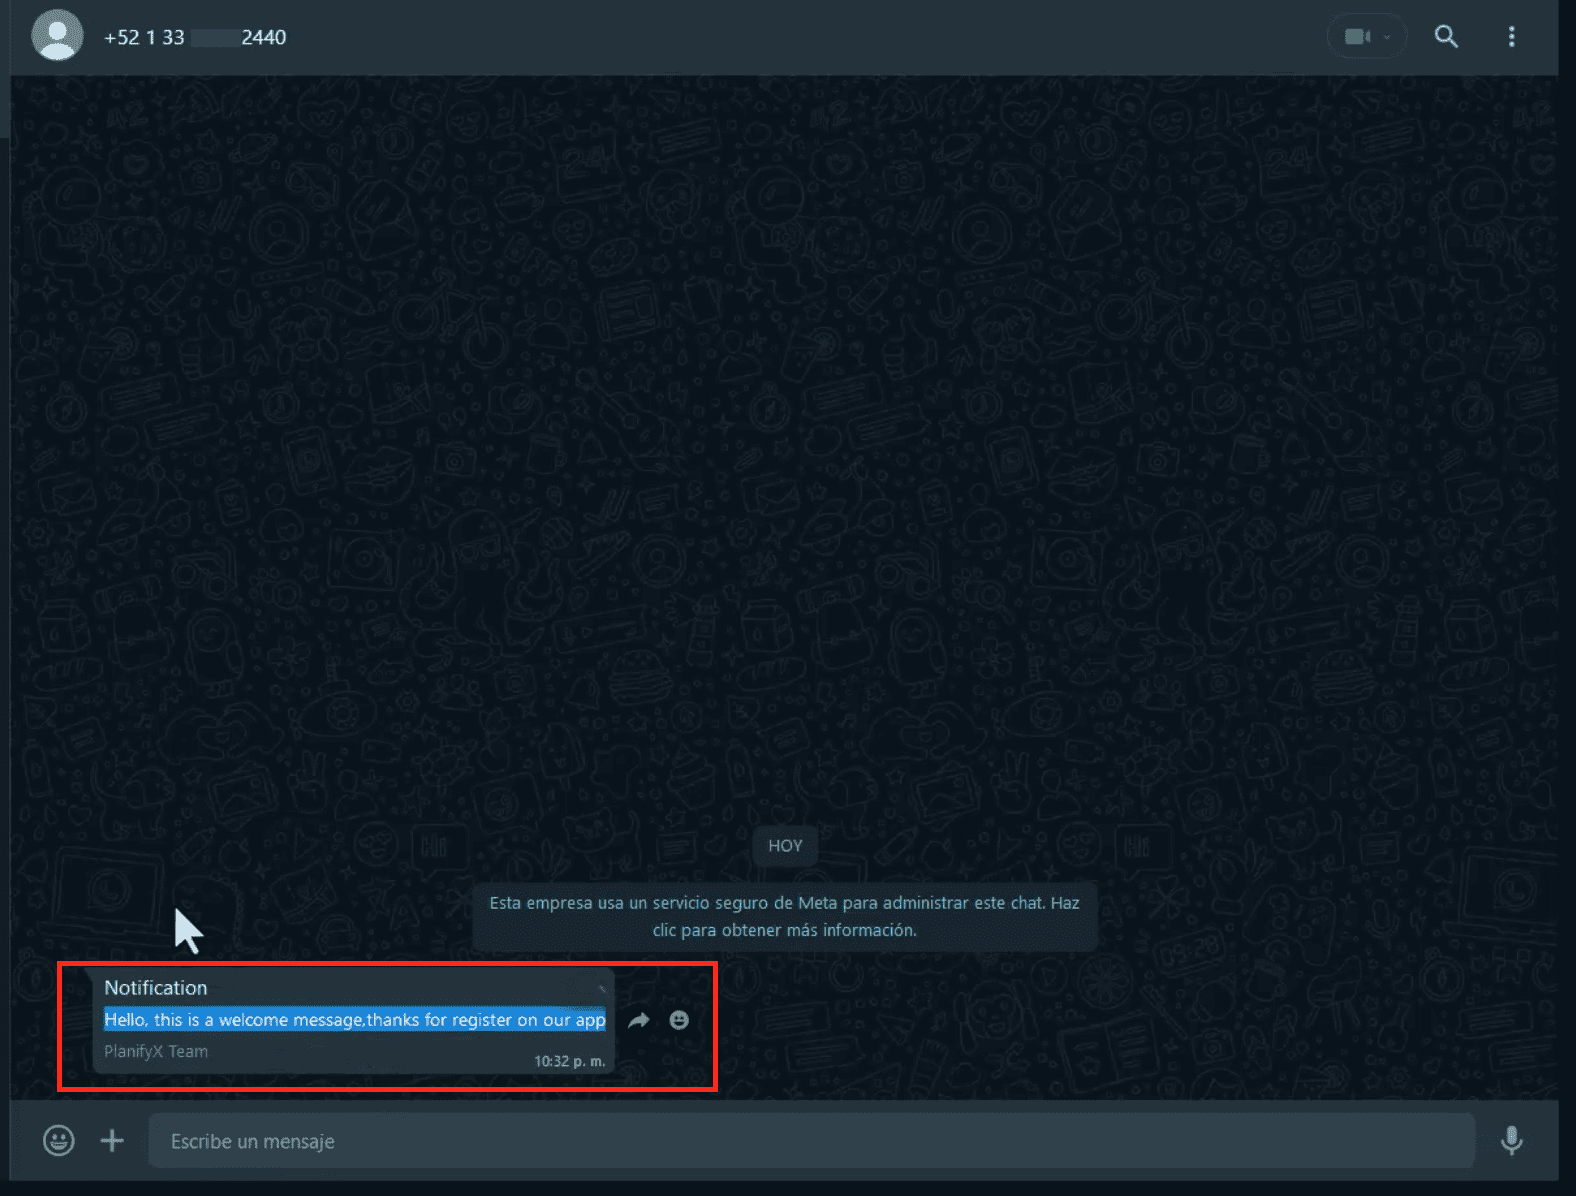
Compose the Message. Write the body of the message without variables, such as “Hello, this is a welcome message, thanks for registering on our app.”
Finally, add footer text if desired.
Submit the template for review. Confirm the language and click done.
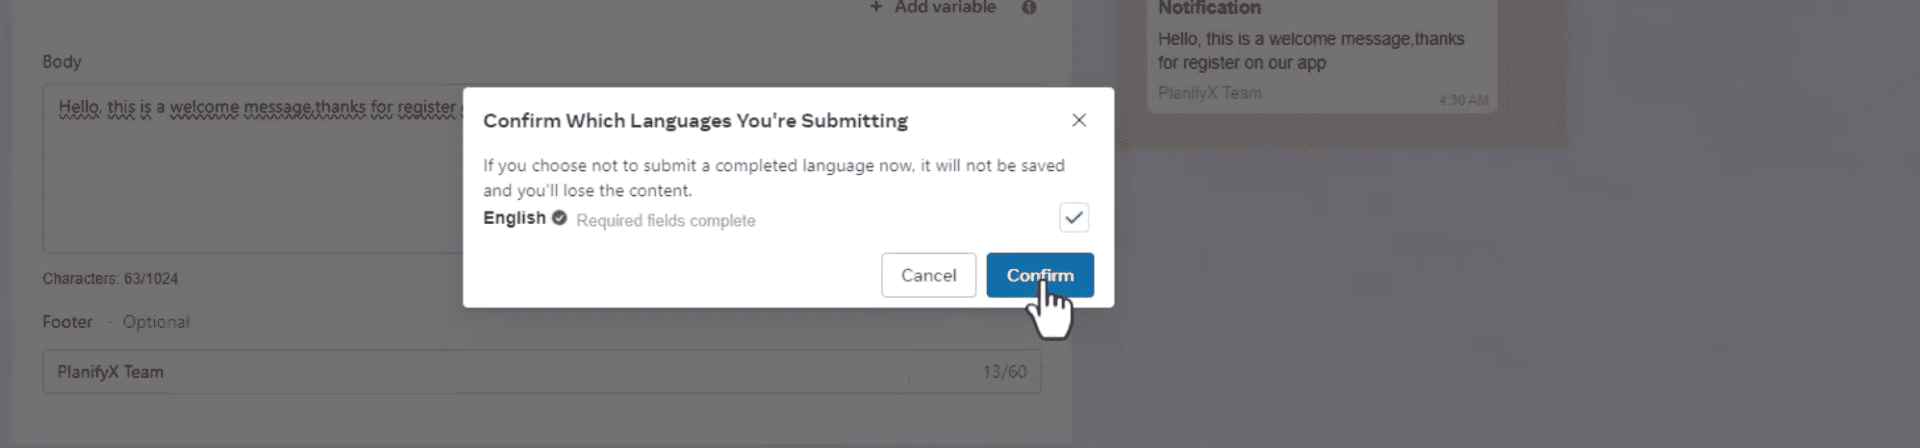
Now, wait for the template to be approved. While it’s under review, we can’t use it.
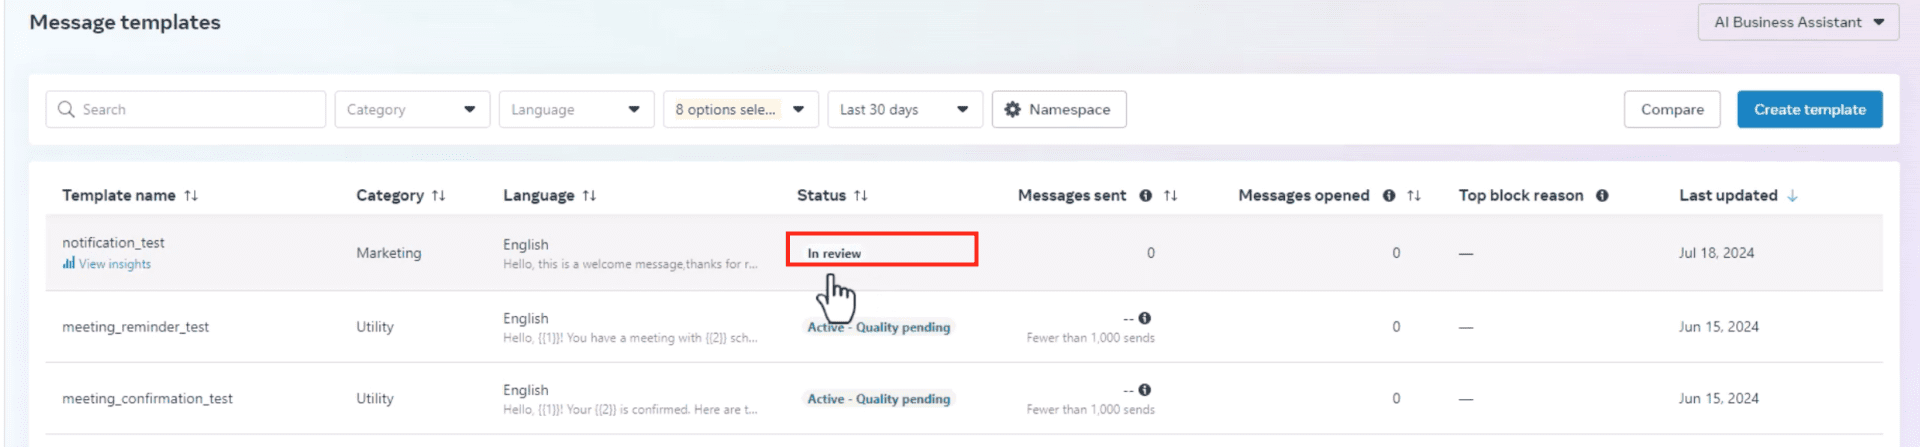
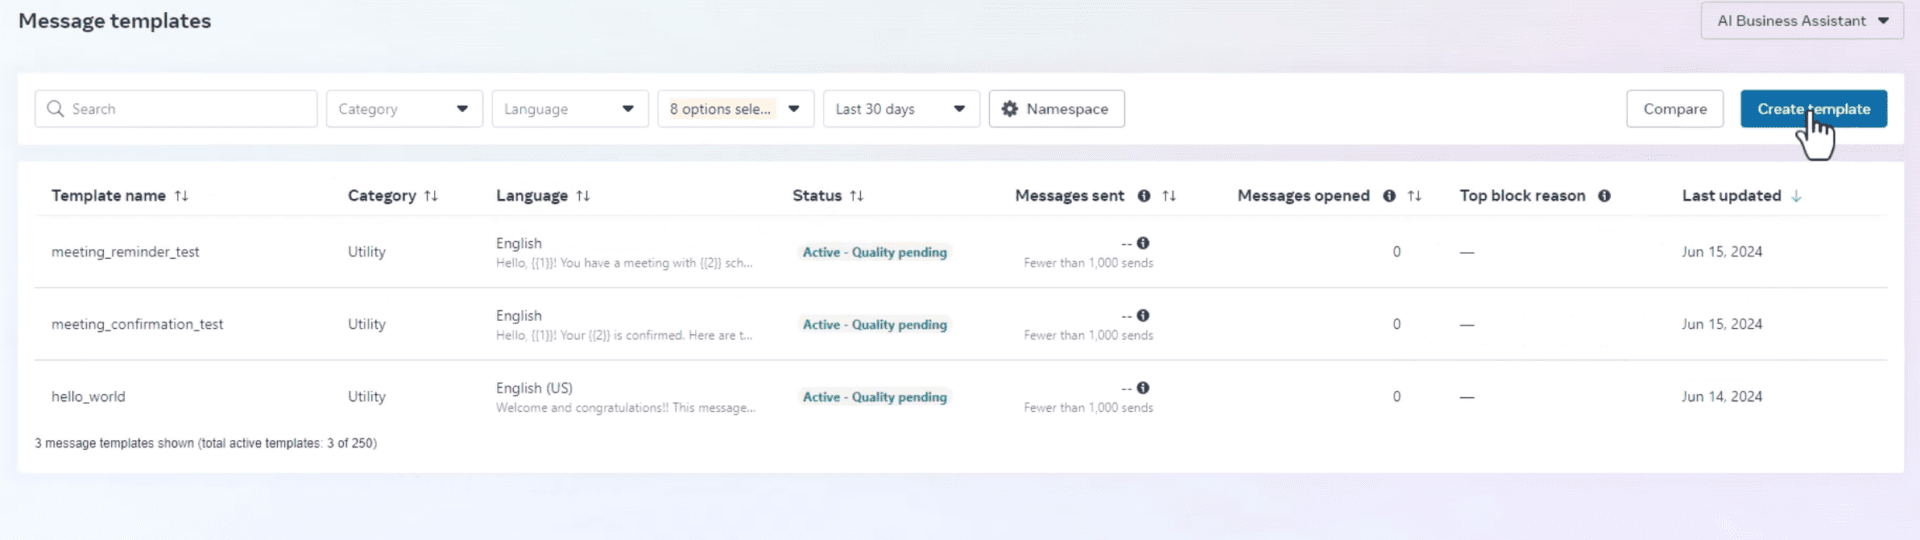
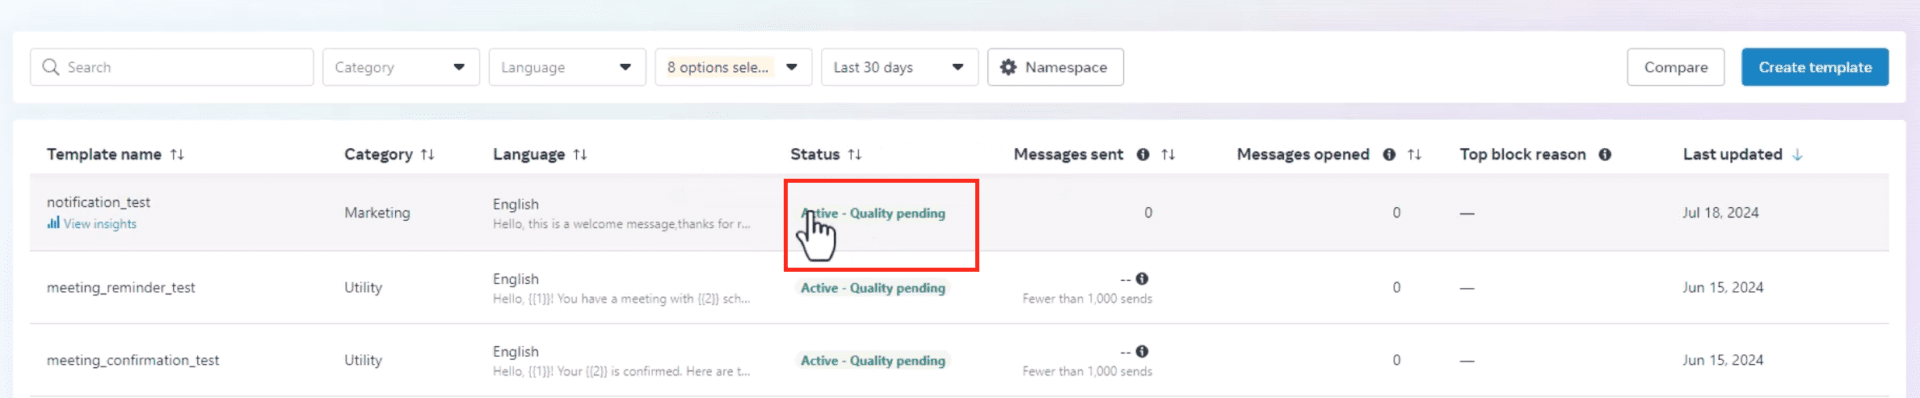
Refresh the page after a few minutes, and it should be ready for a bulk send. Copy the template name, you will need it.
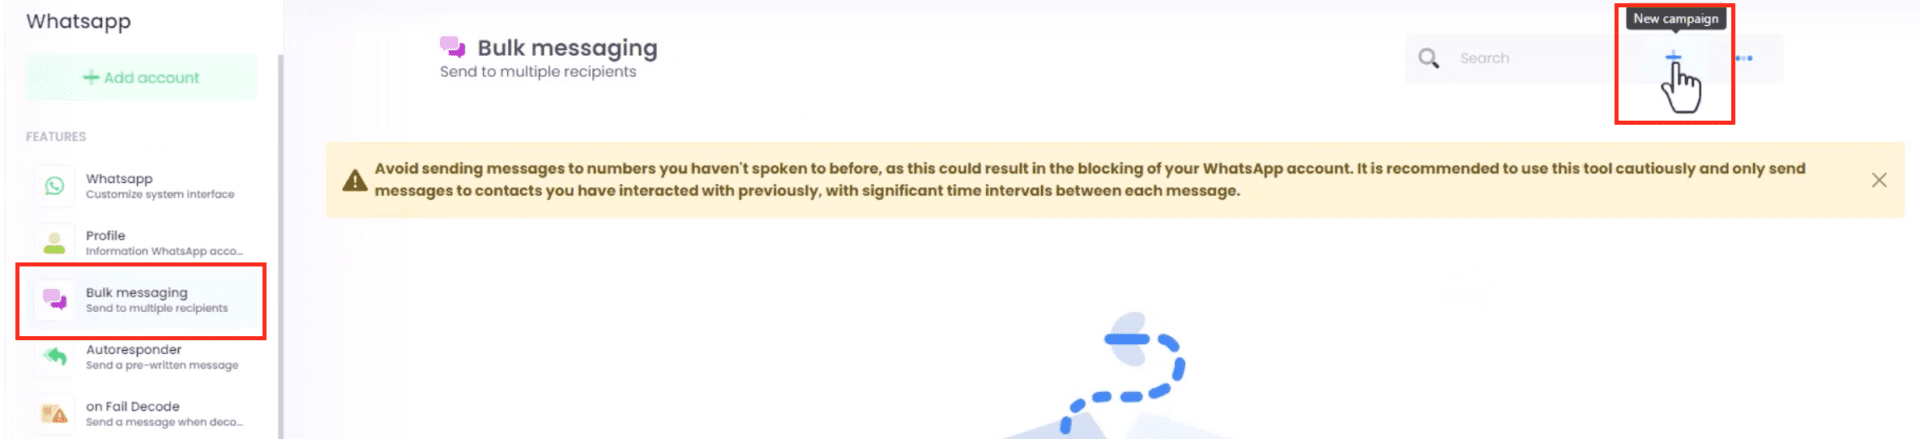
Create a bulk messaging campaign. Return to our chatbot application, open the WhatsApp module, go to Bulk messaging, and create a new campaign
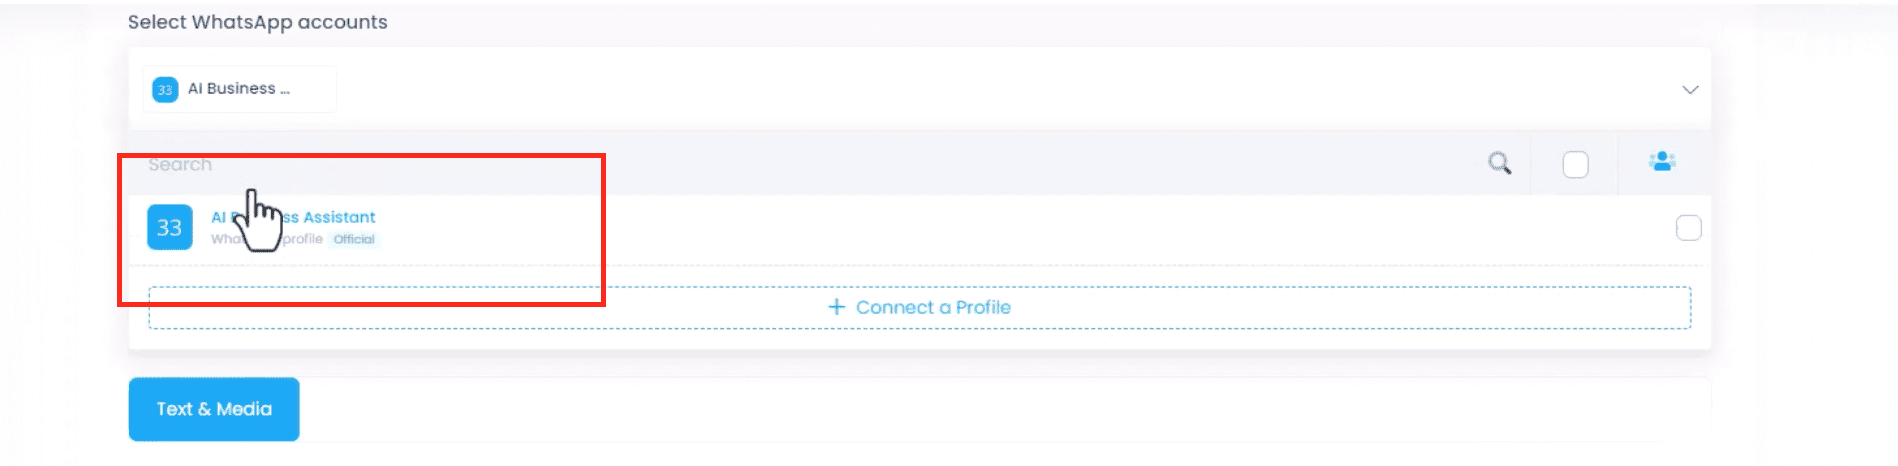
Configure Campaign Details. Select your linked WhatsApp account, name the campaign, and choose your contact group. In this example, we used a contact group containing only one phone number for testing.
If you do not have a contact group to send the campaign yet, learn how to create it here.

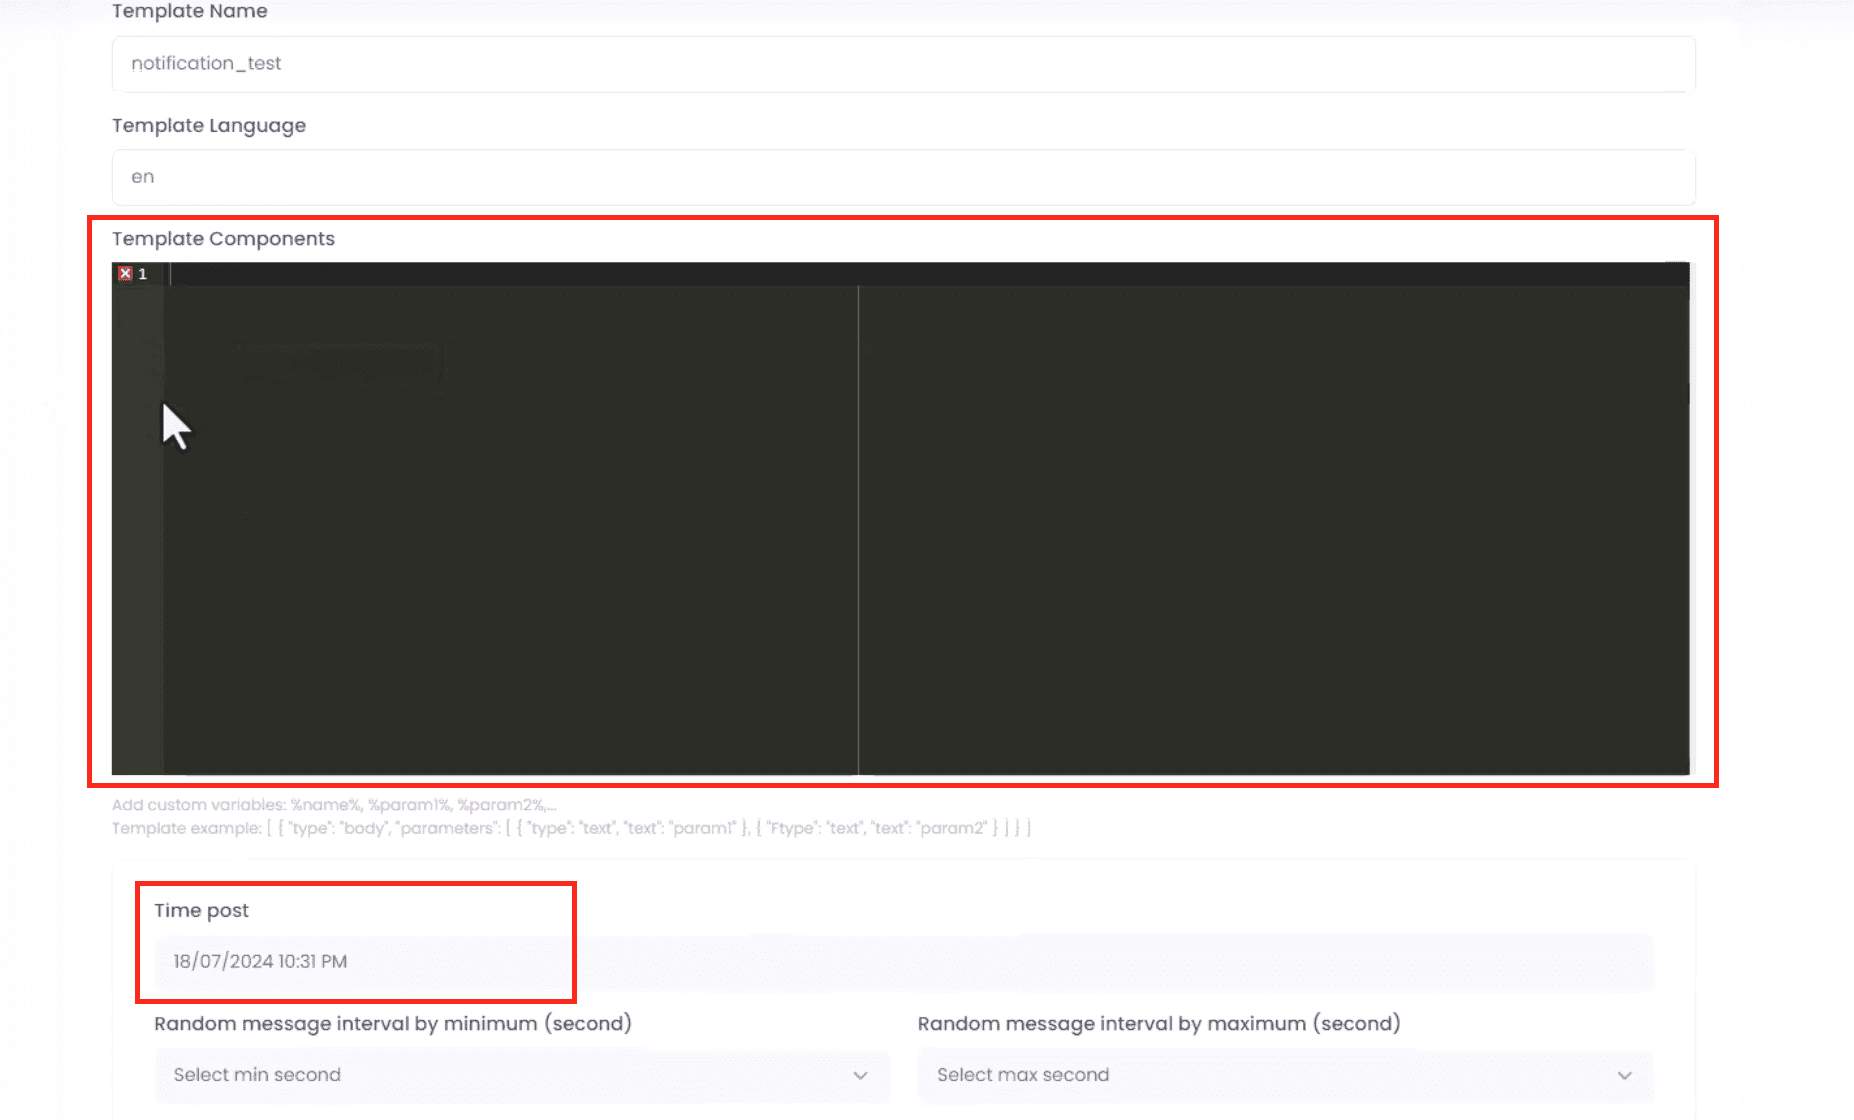
Add the template name exactly as created in Meta Template Manager and the language code you obtained previously.

Since there are no variables, the template components will remain blank. Set the frequency for the messages and schedule the campaign.
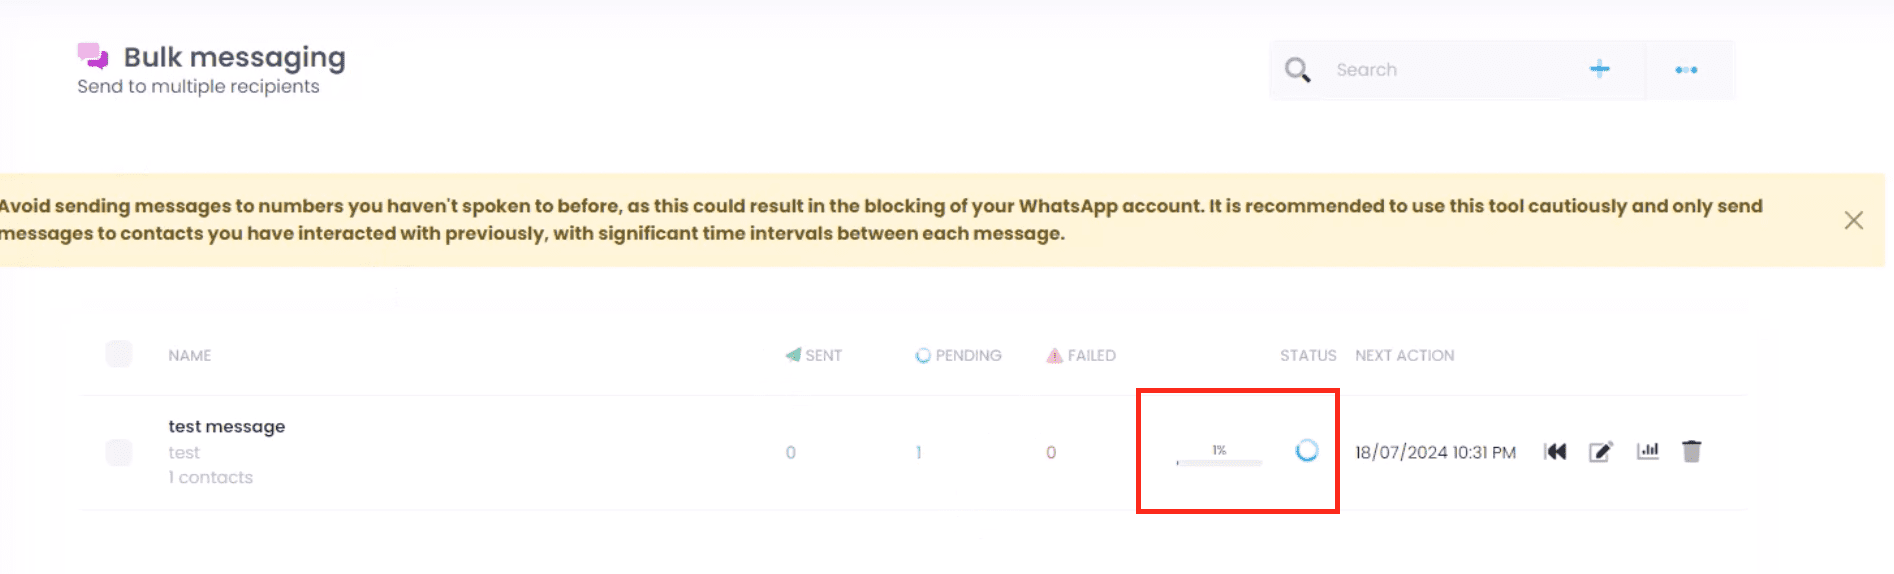
The status should show as pending and then sent once completed.
Here is how your contacts will see the message.
Sending templates with variables
In this section, we’ll explore how to use variables in WhatsApp template messages to create personalized and dynamic content. Variables act as placeholders within a message template that can be replaced with specific information for each recipient, such as their name or other personalized details. This feature allows you to send tailored messages to a large audience without creating multiple templates, enhancing the relevance and engagement of your communications. Let’s dive into the steps for setting up and sending a template message with variables.
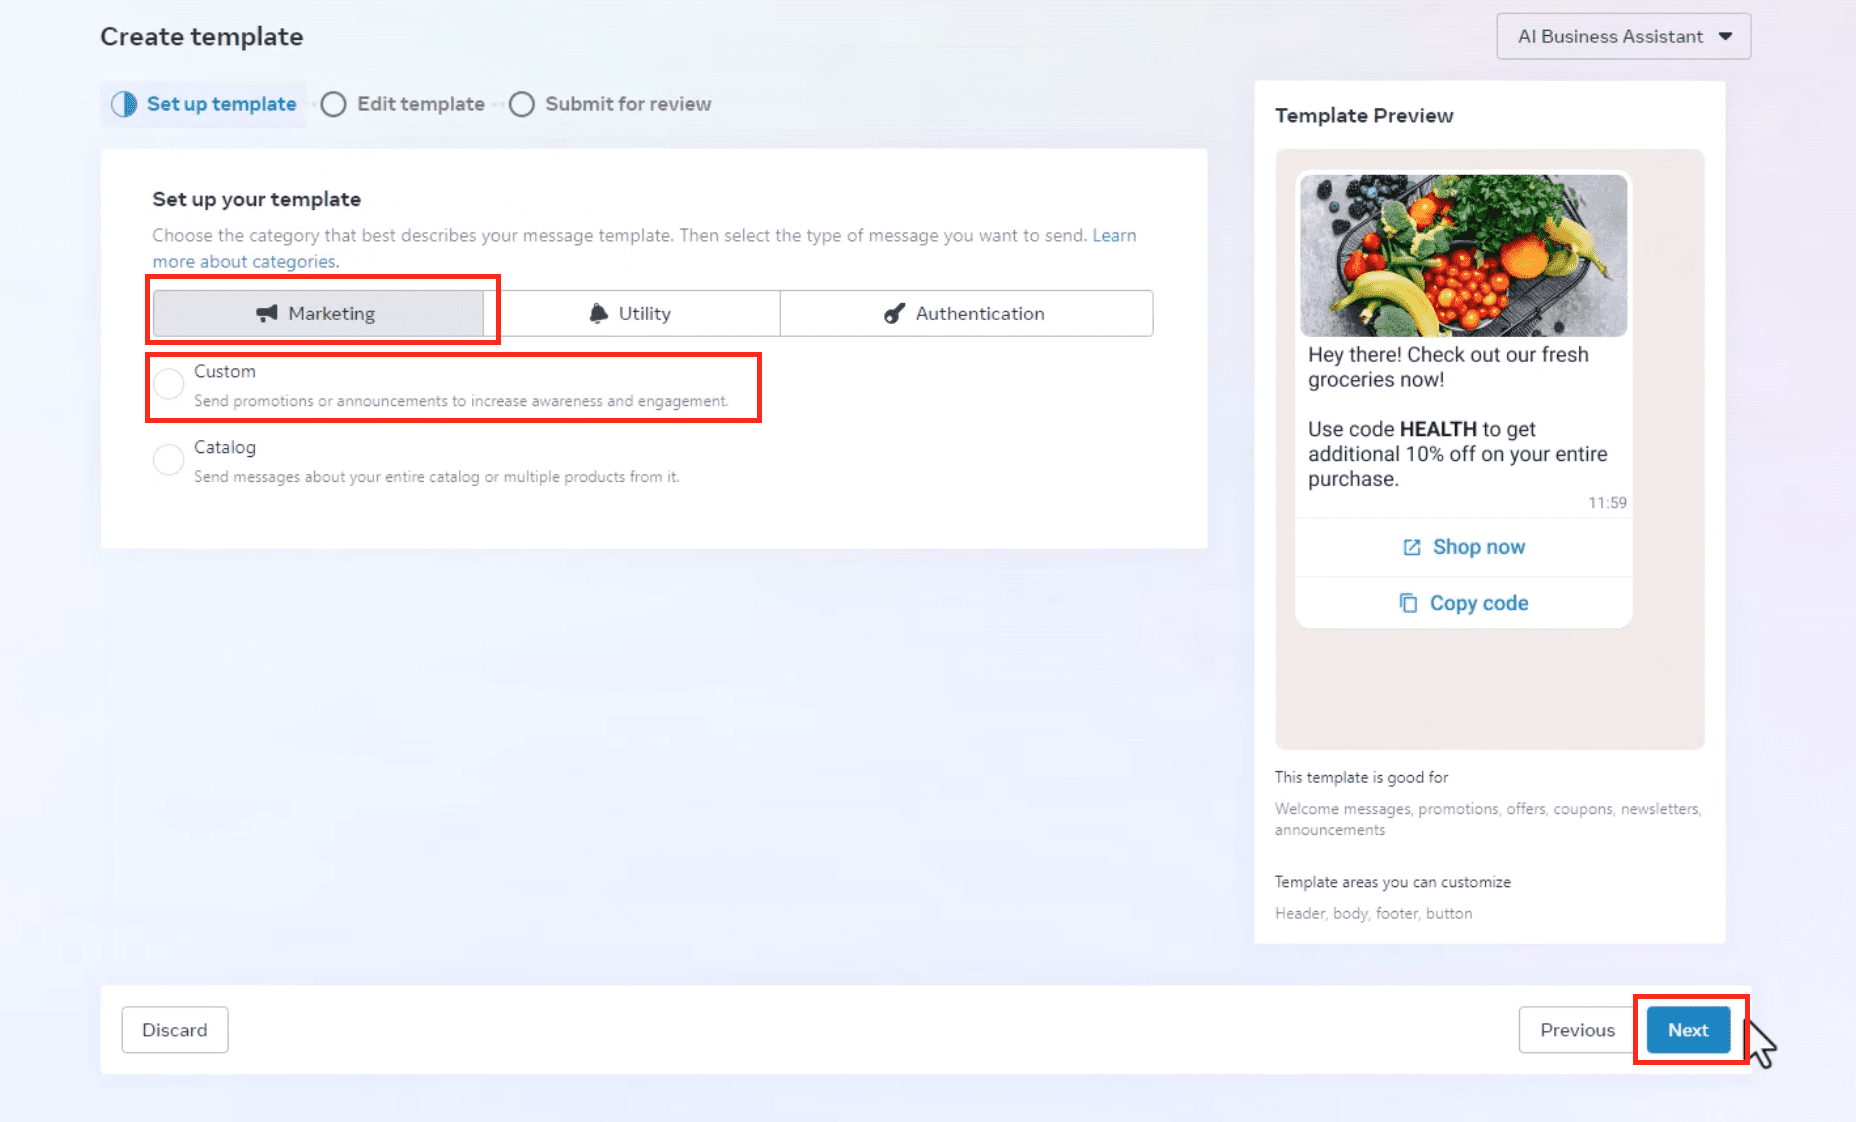
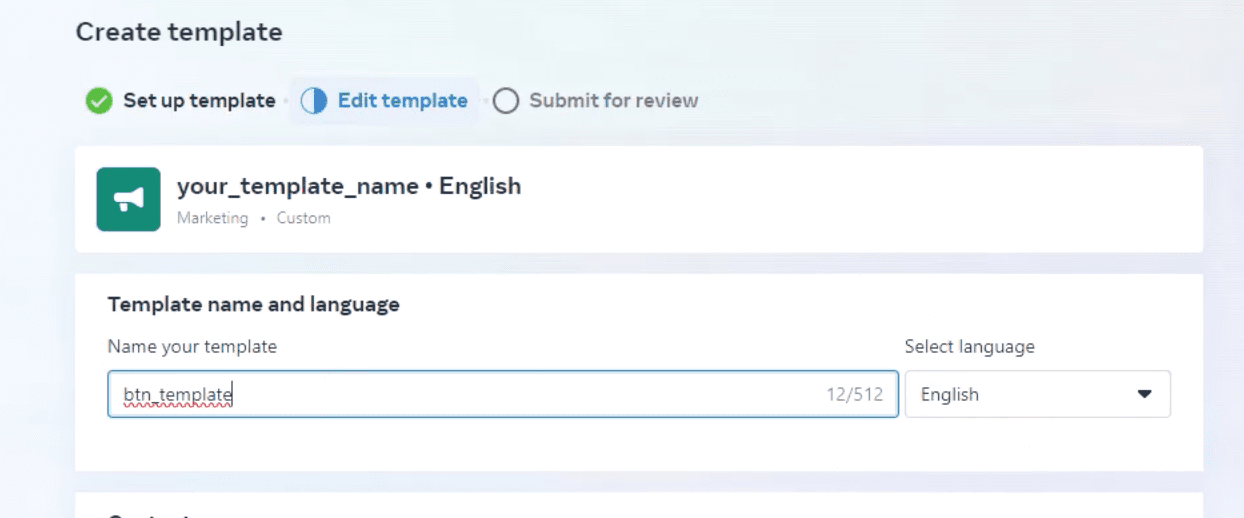
Create a Template with Variables. To add variables, create a new template in the Business account, select marketing and custom.
Name it and copy the name, once again, you’ll need it later.

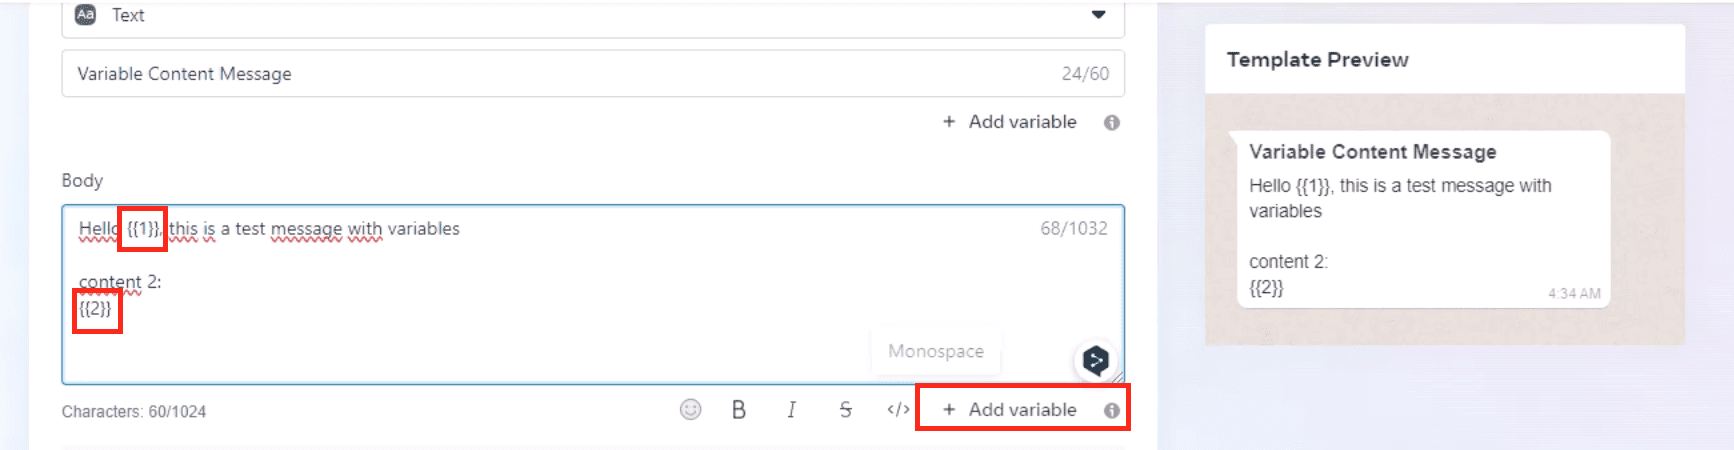
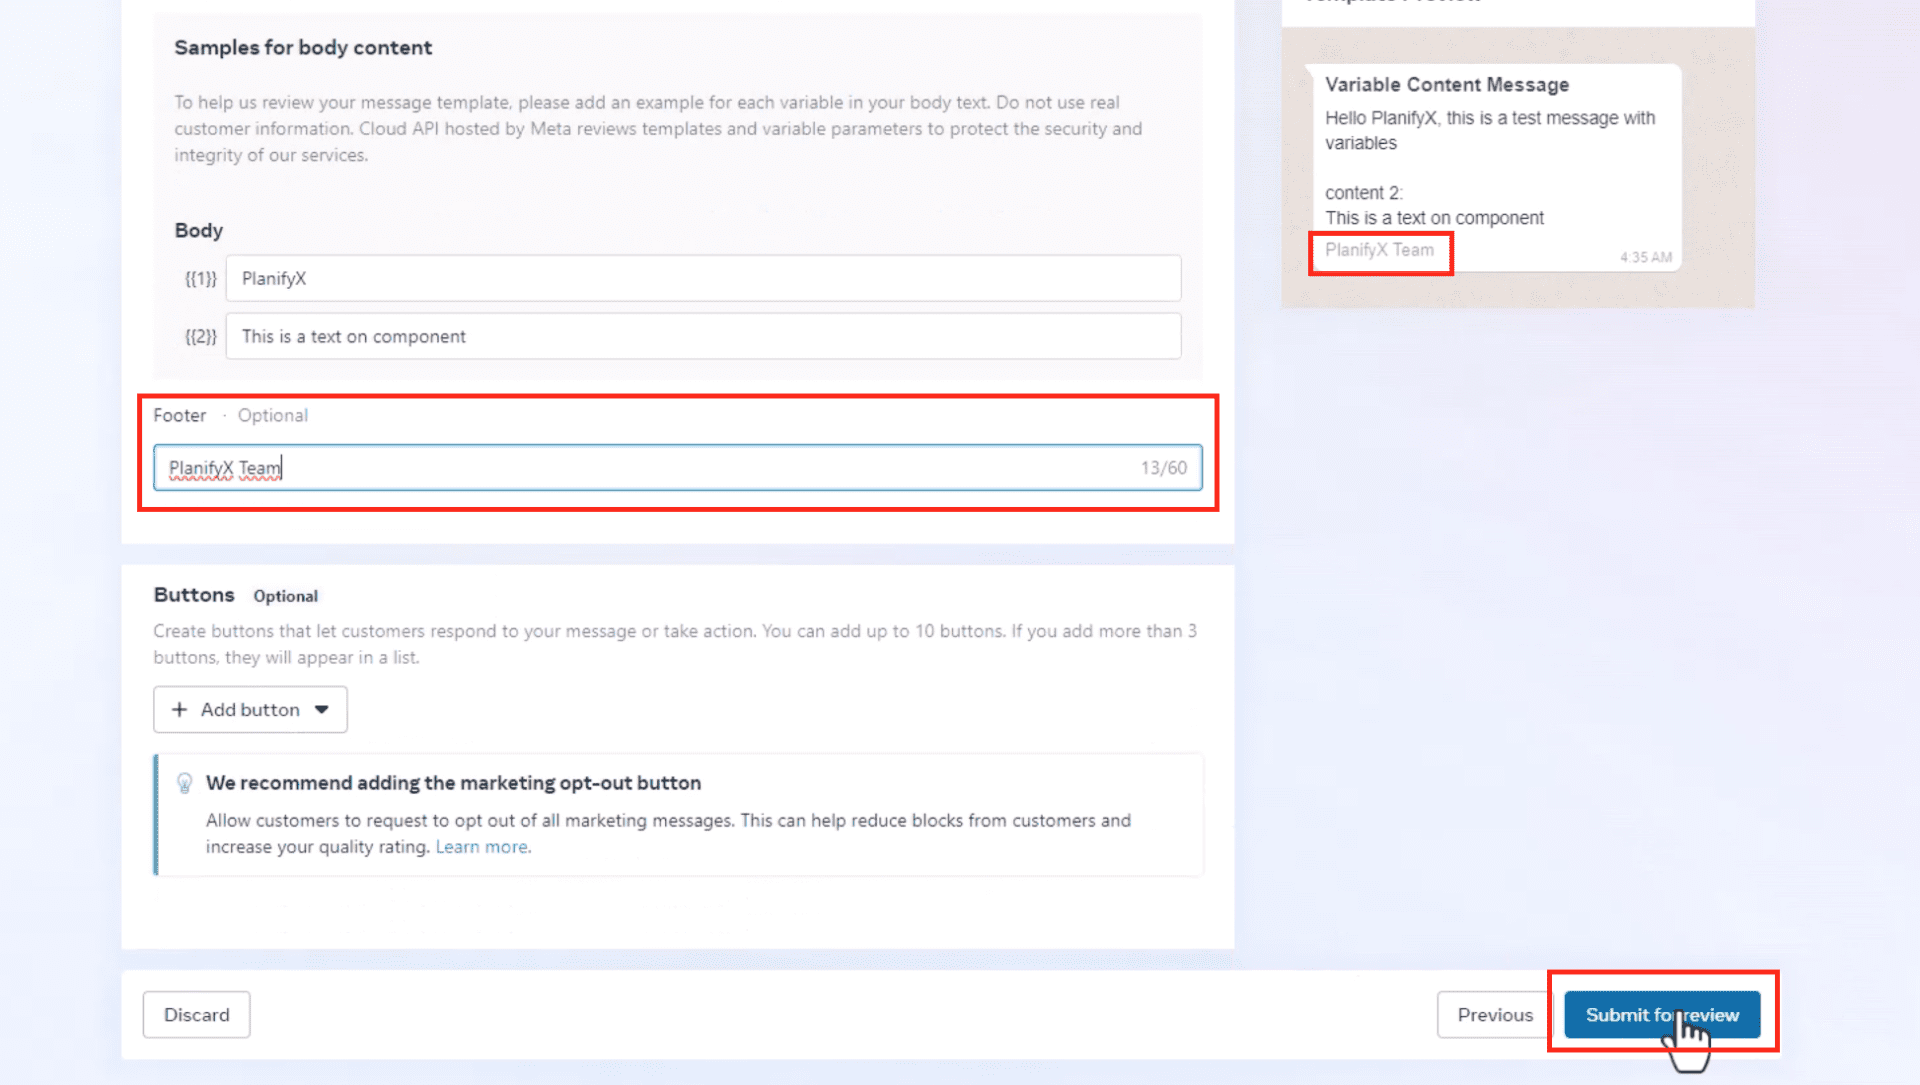
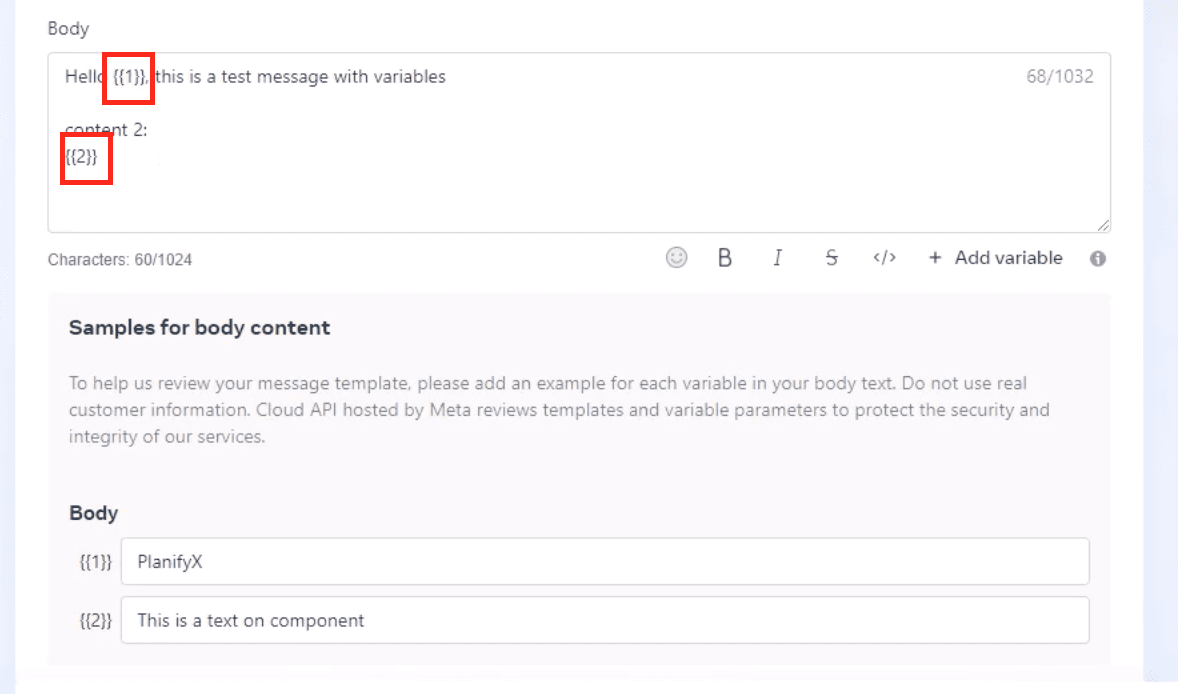
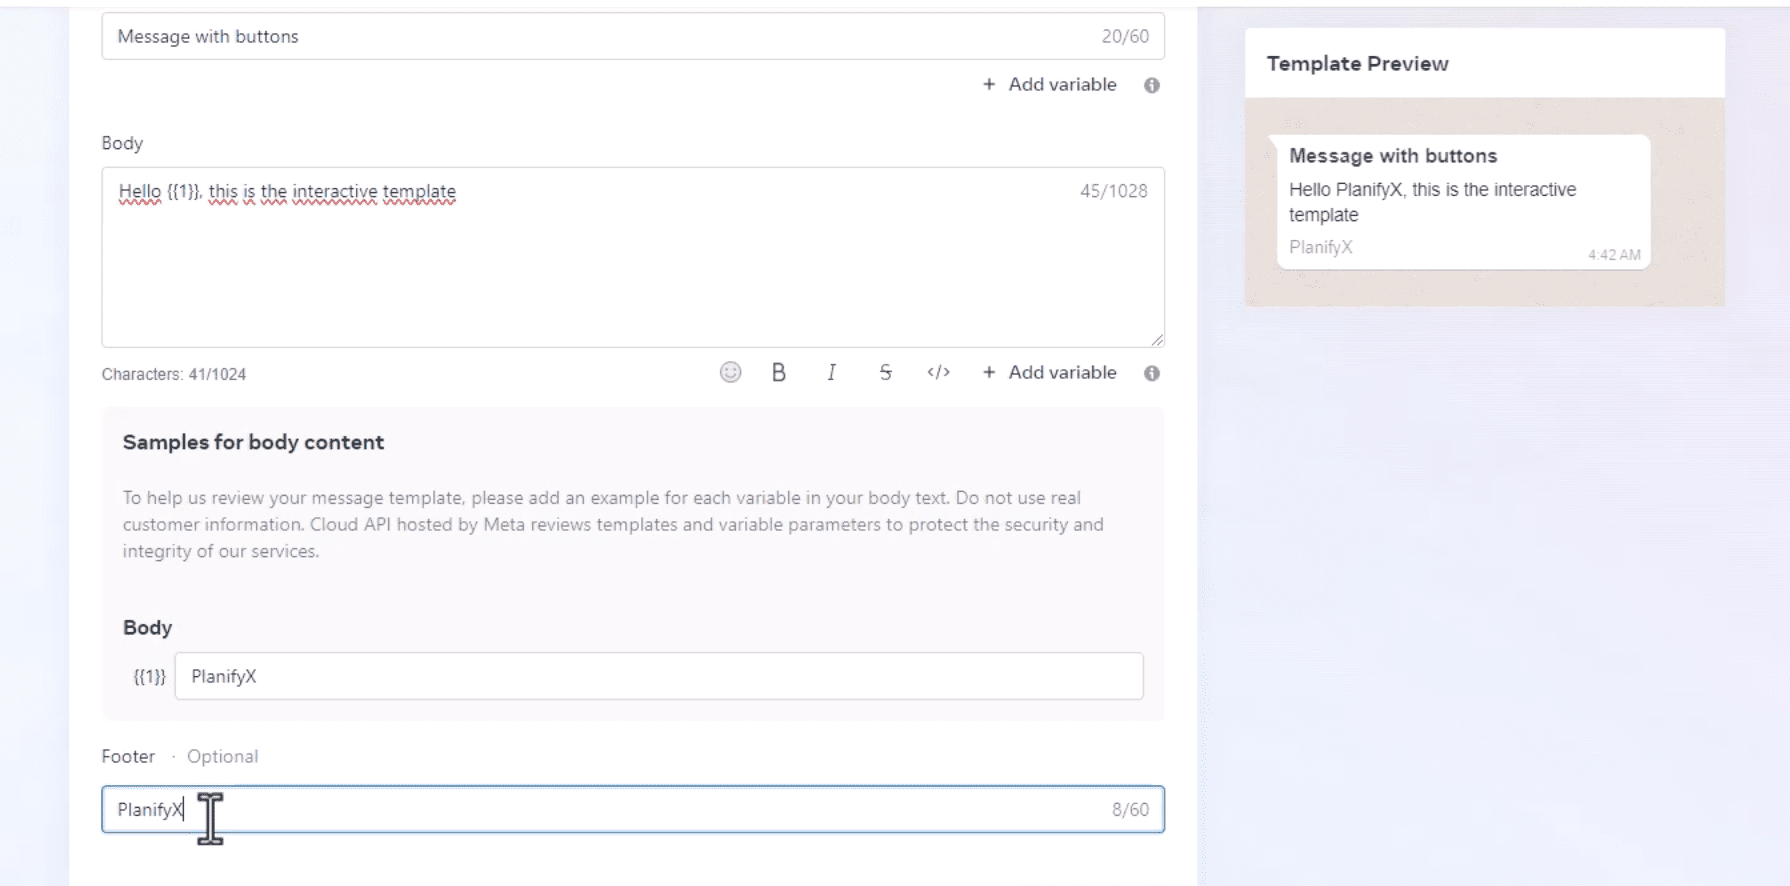
Add a header, and a body. Finally, include variables in the message body using double curly braces. For example, {{1}} and {{2}}.
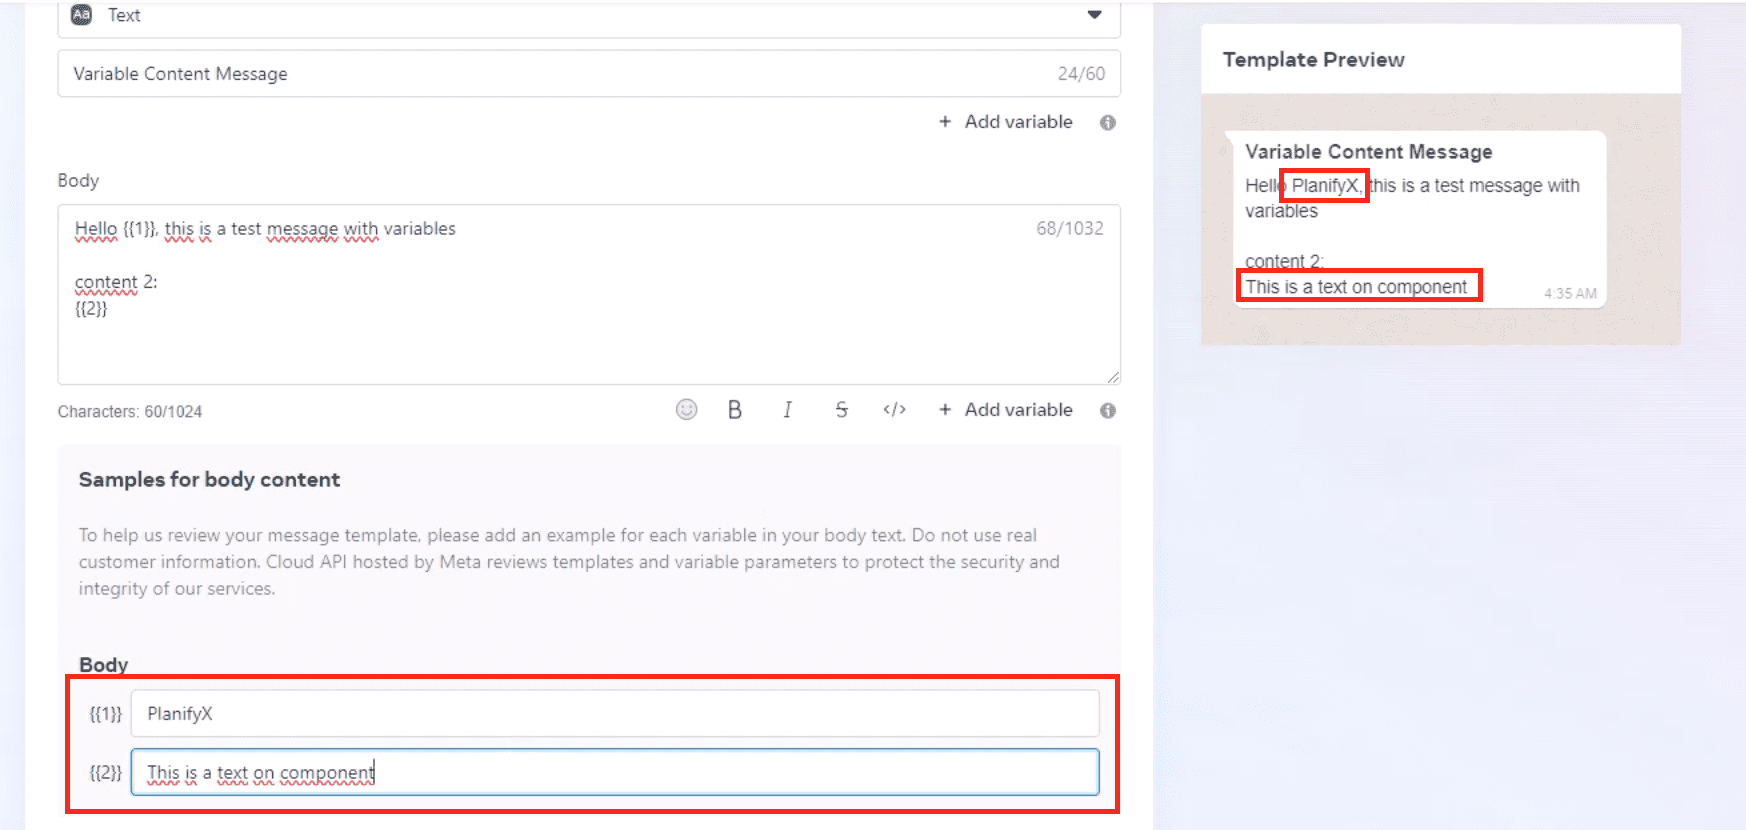
Provide sample text for these variables for Meta’s approval.
Optionally, add a footer. Submit the template and wait for approval.

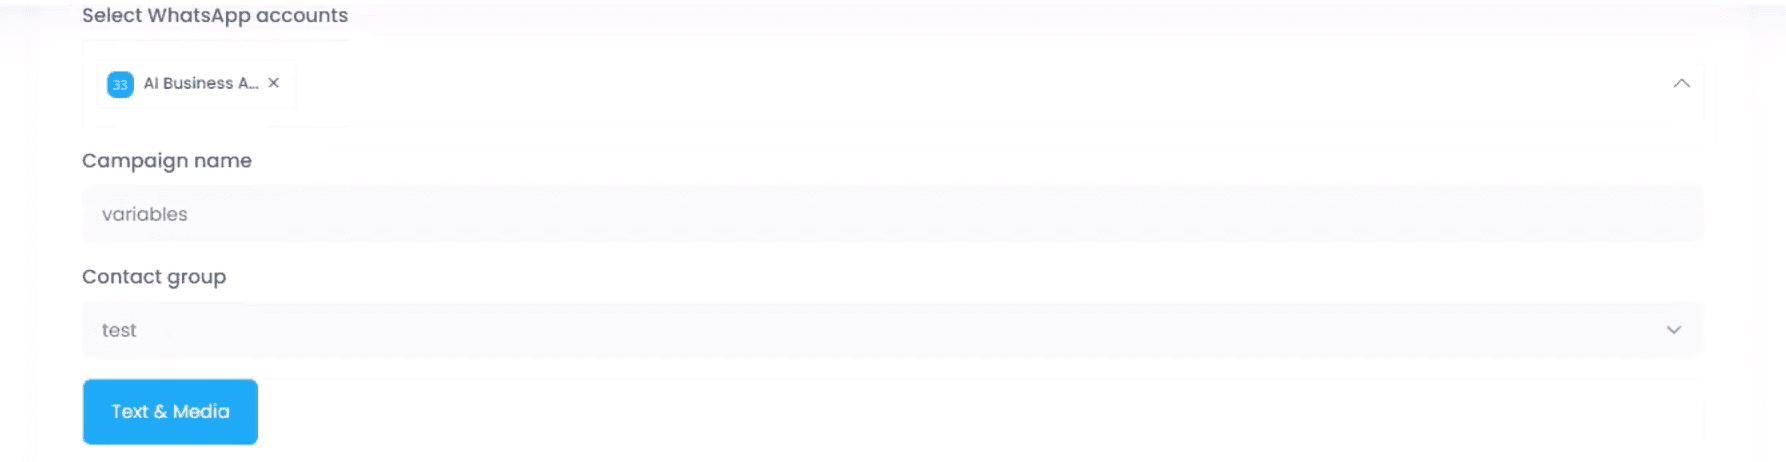
Set Up Variable Components. Back in our app, create a new campaign.
Select the official account, name the campaign, for example, “variables.” Choose a contact group and enter the template name and language.
Access the Templates Components Box. Scroll down to the Templates Components Box where you’ll define the components for the variables. Since we’re using variables, this step is crucial to ensure the template is correctly populated.
Refer to Cloud API Documentation. Go back to the Cloud API documentation to check the required format. According to the documentation, you need to use Body type components and parameters structured as shown in the image below. This image illustrates the correct structure for setting up these components.
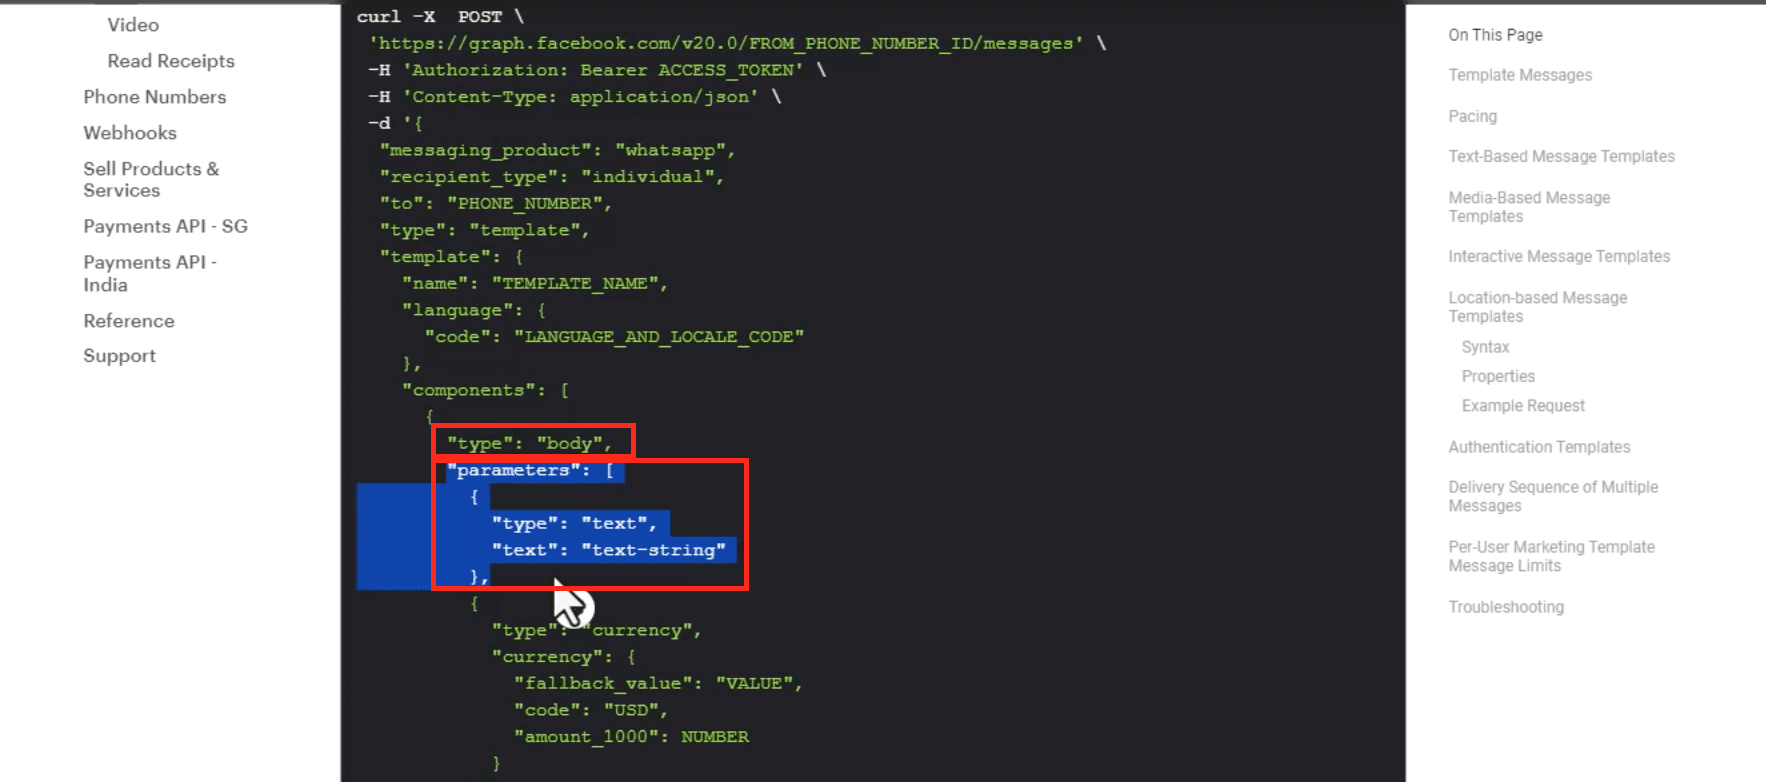
Input Parameters with JSON. Use JSON format to specify the parameters for the variables. This format is necessary to ensure that each variable is correctly replaced with the intended value in the message. The image below demonstrates how to structure the JSON data. Copy the selected code.
💡 PRO TIP: Remember that earlier in the document we provided you with the link to Meta’s documentation. From there, you can copy and paste the code to modify it.
💡 PRO TIP: You can ask ChatGPT to review your code. Just paste the code and ask it to check the JSON code you provided, and it will correct any errors with parentheses if there are any.
Enter Template Details. Paste the JSON code into the Templates Components Box inside the app and configure the brackets as indicated in Cloud API Documentation. This step is shown in the image, illustrating where to place the code.
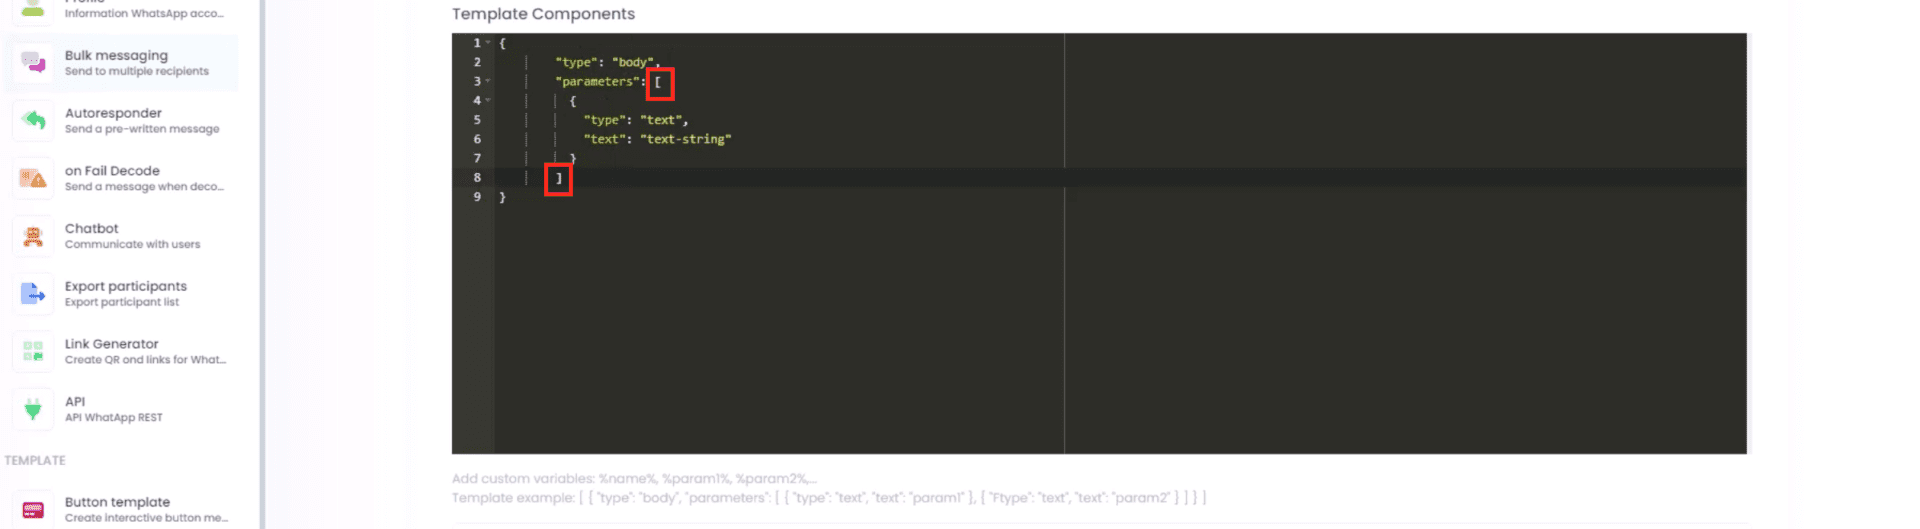
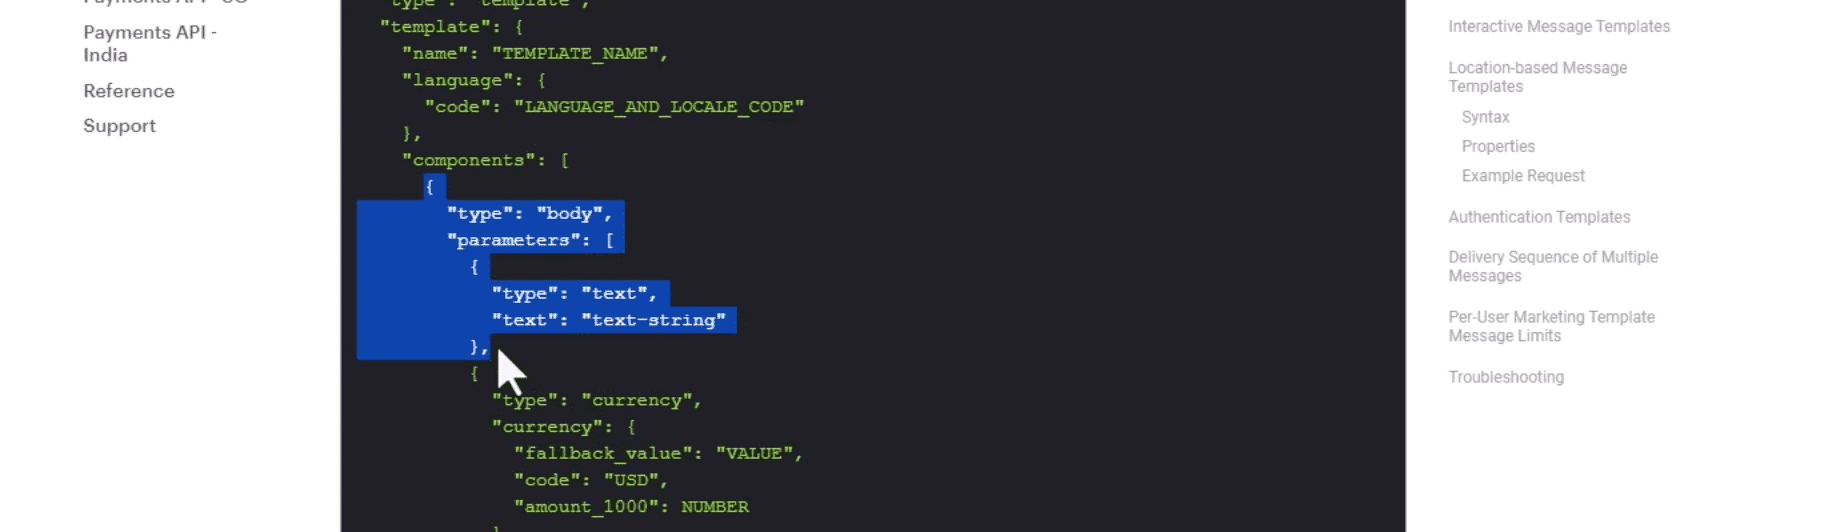
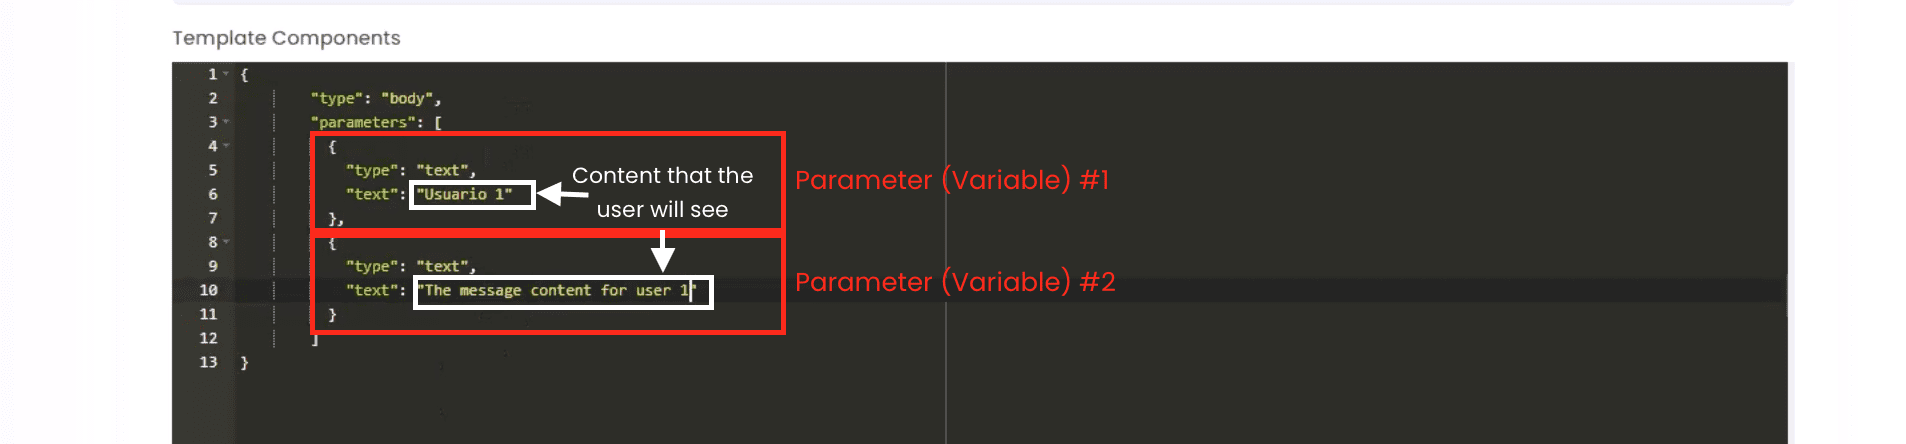
Verify Parameter Order. Double-check that the parameters are correctly ordered. In our template, we have two parameters: parameter 1 and parameter 2. These are indexed, meaning the first parameter in the Body parameters array will correspond to 1, and the second to 2.
Define Content for Parameters. Copy and paste the necessary content for each parameter. Adjust this for as many parameters as you need, as demonstrated in the image below.
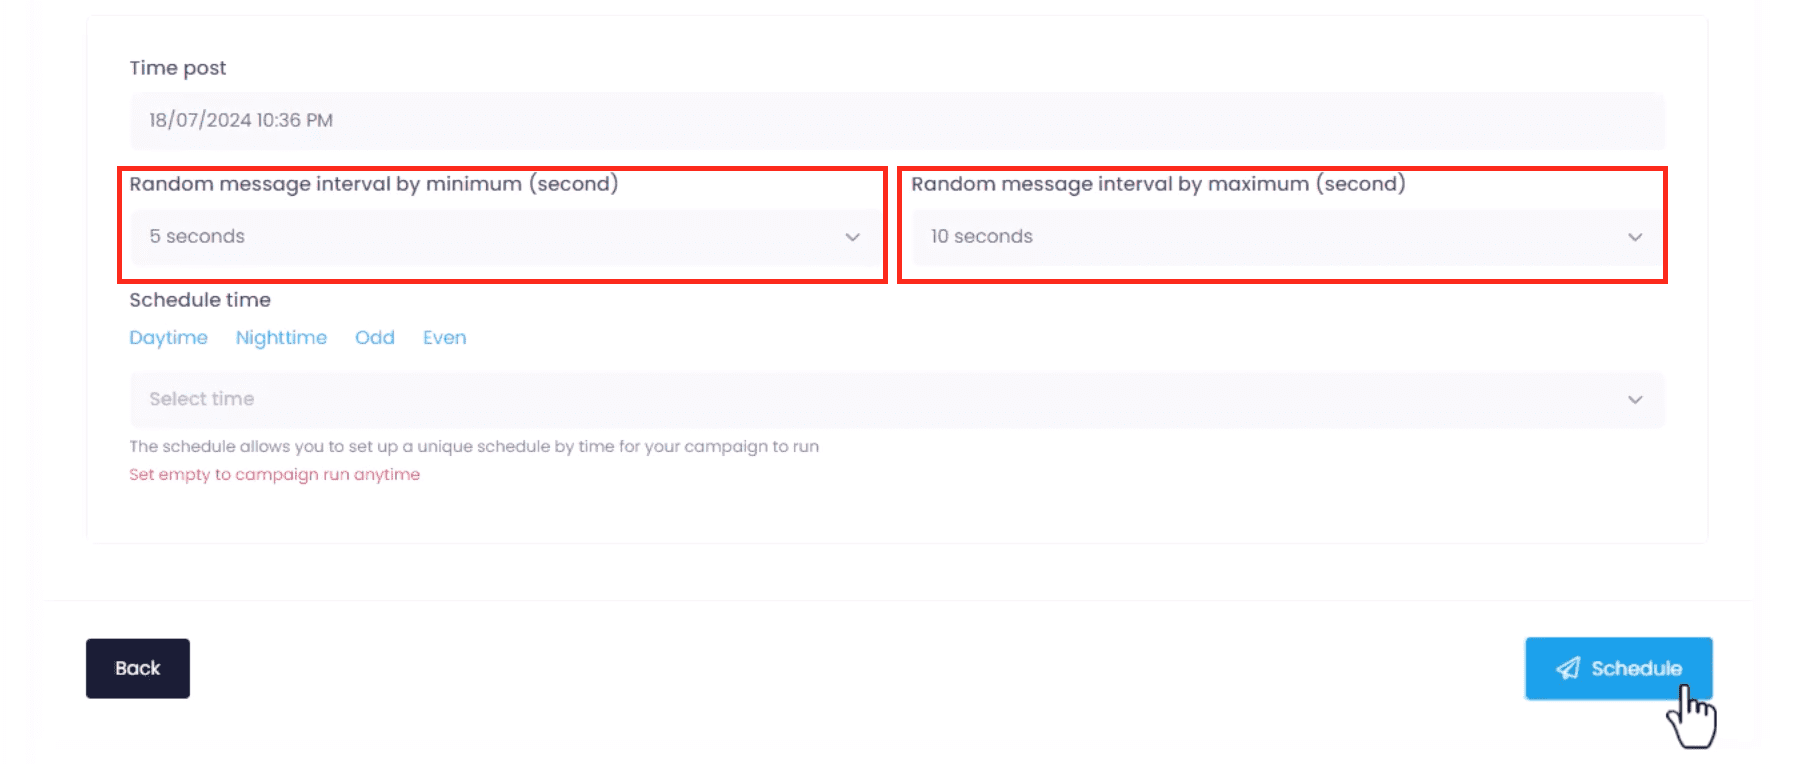
Set Timing and Schedule. Once the parameters are configured, set the timing for sending the messages, such as 5 or 10 seconds. Then, click the schedule button to proceed.
Handling Errors. If you receive a message indicating the JSON is incorrect, it means there’s an issue with the format. For instance, missing brackets are a common problem. The image below shows an example of such an error.

Correcting the JSON Format. Check Meta’s documentation to ensure all components are placed correctly. In the example, we missed that all components must start and end with square brackets. The image below shows a correct JSON format. Once corrected, reschedule the campaign.
💡 PRO TIP: You can ask ChatGPT to review your code. Just paste the code and ask it to check the JSON code you provided, and it will correct any errors with parentheses if there are any.

Click the restart button if necessary, accept the changes, and the status should update to pending.

Wait for Message Delivery. After scheduling, wait for the message to be delivered to the WhatsApp account. This step may take a few seconds.
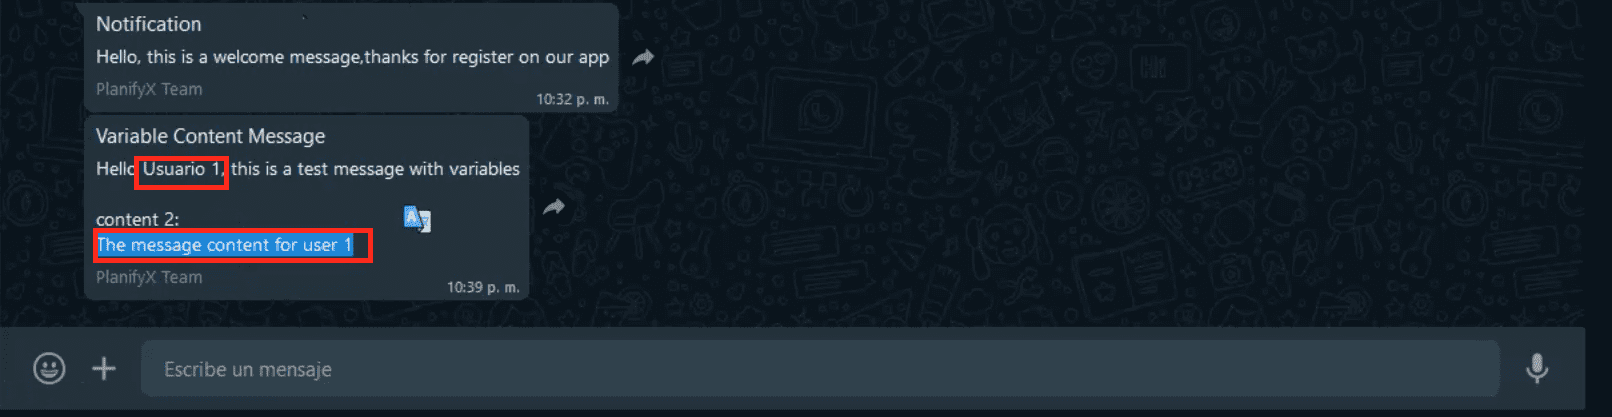
Confirming Receipt. Once the message is received, you’ll see the template with the variables filled in, as configured. The header “variable content message” and the specific variable text like “user 1” should appear correctly. This process confirms that the bulk send using variables and a template has been successfully executed.
You can further customize these bulk messages by using data from a CSV file containing user-specific information, allowing for personalized messaging. This flexibility is a key benefit of using variables in templates.
Sending templates with buttons
Adding interactive buttons to your WhatsApp templates enhances user engagement by providing clear and easy ways for recipients to interact with your messages. In this section, we’ll guide you through the process of creating templates with buttons, which can be used for quick replies that connect with your chatbots or to guide users to specific actions.
Create a Template with Buttons. Create a new template in the template manager.
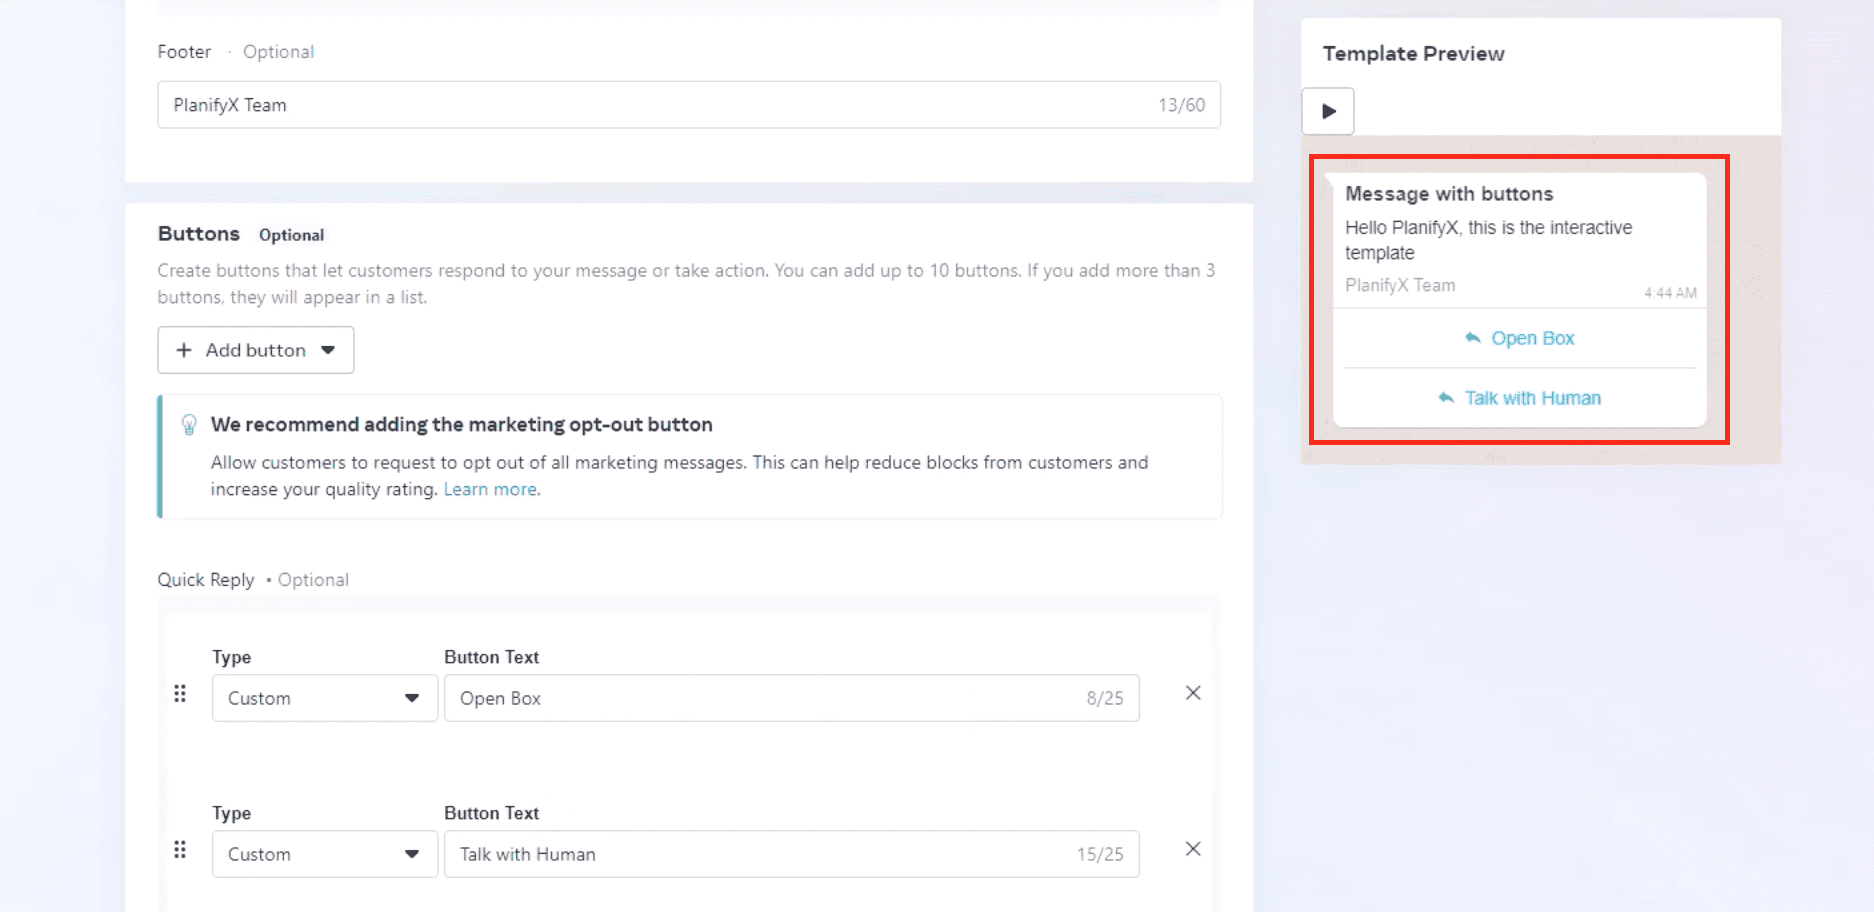
Enter Template Details. Add a header to your template. For this example, we’ll use plain text and include some text with variables in the header. In the body of the message, include sample text similar to what we’ve used in previous templates. Additionally, you can add a footer to the message for extra context or branding.
Add the buttons. For example, you can start by adding a button labeled “custom,” and set its button text to “quick reply.” This feature allows users to respond quickly to your message with the text contained on the button.
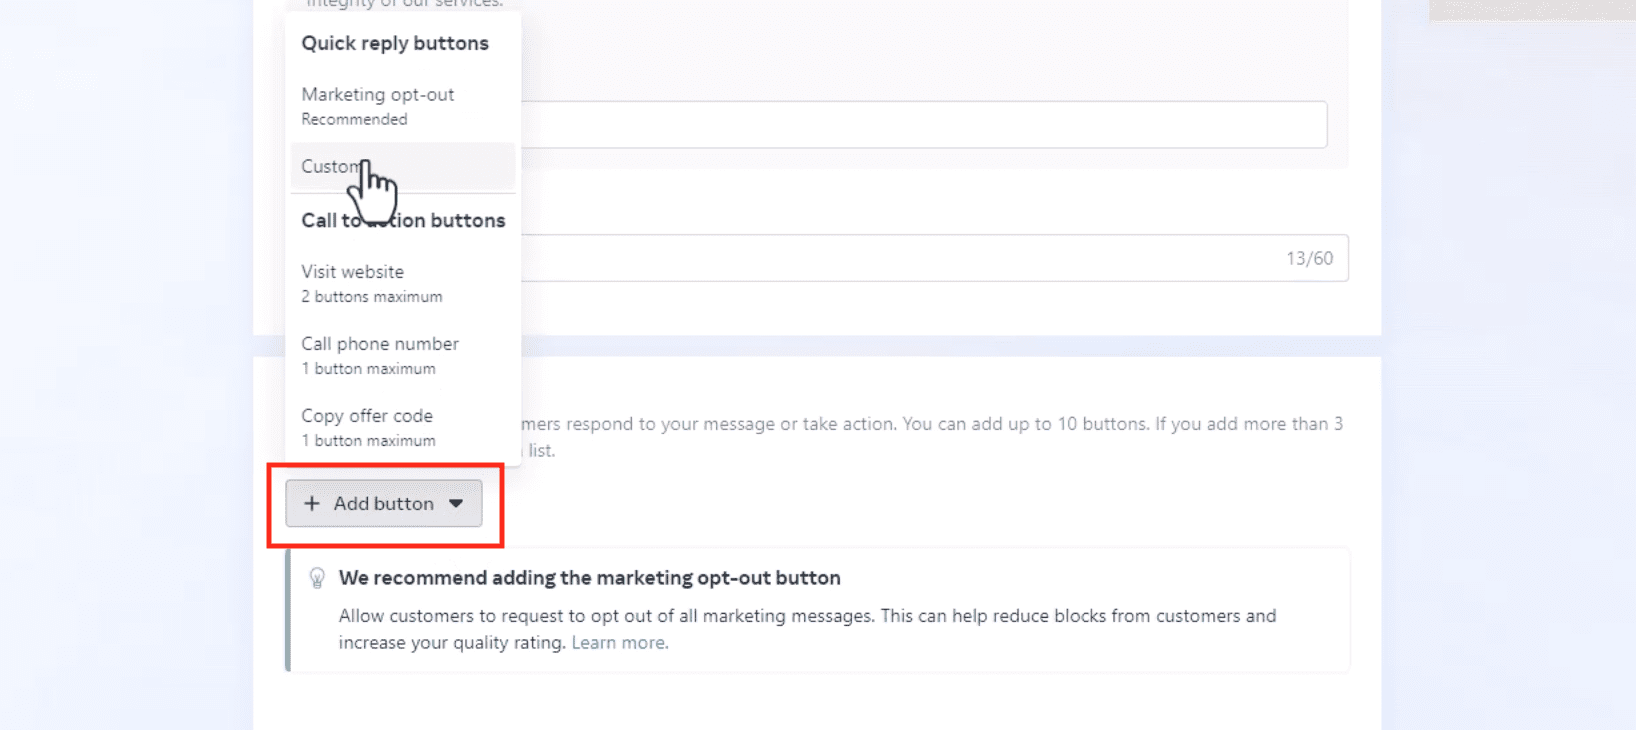
Customize the button text further if desired. For instance, you can change “quick reply” to something more specific like “open box,” depending on the action you want the user to take.

Add another button if needed, using the same process. Ensure that your button text is concise, as there is a 25-character limit for button labels. You can add up to three buttons per message.
Submit the template for review. After reviewing your setup, click “Submit for review,” confirm the details, and proceed. Wait for the approval from Meta. Once approved, the template will be ready for use. Once again, copy the template name.

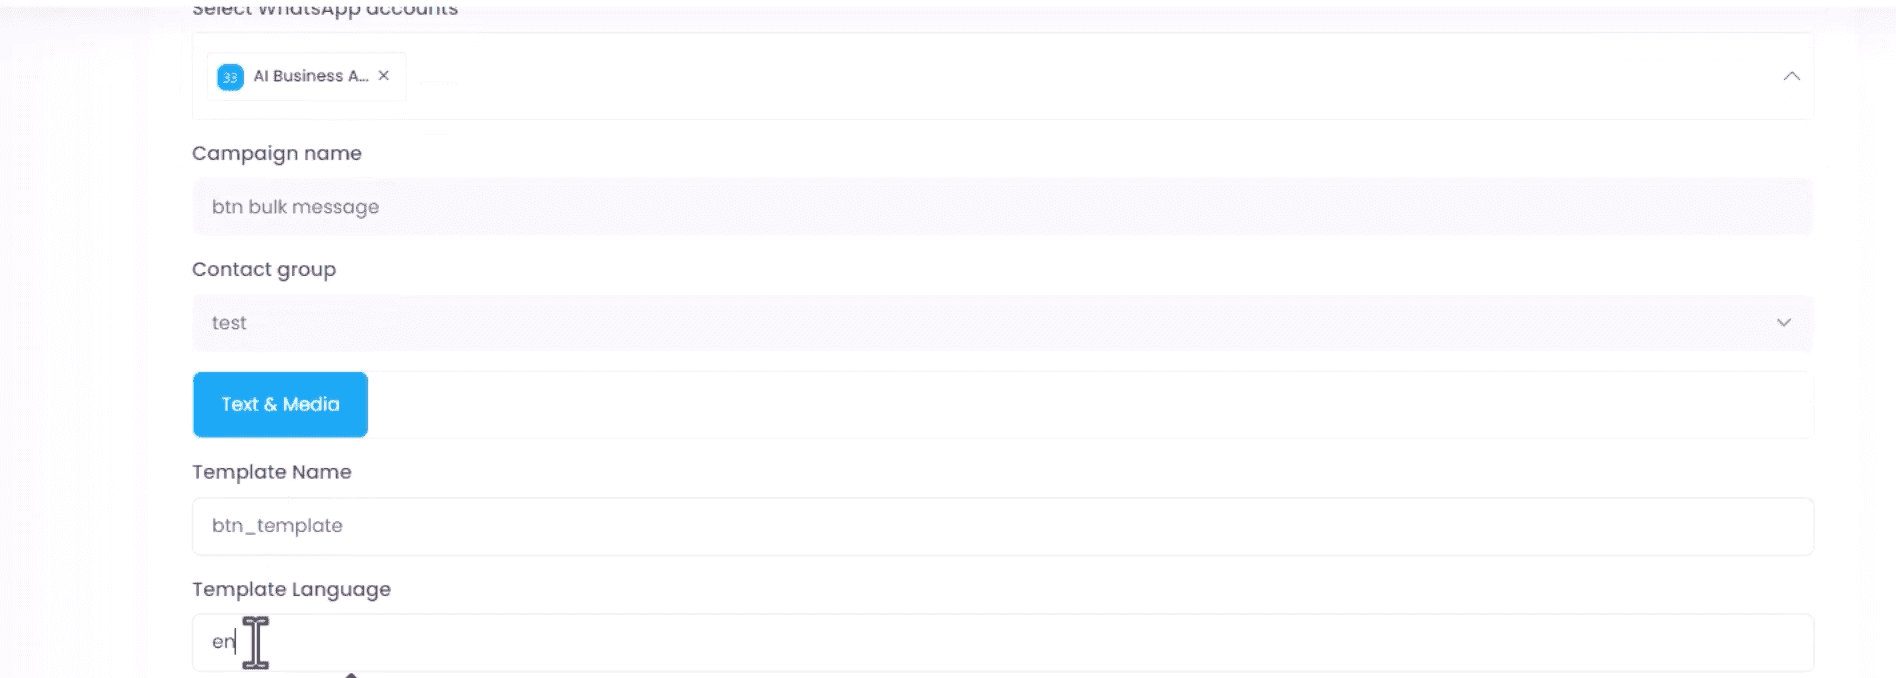
Set up a new bulk campaign. Back in our app, create a new bulk messaging campaign, select the account, choose a name for your campaign, and pick the contact list you want to use. Enter the template name, which in this case is btn_template, and set the language to English.
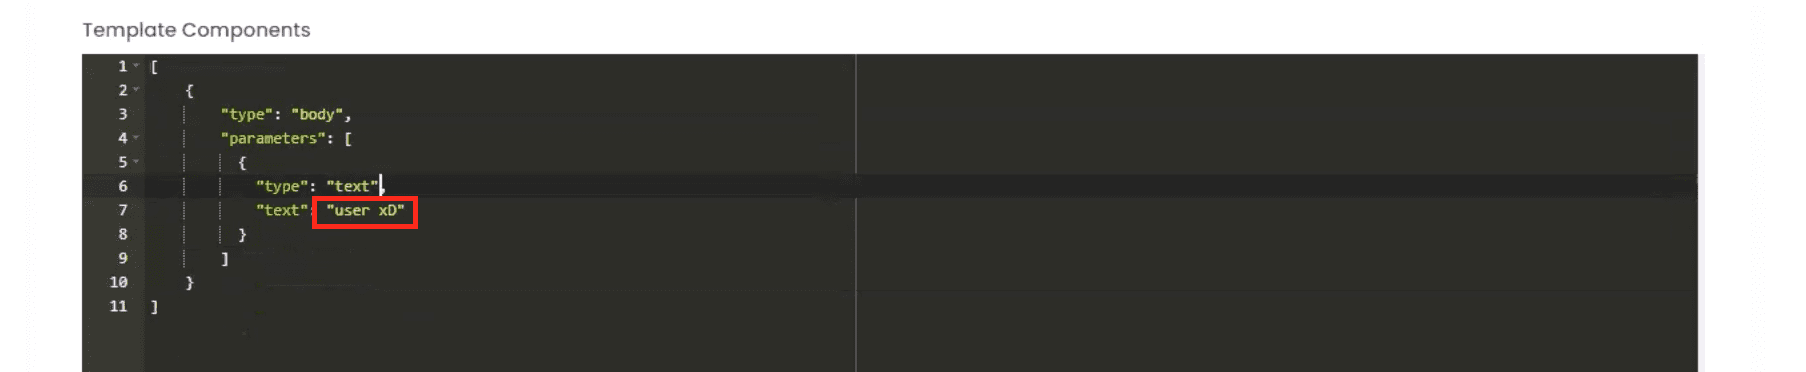
Configure the variables. Set any necessary parameters in the body of the template. For this template, the only parameter required is a placeholder for the user’s name. Ensure all JSON formatting is correct, and the parameters are properly configured.
💡 PRO TIP: Remember that earlier in the document we provided you with the link to Meta’s documentation. From there, you can copy and paste the code to modify it.
💡 PRO TIP: You can ask ChatGPT to review your code. Just paste the code and ask it to check the JSON code you provided, and it will correct any errors with parentheses if there are any.
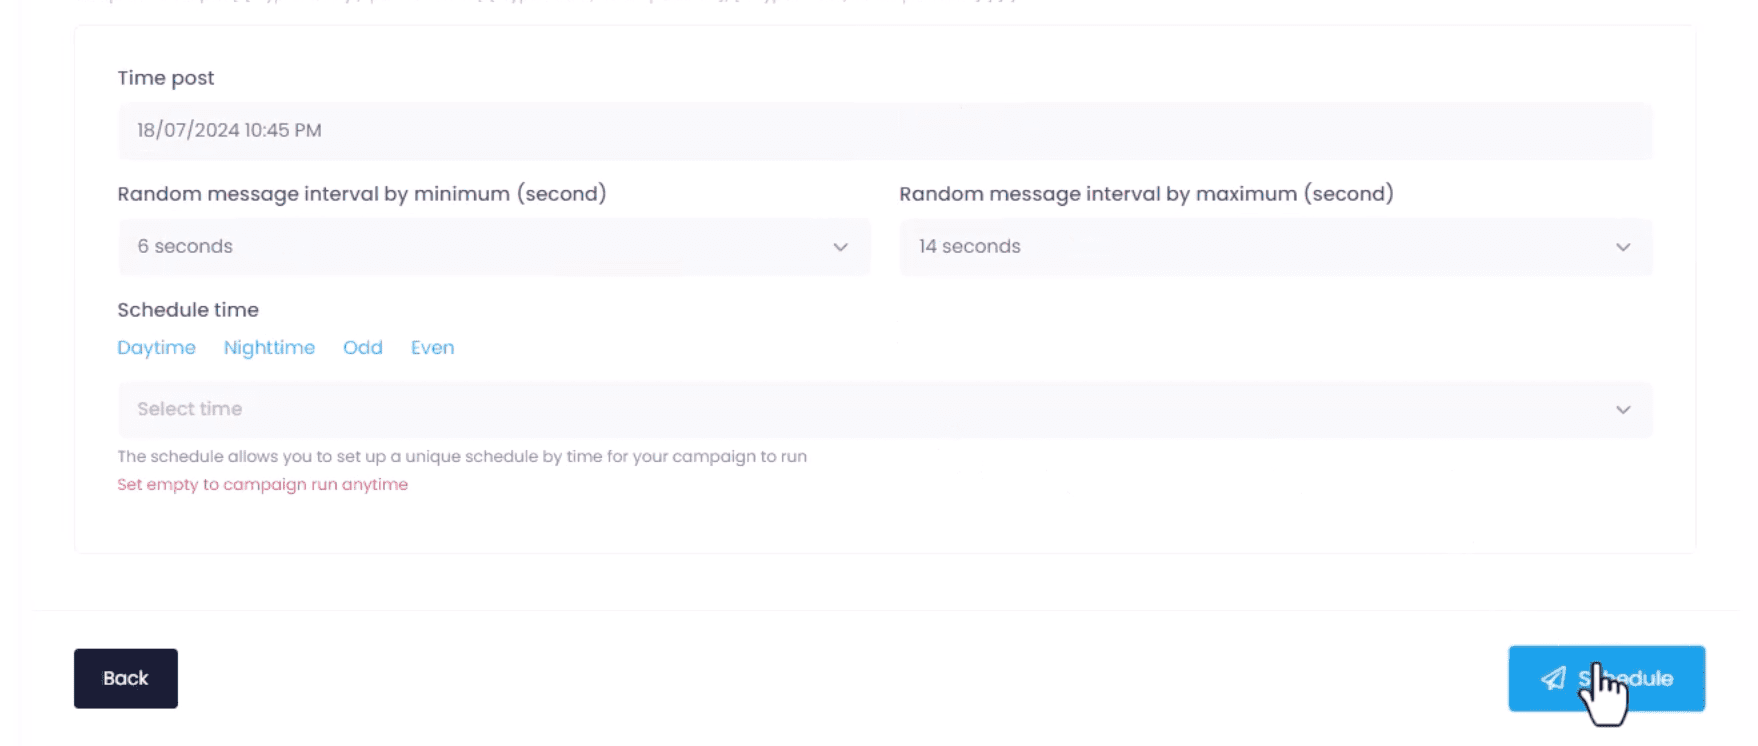
Schedule the message delivery. Set the timing parameters, such as the interval between sending messages, and then click “Schedule.”
Monitor the message status. After scheduling, refresh the page to check if the message has been sent. Typically, the message should be sent within a few seconds, including the interactive buttons you’ve set up.

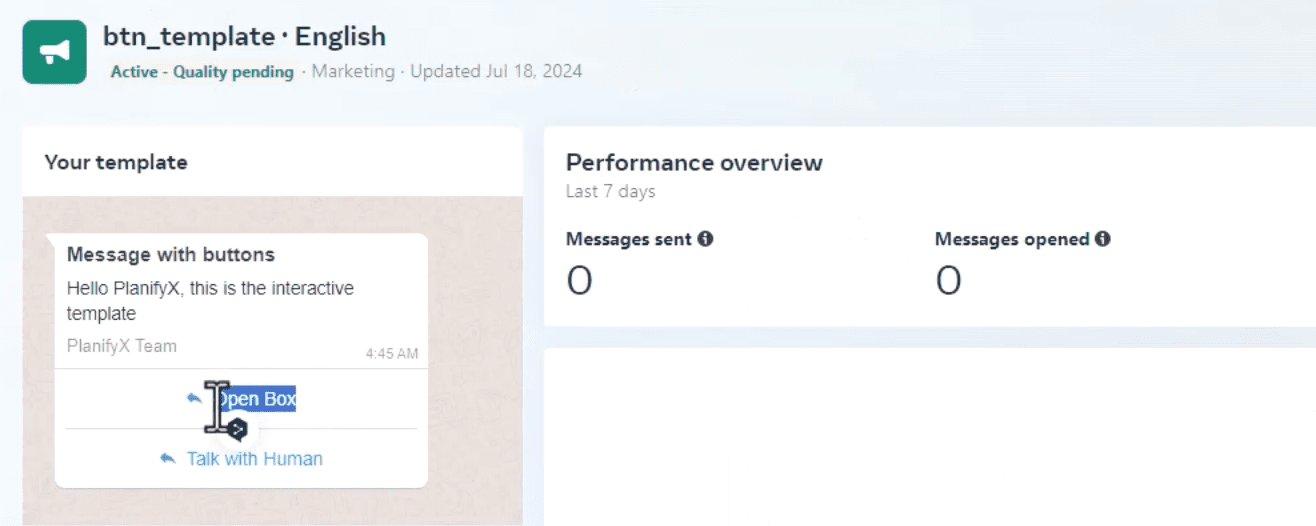
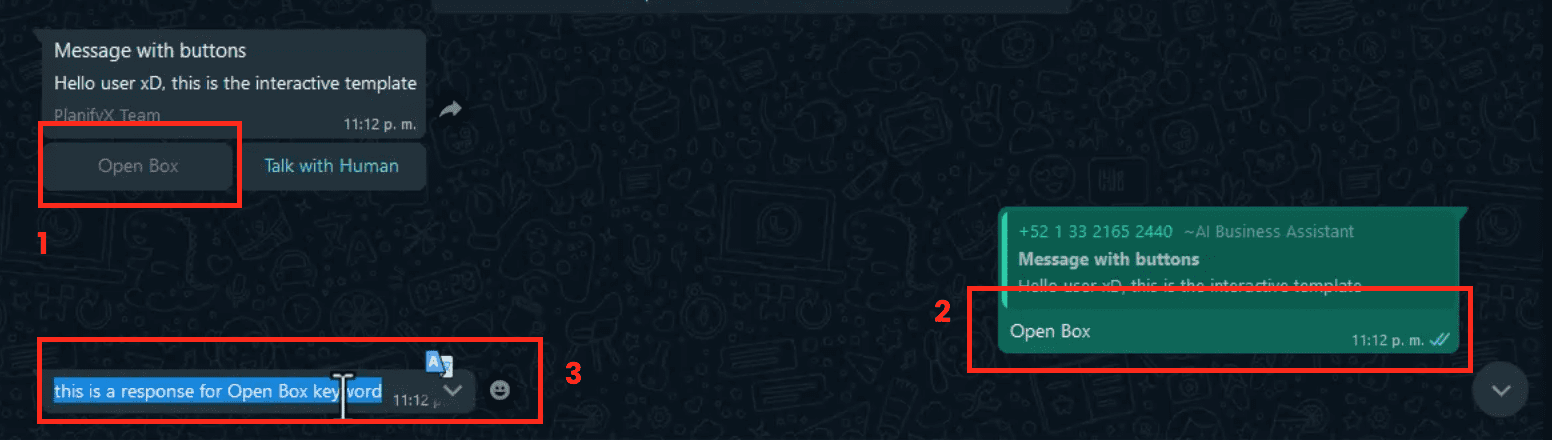
The template with interactive buttons should now appear as expected. This setup allows users to interact directly with the message through the provided buttons.

In this example, I won’t click any button to show you how we can integrate this a chatbot.
Connecting the template to the chatbot
Locate the Quick Reply Button Text. In our previous setup, we created a quick reply button labeled “Open Box” within the message. Copy this text as it will be used to set up the corresponding chatbot response.
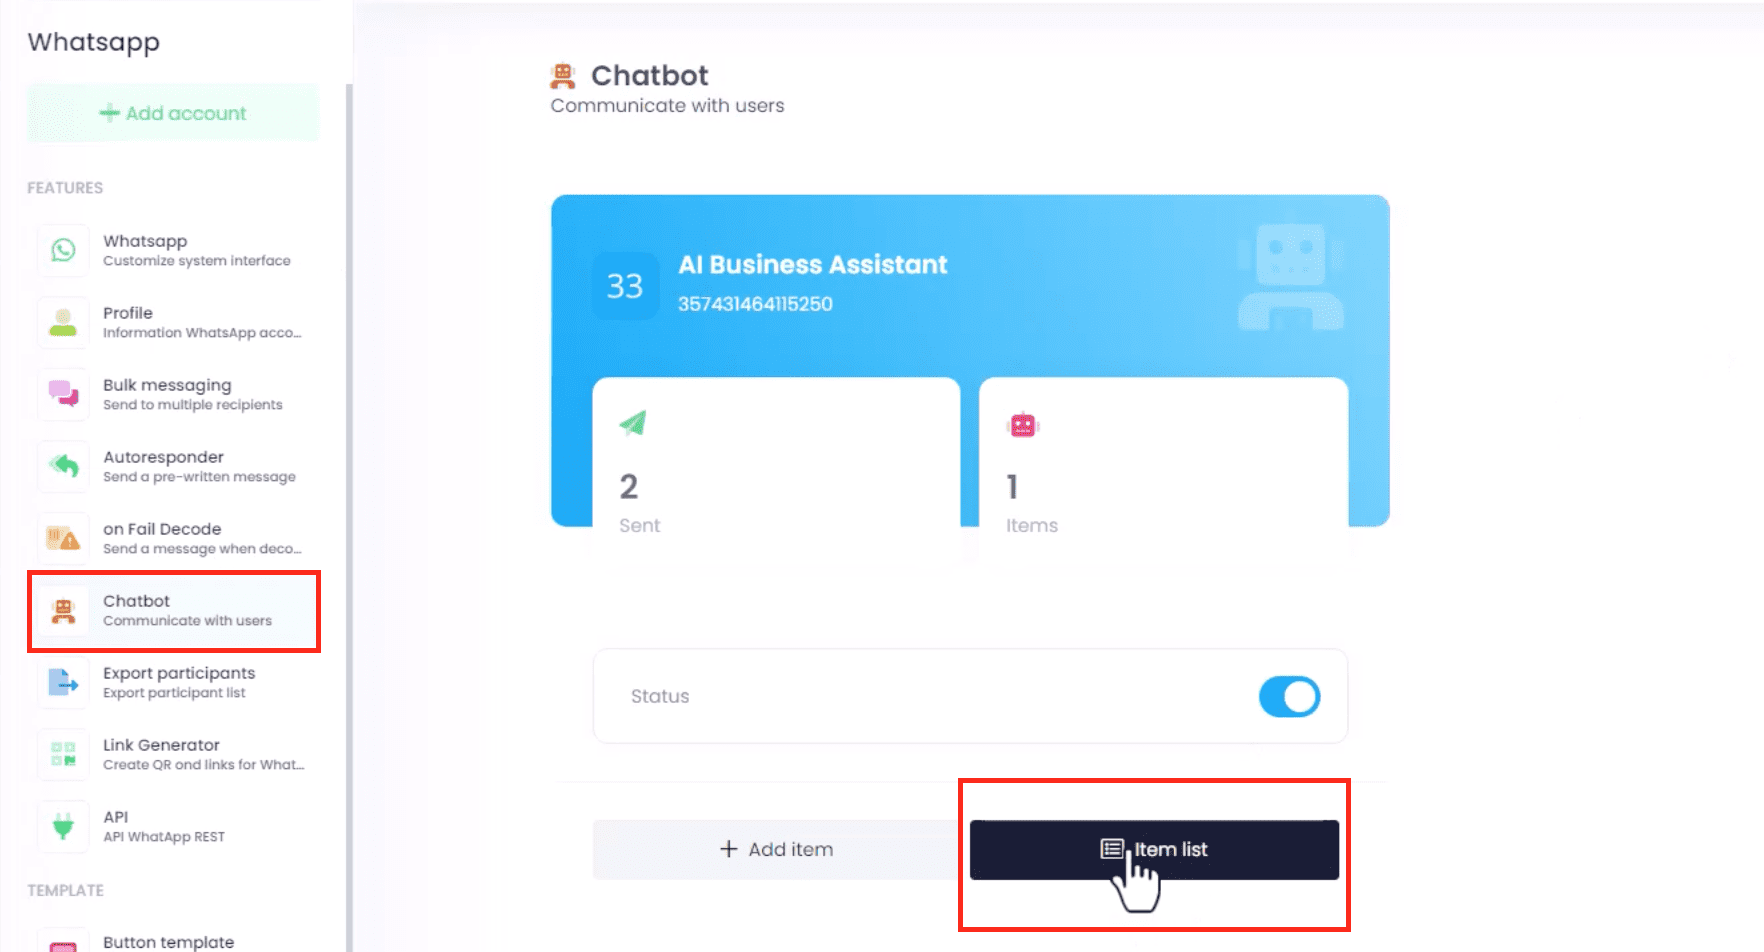
Navigate to the Chatbot Creator. In the app, go to the item list where you can manage chatbots. Create a new item that will respond to the quick reply button.
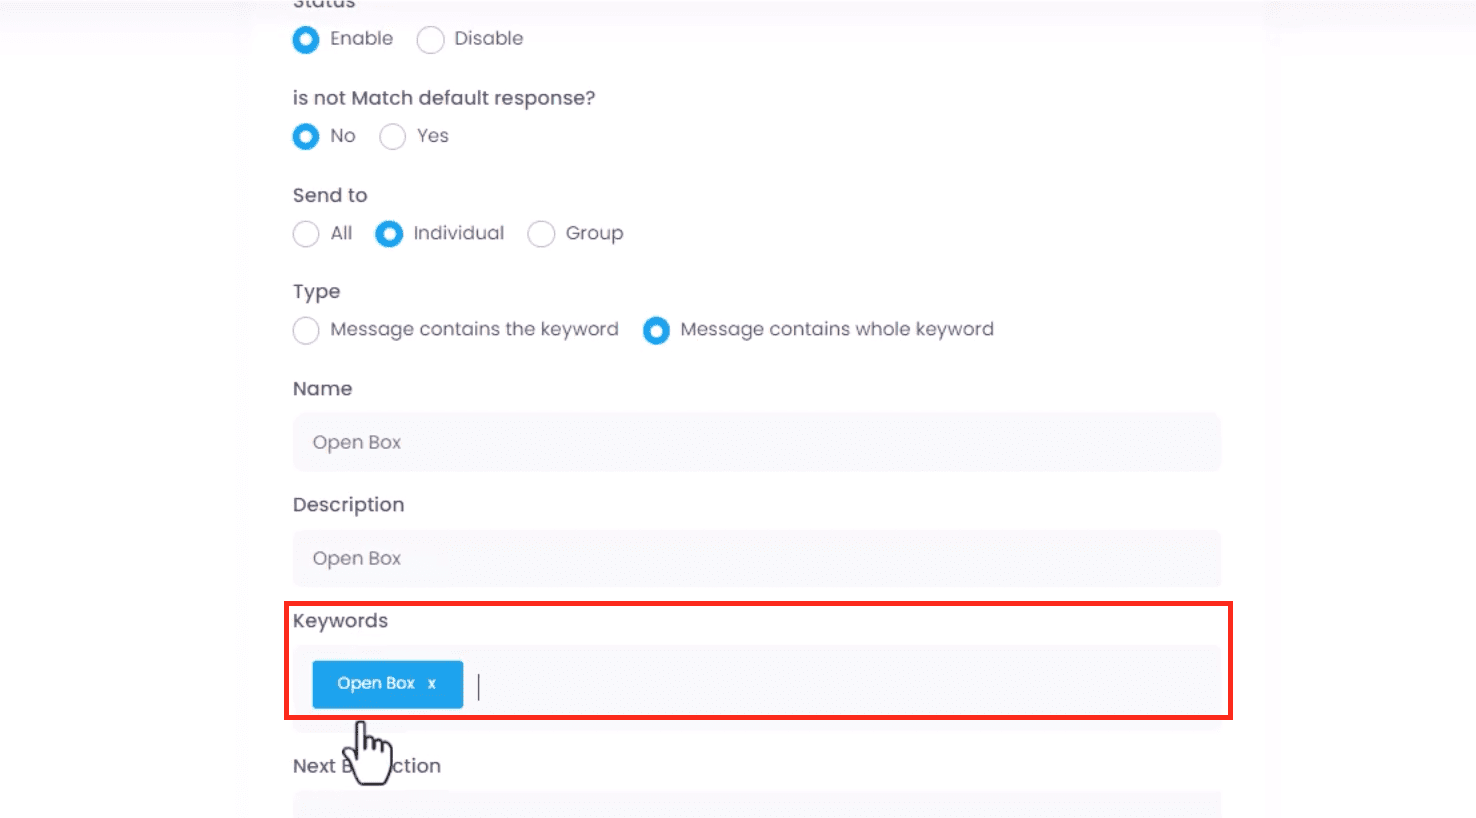
Enable the Chatbot and Set It Up. Configure the chatbot as an individual, meaning it will handle responses on a one-to-one basis. Set the rest of the settings as shown in the image. For the keyword match, paste the “Open Box” text, which corresponds exactly to the text used in the quick reply button. This keyword will trigger the chatbot’s response.
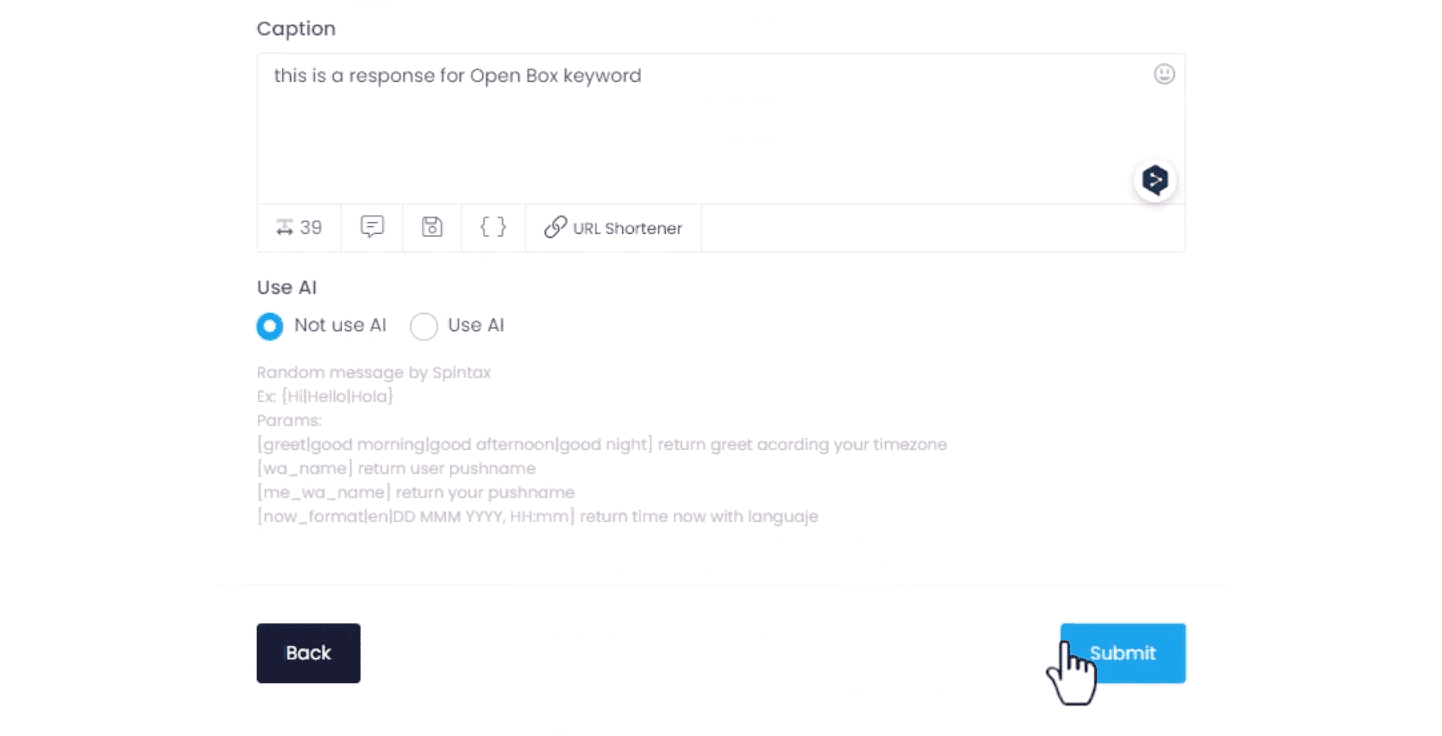
Define the Chatbot’s Response. Set a specific response message. For example, “this is a response for Open Box keyword.” Once the setup is complete, click submit to save the chatbot configuration.
Test the Chatbot’s Functionality. To ensure everything is working correctly, use the quick reply button “openbox” in a test message. The chatbot should respond with the predefined message, “this is a response for openbox keyword,” confirming the setup is successful.
This process demonstrates how to effectively integrate templates with buttons and interactive features like chatbots. If you encounter any issues during setup or functionality, please raise a support ticket for assistance.
Sending templates with images
Finally, we will explore how to incorporate media files into your templates. While media such as videos and images are added in Meta for visualization purposes, you need to link them inside our application as if they were additional variables. This ensures your templates display correctly when sent. Let’s get started!
Create a Template with an Image. To do it, create a new template in Meta’s Template Manager. Once again, select the Marketing and Custom options in the Set Up screen.

Once again, select a language. Then, name it and copy the name. In the header section, select Image.

Just as with the variables, Meta will ask you to provide a sample image. Upload it; make sure it is a PNG or JPG file and has a good quality.

Then, add the body of your message. You can include variables here, as seen in previously. Optionally, add a footer and buttons too.

Submit the template and wait some minutes for Meta’s approval.

Upload the image to our app. Go to our platform, log in, and click on the File Manager option at the left sidebar. Upload an image.
💡 PRO TIP: You can generate an image for your campaign using the AI Image or the Adobe Express Integration found on the Composer tool of this app. Your creations will automatically appear in the File Manager.

Once its up, click on the information icon at the left bottom corner of the image to open a preview.

Finally, right click on top of the image and select ‘Copy image address’ to copy its URL. Save it, you will need it.

Link the Template to the App. Go back to the WhatsApp section and create a new bulk campaign. Select an account, give it a name and select a contact group to receive it. As before, paste the template name exactly as you wrote in Meta, and enter the language code.

Access the Templates Components Box. Scroll down to the Templates Components Box where you’ll define the components for both the variables and the image. As before, this step is crucial to ensure the template is correctly populated.
Refer to Cloud API Documentation. Go back to to the Cloud API documentation to check the required format. According to it, Media-Based Message Templates need to use Header Type Components for the image as shown below. For text variables, the components are Body type, just as shown previously in this tutorial. Copy the code for both.

Enter your template details. Then, go back to your bulk campaign and paste the JSON code into the Templates Components Box. Follow the instructions in the Cloud API documentation for configuring the brackets (you can also review what we did earlier in this tutorial). Ensure that all brackets are correctly paired—every opening bracket must have a corresponding closing bracket.
💡 PRO TIP: Remember that earlier in the document we provided you with the link to Meta’s documentation. From there, you can copy and paste the code to modify it.
💡 PRO TIP: You can ask ChatGPT to review your code. Just paste the code and ask it to check the JSON code you provided, and it will correct any errors with parentheses if there are any.
By now, your code should look like exactly as the image below. The code inside the red box is for the image, and the code inside the blue box is for the text variable we added to our template. If you have additional text variables, add more components as demonstrated in the previous sections of this article.

Add your image. In your code, replace the images “link” with the actual URL of the image you wish to use in your campaign. If you followed the steps in this article, this would be the URL of the image you copied from the File Manager.

Define content for your parameters. Replace the “text-string” of your text components with the actual content you wish your users to see in the places where you placed a variable. For example, here we replaced it with ‘User 1’.

Schedule your campaign. Select a date and a time, as well as an interval for the messages to be sent, and Schedule. If the steps were performed correctly, the messages will be sent successfully.

Mix all the steps below to create interactive messages containing variables, media and buttons. If you have additional doubts, you can book a personalized training session with one of our experts to guide you.
