Building a WhatsApp chatbot with artificial intelligence is easier than it seems. Yes, in 2025 we have over 25 tutorials on our app, and we know that if you’re just getting started, it might feel overwhelming. You can read through them to dive deeper and become an expert, but if you’re looking to cut to the chase and learn how to set up a simple chatbot for your business, this ultimate guide has what you need.
In just a couple of hours, you’ll be able to download and install a demo of a simple chatbot. I’ll show you where and how to customize it for your business, and walk you through the basic functions you need to know to use it. I’ll also provide links to other articles where you can dive deeper into each step.
Ready? Let’s get started.
💡 PRO TIP: If you want a more personalized WhatsApp chatbot for your business, need advanced features, or simply want to skip the learning curve, hire an expert to design it for you. You can also schedule a personalized session to clear up any questions here.
What Do You Need?
- A subscription to our app (If you’re a reseller, you can use the platform we provided, either on the admin account or an additional user account).
- A WhatsApp account connected to the app. Remember, there are two ways to link your account: via QR API or via Official Meta API. Either option works for this tutorial.
- The chatbot demo. This is a JSON file you can download here. Make sure to download the Media Files folder as well.
- A free OpenAI account and a card to add credit. If you don’t have an account, don’t worry—we’ll guide you on where and how to create one later.
- A secondary WhatsApp number to test the chatbot as an end user.
Understanding Chatbot Types
First things first. What is a WhatsApp chatbot, and what’s the difference between an AI chatbot and a conventional chatbot?
Basically, a WhatsApp chatbot consists of a series of automated responses triggered by specific user messages. In a conventional chatbot, the trigger for these responses is a specific keyword (or a series of keywords). When the user sends a message containing that keyword, the chatbot sends the response you specified.
This response could be anything: a text message, a voice note, a PDF, or an image. A keyword can also trigger an action in a third-party application (like a CRM) when connected via Rest API. This is more advanced knowledge, which we’ll cover in a different tutorial, but it’s important to know it’s possible.
In our app, each response and keyword pair is called an item. You can add as many items as you need to your WhatsApp account to personalize your chatbot as much as you like. You can also link several items together to create sequences, as we’ll see later. These chatbots don’t use AI to respond. Chatbots trained this way are called multi-step chatbots.
Now, what happens if a user sends a message that doesn’t contain any of the keywords you’ve trained your chatbot with? In that case, the chatbot won’t be able to respond, unless you have something called a no-match template enabled. The no-match template is a response that is triggered when the chatbot doesn’t recognize any of the keywords in the user’s message.
This no-match template can be a standard text, but you can also replace it with an AI that can respond to any question, just like ChatGPT. By putting AI in the no-match template, it will be able to respond to any question, whether it contains a keyword or not. In a chatbot with this type of training, which we call an AI chatbot, you might not have any other items, and the AI would still respond perfectly. Note that AI can only respond with text messages—it can’t generate images or voice notes, and, so far, it can’t recognize these types of files either.
We recommend combining both types of training, the keyword-based multi-step method and AI training, to create an interactive chatbot that covers all your customers’ needs. With AI, you can answer 80% of questions, and with other items, you can add dynamic elements like images, voice notes, and files, create menus, and add buttons.
The chatbot we’ll build in this tutorial combines both training types. Now that you understand the difference, let’s begin.
Importing the Demo
Get the demo training. As mentioned, to follow this tutorial, you’ll need to download our chatbot demo here. It will be saved on your computer as a JSON file. Also, download the folder with the Media Files. We’ll use these later to enable your chatbot to send them.
Open the item list. Go to our app. On the right sidebar, click on WhatsApp, then go to the Chatbot section. There, you’ll see all the WhatsApp accounts you’ve connected.
Click on the Item List button for the account where you want to create the chatbot.

Import the demo training. Once inside the item list, click on the three-dot icon at the top right corner to open the More Options menu, and select Import Chatbots.

Upload the JSON file you downloaded earlier and save it. The demo training will load into your account, as shown in the image below. These sections represent the items, each with its own set of keywords that trigger them. You have different types of items, which we’ll explore later.

Turn the chatbot on. Click the Start Chatbot button and make sure it turns green. This means the chatbot is active.

Test it. Using a different WhatsApp account, send the message “hi” to the number where you installed the chatbot. If everything is working correctly, the chatbot will respond like this.

If the chatbot doesn’t respond, something might be wrong with your account’s connection. Check this guide for troubleshooting common issues, or hire an expert to help you here.
If the chatbot responded correctly, keep reading to learn how to personalize it.
Configuring the AI
The first thing we’ll do is set up the AI so it can respond to all your messages. Although the demo already includes an example training that you can customize, you’ll need to add an OpenAI API key and add credit for it to work. Let’s see how.
Adding the OpenAI API key
Obtaining your Key
Go to the OpenAI website. Scroll down to the footer and click on API login. Create an account or sign up to an existing one. If you have a ChatGPT account, you can use the same credentials.

Open the API area. After you enter your personal information, the following screen will appear asking where do you wish to go. Select API.
Open your dashboard. Click on the Dashboard button at the top right corner of the screen.

Generate an API Key. Click on the API Keys option at the left sidebar. Then, click on the Create New Secret Key button.

Configure your API Key. Give it a name to identify it. In permissions, select All. Optionally, link it to a project and click on Create secret key. Copy the code that will appear and save it somewhere safe. After you close this window, you will not be able to see it again.

Adding credit to your OpenAI account
All OpenAI models work with tokens, and these tokens have a cost. Therefore, you need to add credit to your OpenAI account for your OpenAI keys to work. We recommend adding at least $10.00 USD to get started. Here are the steps to do it.
Navigate to the Billing Section. Click on the Settings icon in the top-right corner of the OpenAI dashboard, right before your profile picture. You will be directed to the Settings page. From the left sidebar, select Billing.

Add a Payment Method. In the Billing section, click Add a payment method. Enter your credit card or payment details and save them. You can add several payment methods and set one of them as default.

Add Credit. Go back to the Billing Overview page. Click on the Add to credit balance button.

Indicate the amount you wish to add in dollars. Options usually range from USD $10 to $500, depending on your requirements. Then, confirm your payment. Once processed, the credit will be available in your account.
We recommend going back to the Overview section to confirm that the credit has been added. When your credit balance reaches $0.00 USD, your API requests, and therefore your chatbots, will stop working, so you must repeat this step frequently to ensure you always have enough credit.
Optionally, enable automatic recharge. You can enable automatic recharge to automatically keep your credit balance topped up. To do this, go back to the Billing Overview page and click on the Enable auto recharge button.

Indicate when should the credit be recharged, and to which amount, and save. Now that your account has sufficient credit, your OpenAI-powered tools and chatbots will continue to work smoothly without interruptions!

Inputting your API key into the WhatsApp Chatbot
Go back to the item list of your WhatsApp account. Open the three-dot menu, and click on Chatbot Settings.

Paste your OpenAI API Key. The Chatbot Settings page will load. Paste the OpenAI API key you generated on the AI API Key box.
Select a model. You need to choose the GPT model you wish to use in your chatbot. Different models have different input limits (affecting the maximum length allowed for the AI training text), as well as different language comprehension abilities and costs. You can check the OpenAI documentation to learn more about this; meanwhile, we recommend selecting the gpt-4o mini, as this model works fine with most training needs. As for the AI Temperature, leave it as it is.
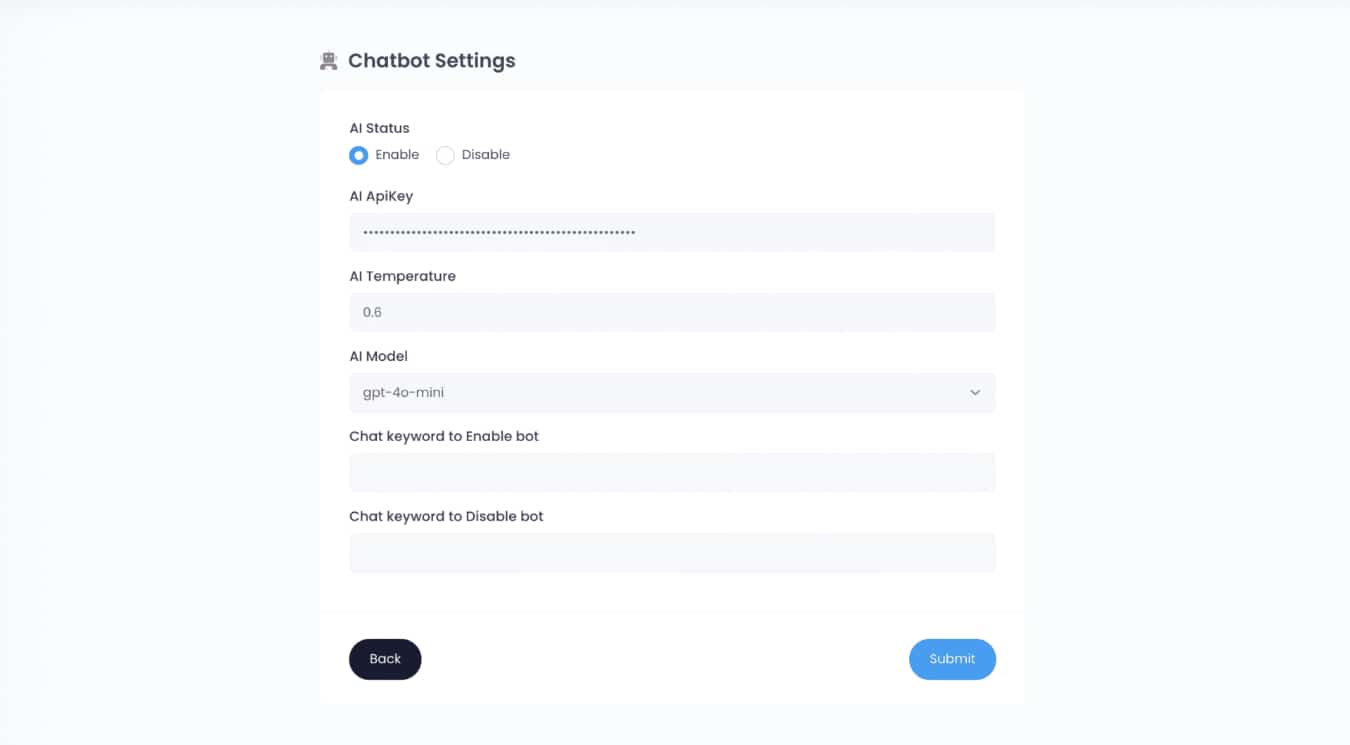
Save your settings. Make sure the AI Status at the top of the page is set as Enabled and click Submit to apply your changes.
Testing the AI
Send a question to the AI from a different number. We recommend asking “Who are you?” to make sure you are not triggering any other keyword. The AI must respond something similar to this.

If the AI does not respond anything, your OpenAI API key might not have enough credit. Make sure to add at least USD $10 as we explained before, and to paste the key correctly.
Personalizing the training
Congratulations! If you’ve reached this section, it means you’ve successfully set up a functioning WhatsApp chatbot with AI. However, we still have more steps ahead. Now, you need to personalize it for your business! Additionally, you’ll need to set up a way to stop the AI if you, as a human agent, want to intervene in a conversation with a specific customer. Keep reading as we’ll walk through both steps in detail.
Find the AI Training item. You’ll locate it in your imported item list as “No-Match template“. It’s also easily identifiable by a small brain icon under the Type section. Click on its name to open its settings.

Identify the Status. You’ll notice that at the top of the page you have a section called Status. As long as it is set as Enabled, this particular item will be active. You’ll also notice that under Is this No-Match?, the option Yes is selected. This means that this particular item is the No-Match template that we talked about before. And as so, this is where we placed the AI training. On the rest of the items we will work with, this setting will be set to No.
Configure the scope of the AI. Under the Send to section, indicate if you want the AI to answer individual chats, group chats, or both.

Optionally, add a delay. Scroll down to the Presence Delay section. There you can optionally add a small delay in which your customers will see that someone is “typing” a message. Indicate how many seconds this delay must last. If you want to turn it off, simply select the Disable option and set the seconds to 1.

Finally, edit the training. Under the Caption box, you will find the actual training that is guiding the AI’s answers. This training is basically a prompt divided in two parts: An initial instruction that indicates the AI how to respond, and a sample conversation showing it what to respond (coming after the command <conversation>).

You will notice that this training is filled with information about our fictional Loch Jewelry. However, the structure is exactly what you need for optimal AI responses. So, instead of erasing it, simply replace the parts of the conversation that talk about Loch Jewelry with information about your actual business. Where you have frequently asked questions, write your own FAQs. Where you see the shipping process, describe your own delivery system. Replace the phone number with your actual contact information. And so on.
⚠️ IMPORTANT: The training talks about the process to speak with a human agent. Do not change this part! We will need it for further steps on this tutorial.

Save your changes. When you are done, make sure the Use AI option is still enabled, and click on Save.
Test it! Send the AI questions about your business from a different number. The AI will be able to answer them now.

Adding keywords to enable and disable the AI
Okay, the AI is active and can handle most of your customers’ questions. But what happens if you need to step into the conversation? For instance, to confirm an appointment date or solve a specific issue. In such cases, you’ll need a keyword to pause the AI and prevent it from responding at the same time as you. Let’s see how to set it up.
Go to your Chatbot Settings. Open the Item List again, click on the three-dot menu in the top-right corner, and select Edit Chatbot Settings.

Set the keywords to enable and disable the chatbot. Under Chat keyword to Disable bot, type the word OFF, exactly as shown here, keeping the uppercase letters. You can modify this later, but for now, we need it this way for the demo to work properly.
Next, under Chat keyword to Enable bot, type the word ON, again keeping it exactly as written here. This keyword will allow you to reactivate the AI in the conversation after you’ve finished interacting with the customer.
Click Submit to save your changes.

Now, go to the WhatsApp LiveChat. You’ll find this option in the left-hand sidebar. Once inside, click the LiveChat button for the WhatsApp account you’re working with.
The LiveChat is where you can view all customer conversations and jump in to respond. You can also organize these conversations into custom Kanban-style columns and assign permissions to your agents for handling replies. Refer to the relevant documentation to learn how to do this. For now, you can use it as is.

From a different number, send a message to the WhatsApp account where you’ve installed the AI. You’ll see that the AI responds.

Look for the conversation on the LiveChat. If you don’t see it, try refreshing the page.

Send the keyword. Click on the conversation to open it. From within LiveChat, send the keyword OFF. This will disable the AI.

Now, from the other WhatsApp account, send a question. You’ll notice that the AI no longer responds. You can now have a direct conversation with this number without chatbot interference.

Send additional messages from LiveChat, where you’ll see their responses in real-time.

Next, let’s see how to turn the chatbot back on. From LiveChat, send the keyword ON. You’ll notice that now, when a message is sent from the other number, the AI responds again.

Using the ON and OFF commands, you can easily control your conversations. Note that if the customer sends these keywords, they won’t have any effect—they must be sent directly by the administrator.
But what if you want the customer to be able to disable the chatbot themselves? For example, you could instruct them to send the word HUMAN to stop the chatbot and request agent intervention. Once the AI stops responding, you can jump into LiveChat and take over conversations where HUMAN is the last message.
Let’s see how to set this up.

Create a new item in your WhatsApp chatbot. To do this, simply go back to WhatsApp > Chatbot and click on the New Item button of the WhatsApp account where you are working.

In the new item, set HUMAN as the keyword and write OFF in the caption. Leave the rest of the settings as on the image below and Submit. From now on, when your customer sends the word HUMAN, the chatbot will reply with OFF and deactivate the AI.

Try it. Go ahead and test it out. As before, to turn it back on, simply send the keyword ON from the LiveChat in that conversation.

With this setup, your AI is ready to assist your customers! In the next sections, we’ll explore how to configure additional interactive elements to create a fully dynamic chatbot.
Configuring the Keyword-based items
AI chatbots are incredibly useful for responding to most messages, but to enable truly dynamic conversations, it’s beneficial to complement them with additional elements. As we mentioned earlier, keyword-based items can perform a wide range of functions—from collecting and storing information to sharing data with third-party applications.
In this tutorial, we’ll focus on three key features every chatbot should have to enhance the user experience in your WhatsApp chatbot:
- A welcome menu with quick access options
- Sending files, images, and voice notes
- Message sequences
As you must have seen when you were first testing your chatbot, demo you imported already includes all these features. Send the word “hi” to your chatbot’s WhatsApp from a different number to see them in action again. While the menu options aren’t active yet, this will give you an idea of how it works.

Let’s explore how to configure them so you can adapt them to your business needs.
Setting Up the Welcome Message
Let’s start by customizing your welcome message.
Locate the item that contains it. Go to your chatbot’s item list—you should have imported it with the demo under the name Start message. Click on it to open its settings.

Set up the keywords. This message is triggered by the keywords “hi,” “hello,” and “start.” If you’d like, you can add additional keywords your customers might use when sending their first message.
💡 PRO TIP: Keep in mind that while the AI can respond in any language, the same doesn’t apply to keyword-based items. If you want your chatbot to work in a language other than English, you’ll need to translate both the texts and the keywords.

Customize the message in the Caption field. Note that the [wa_name] command will automatically use the name your customer is registered with on WhatsApp. We recommend keeping instructions in this initial message on how to interact with the AI and use the menu to ensure a better user experience. Simply replace the placeholder “(my business)” with the name of your business.

Identify the next bot action. In the next bot action field, you’ll see the keyword “menu.” This connects the initial message to the one containing the menu and its title. For now, leave it as is—just make sure you locate it and remember this keyword for later.

Save. Click Submit to apply your changes.
💡 PRO TIP: The message you configured in the previous section will be triggered by the keywords you assigned to it. However, you can optionally turn it into an autoresponder. This will activate the message the first time a user sends a message, regardless of the keywords it contains. Follow this tutorial to learn how or hire an expert to guide you through the process.
Configuring the Navigation Menu
Now, let’s see how to edit the navigation menu that accompanies the welcome message.
Locate the item with the Menu Title. Go back to your chatbot’s item list and find the item named “Menu Title”. Click on it to edit.

Identify the Keywords. Currently, this item is triggered by the keyword “MENU”. Do you remember that in the welcome message item, this same keyword was in the Next Bot Action box? This is what links the two messages so they are sent together. Essentially, you need to enter the keyword of the next message (or messages) you want to trigger in the Next Bot Action box. Don’t worry if it’s not fully clear yet; we’ll cover it in more detail later. For now, keep the keyword “MENU” here so that your customers can return to the navigation menu without triggering the welcome message again.
Identify the Next Bot Action. This item has “options” in the Next Bot Action box, which will trigger the message containing the menu options. For now, leave it as is.

Optionally modify the title. You can change the title that appears in the Caption box. Note that the text is surrounded by asterisks (*): this formats the text in bold.
Save. Click Submit to save your changes.

Edit the Menu Options. To do this, locate the item called “Navigation Menu“. Here, you’ll find the menu options. Each option is tied to a number, which serves as a keyword to trigger a specific message. You can keep the numbers and change the names of the options. For now, we’ll leave them as they are. In the next sections, you’ll learn how to edit the messages these numbers trigger.

Configuring the Menu options
Our menu currently includes the options Image, PDF file, Text message, and Voice Note. Let’s learn how to send each of these dynamic files using the template from your demo. To do so, you’ll need to upload them to the platform.
Download the folder. If you haven’t done so yet, download the folder with the media files included in the demo. We’ll need it for this tutorial.
Go to the File Manager. You’ll find this option in the left-hand sidebar menu. The File Manager is where you’ll store all the multimedia files you use and/or generate on our platform.
Upload the files. Click the Browser Files button to select the files from your computer.

That’s it! Now you have everything ready. Let’s link these files to their respective items.
Adding Multimedia Files to the chatbot
Locate the item called “Keyword 1” in your chatbot’s item list. Note that its keyword is “1” to link it to the menu. Click on it to configure.

Add the image. Go to the section called Media File and click the File Manager button to open your documents. Find the image, select it, and insert it with the Done button.
Optionally, configure the text message that will accompany the image. You’ll find it in the Caption box as usual.

Save and test. Click Submit to save the changes, then test this item by sending the number 1 to the chatbot’s WhatsApp from a different number. The chatbot should respond with the image like this:

Repeat the process for Keyword 2 with the PDF file. Locate the item, click to configure it, upload the PDF from the File Manager, and save. When testing, it should send something like this:

Finally, repeat the process with Keyword 4 and the voice note. Locate the item, click to configure it, upload the audio file we provided from the File Manager, and save. When testing, it should return the audio as a voice note.
💡 PRO TIP: Audio files must have a specific configuration for WhatsApp to recognize and send them as voice notes rather than downloadable files. Visit this tutorial to learn the specifications.
Configure Keyword 3. This one is not designed to contain any multimedia files, but if you’d like, you can change the accompanying text.

That’s it! You now have a complete menu that your customers can trigger at any time, sending various types of multimedia files. You can experiment with these options to create dynamic features and interactive conversations that meet all your customers’ needs.
The only thing left to learn to complete your first chatbot is how to set up sequences triggered through the next bot action. Although we’ve mentioned it before, we’ll go into detail in the final section of this tutorial.
Creating Message Sequences
To link multiple messages in a sequence, you need to use the feature called Next Bot Action. Essentially, it works like this: in the Next Bot Action box, you input the keyword of the item you want to send immediately after the current one.
Let’s create a sequence using this function to make it clearer.
Find the item named “Next Bot Action 1.” As you’ll notice, the keyword that activates it is “n1“. Now, go to the Next Bot Action box and type “n2.” For now, leave all the other settings as they are, including the Caption, and save.

Find the item named “Next Bot Action 2.” Open it. In the keywords box, enter “n2.” Then, in the Next Bot Action box, type “n3.” Save.

Next, find the item named “Next Bot Action 3.” Open it. In the keywords box, enter “n3.” This time, leave the Next Bot Action box empty and save by clicking Submit.

Your item list should look like the image below:

Test it. Send the keyword “n1” from a different WhatsApp number to test your chatbot. You should see a response like this:

Congratulations, you’ve learned how to use the Next Bot Action! Feel free to experiment with this feature to create message sequences that add a more human touch to your conversations.
💡 PRO TIP: The Next Bot Action can be combined with the save responses feature to create dynamic sequences, where the bot waits for a user response before sending the next message in the sequence. Visit this tutorial to learn more or hire an expert to assist you here.
Now you know the basic elements needed to successfully build a WhatsApp chatbot for your business! The fun part begins now: personalize the demo we created with your own information. Mix and match different elements, add new items, change the multimedia files, and design sequences to address your customer queries. If you need further assistance, you can hire one of our experts to guide you here.
