A WhatsApp chatbot can revolutionize customer interactions—until it stops working. From connectivity problems to configuration errors, several factors could disrupt its functionality. Don’t worry; we’ve compiled a comprehensive guide to help you identify the root cause and resolve the issue step by step. Whether it’s a small glitch or a major setup problem, this tutorial will get your chatbot back on track.
💡 PRO TIP: Save time and frustration by hiring an expert to troubleshoot and fix the issue for you. Click here to book a specialist now!
How to use it
Before diving deep into the possible issues, you need to identify if the problem is with the AI responses, or the chatbot system itself. We are assuming here that you have correctly followed the steps to connect your WhatsApp account and your OpenAI credentials for the AI tools.
Open SocialPoster. Go to WhatsApp > Chatbot. Create a new item and assign it the keyword “test”. On the caption box, write test as well. Make sure you are not using AI.

Check the chatbot is on. Click on item list. You should see a green icon on the top right corner.

Now, from a different account, send a message to your WhatsApp. If the chatbot answers, then the connection is alright. You might be facing issues specifically with the AI responses, so scroll down to the corresponding section on this article for possible causes. If it doesn’t, then it is likely an issue of the WhatsApp account connection to the app. Possible causes vary depending on how you did it: via Cloud API or with the QR API.
Common issues with Meta API Cloud accounts
Most common issues with API Cloud accounts are related to an incorrect configuration of the account while connecting it to the app. For reference, all the steps are detailed on this other article. We recommend you to check it out first, and then keep reading this page for a quick diagnostic.
Incorrect webhook setup
When you are connecting your WhatsApp account via the Cloud API, step 3 is to create a custom webhook URL pointed to SocialPoster with your unique token and Callback URL. If you skip this step, or the token and URL do not match, the chatbot will not send any messages. This issue is specially common when the same Meta app and number have been used across multiple chatbot platforms. In such cases, the wrong settings might be copied over, preventing communication with the WhatsApp API.

How to diagnose it?
Open SocialPoster and go to WhatsApp > Profile. Select your WhatsApp account. You’ll see your Webhook URL and Token.

Open to https://developers.facebook.com/. Login on the same Meta Business account you used when connecting your WhatsApp account to SocialPoster. Select the app you created then.
On the left sidebar, click on Webhooks. Once on the Wehooks page, on Select Product choose WhatsApp Business App.
Verify that the Callback URL and Verify Token in Meta match exactly with the ones in our platform. If they don’t match, this is likely the source of the issue.

How to fix it?
Replace the incorrect Callback URL and Verify Token with the correct ones from our platform. After entering the correct details, click Verify and Save.

Scroll down to confirm that you are subscribed to the Messages webhook. Once the changes are saved, your chatbot should be up and running without any issues.

WhatsApp Account Pending Approval by Meta
Your WhatsApp account might still be under review by Meta, which is why the status is showing as “Pending.” This can happen when your account has not yet been fully approved or connected to Meta’s systems.
How to diagnose it?
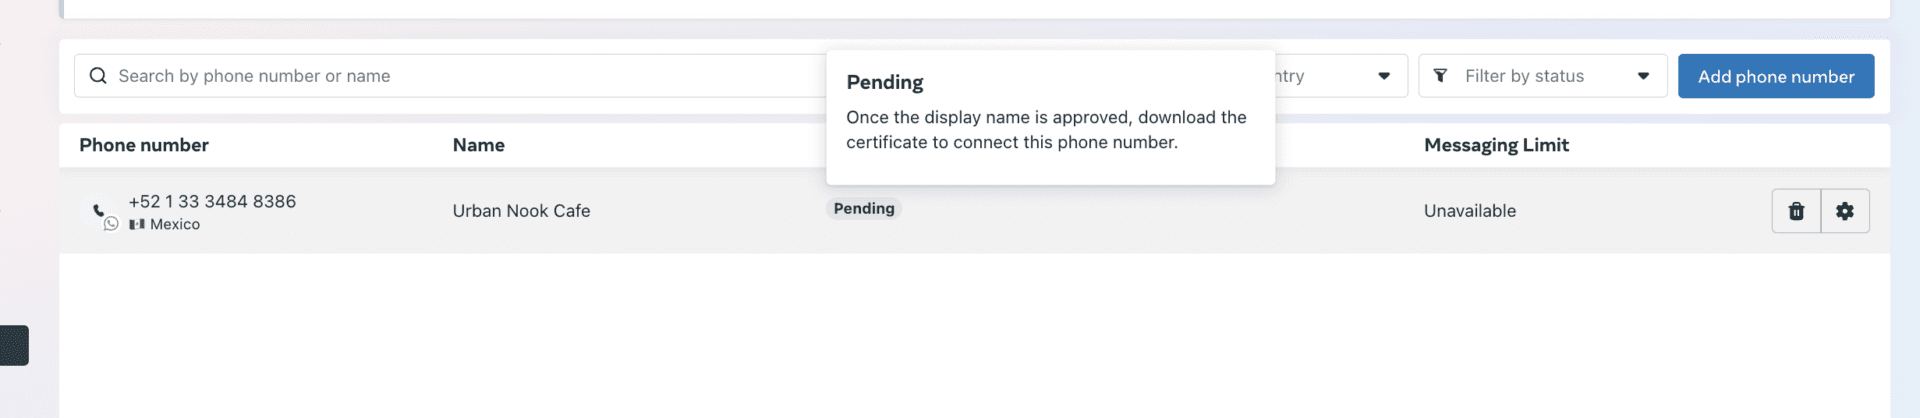
Open the WhatsApp Manager in Meta and ensure your WhatsApp account is selected in the top right corner. In the left sidebar, select Phone Numbers.
Look for your WhatsApp number and check the Status. It should say Connected. If it says Pending, this is the cause of the issue.
How to fix it?
This issue likely arises if you haven’t fully completed the connection between your WhatsApp account and our platform. This is especially true if Meta is asking you to upload a certificate to approve the account.
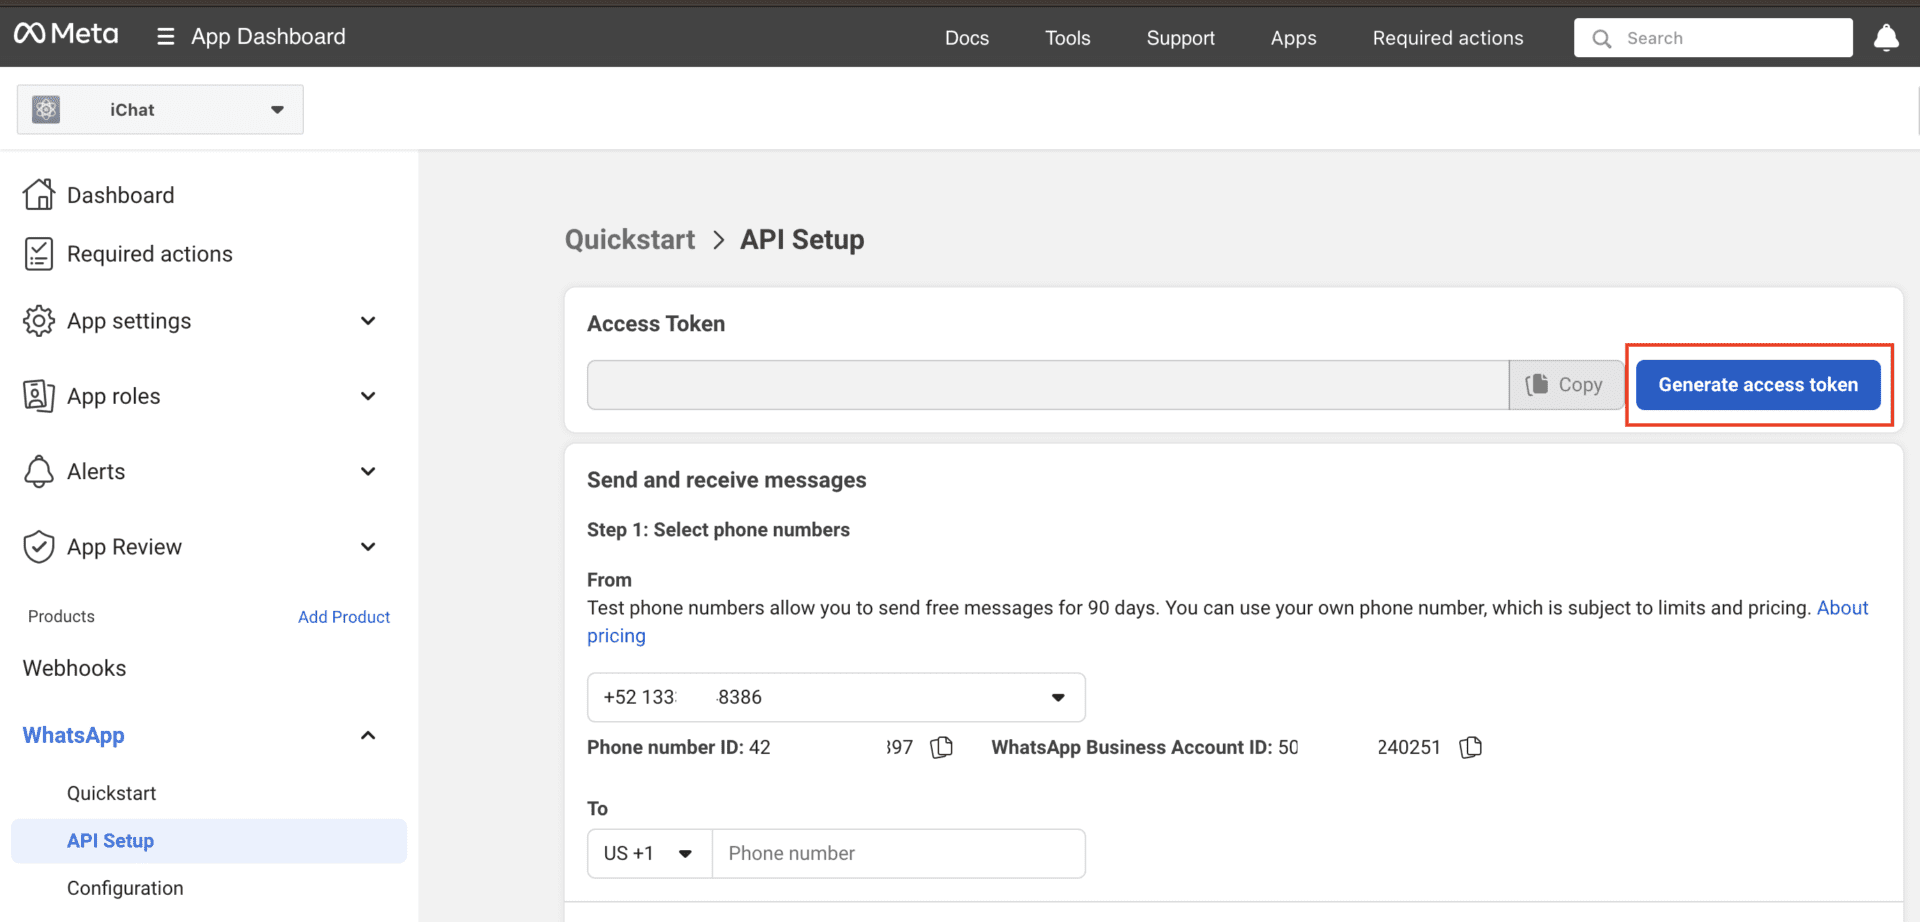
Ignore that message from Meta and focus on finishing the connection process instead. Go to the Meta Developers platform, select the app you created for your chatbot, and navigate to WhatsApp > API Setup.
Make sure you complete Step 6. For further details, check this article.

Once completed, you need to make sure you have a token. Scroll to the top of the API Setup page and under Access Token, click Generate Access Token.
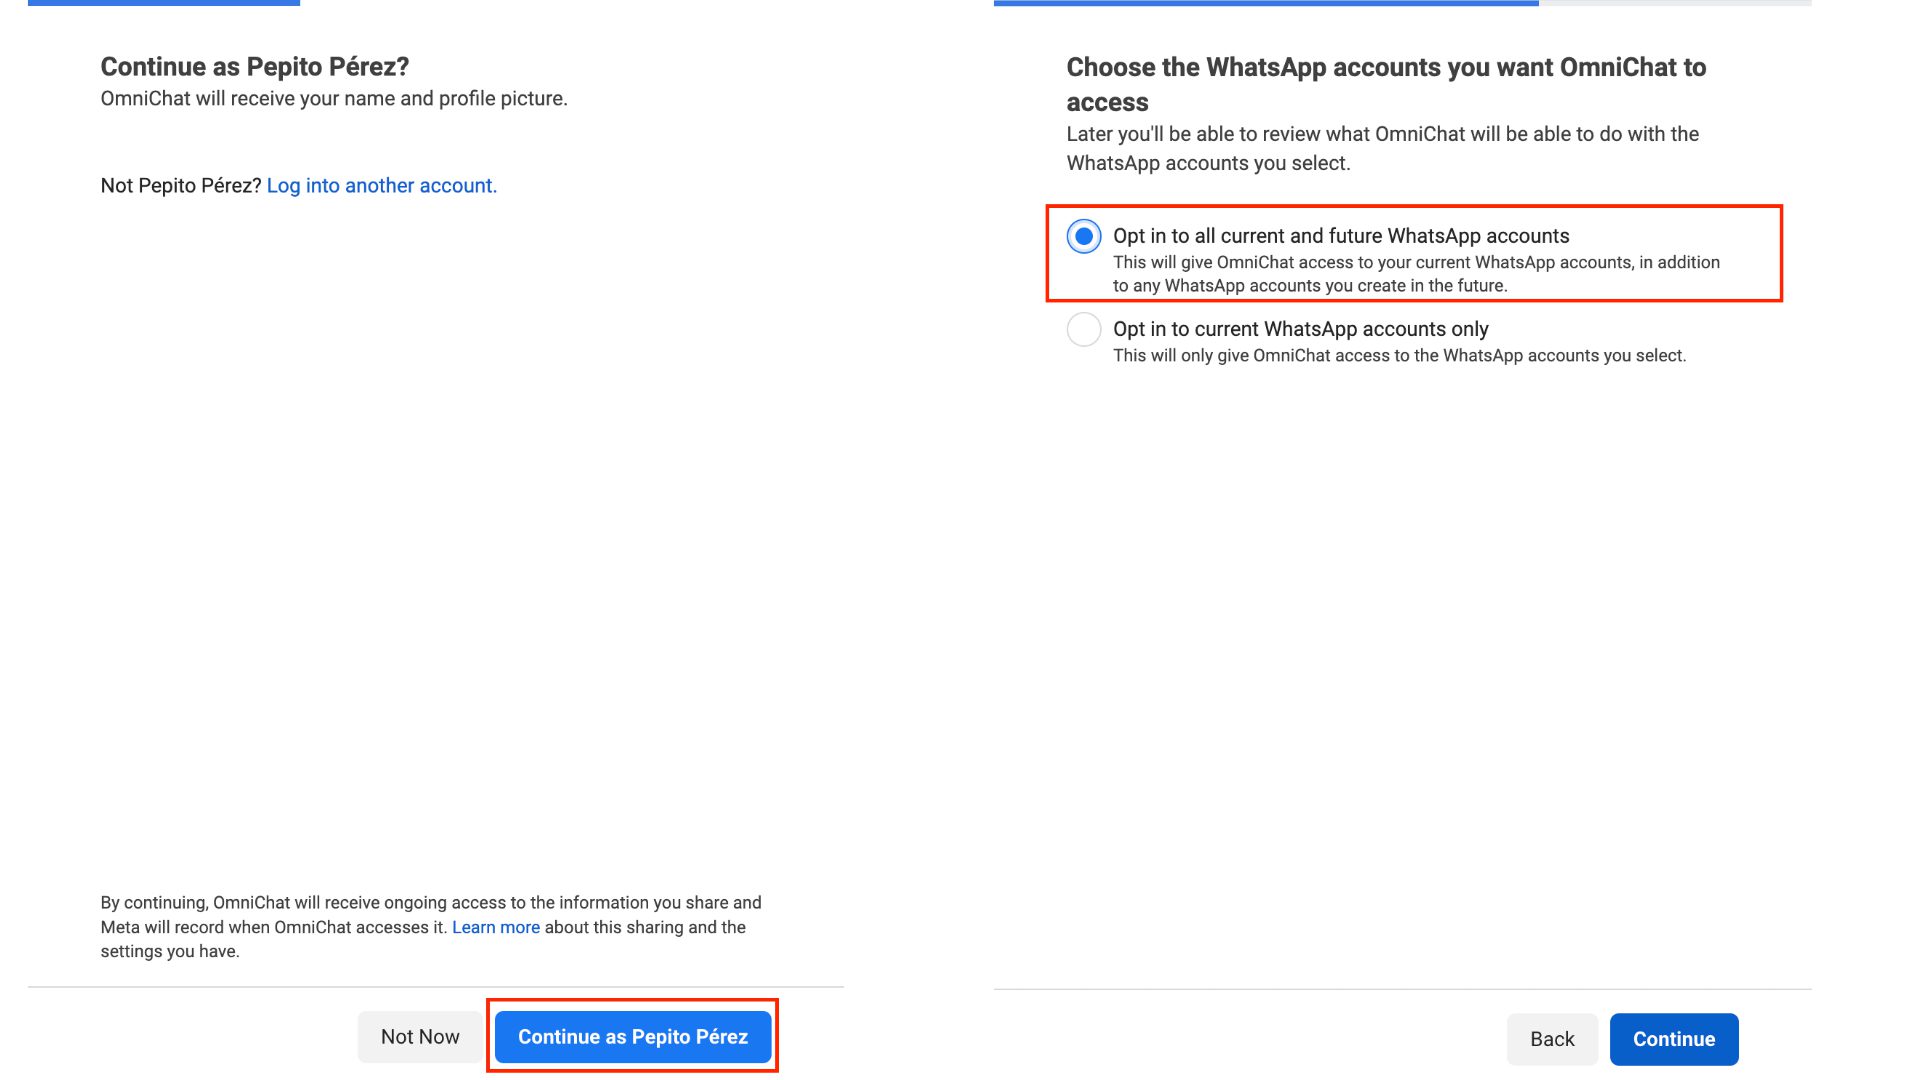
On the page that opens, click Continue As, then select Opt in to all current and future WhatsApp accounts. Click Continue and then Save. Skipping this step is most likely what keeps your account in Pending if you have connected it to our app already.
Make sure you have finished connecting your WhatsApp number to our platform by following every step in this tutorial. After these steps, your WhatsApp account and number should be connected. Please allow several hours for Meta to detect that you’re using a verified partner (us) to build your chatbot and approve your account.

You Do Not Have a Valid Payment Method Connected on Meta
If a valid payment method has not been added to your WhatsApp account, its functionality may be restricted and Meta might not approve your number. This step is critical for completing the API setup of your WhatsApp Cloud Account.
Why is a Payment Method Required?
Meta requires a payment method because business-initiated conversations (e.g., proactive messages sent to customers) have a cost. Even if you’re only using a chatbot to respond to customer-initiated conversations, adding a valid payment method is mandatory for account approval. You can learn more about WhatsApp’s pricing structure [here](#).
How to Diagnose It?
Open Meta’s Business Settings and go to WhatsApp on the left sidebar. Select your account. There, you will see if you have a valid payment method available.

How to Fix It?
Click on the Payment Settings button. You will be directed to the Payment Settings page.
Click on Add payment method. Make sure your Business Account is selected.
Add a valid debit or credit card. Rest assured, no charges will be made unless you begin using bulk campaigns or other chargeable features.
After completing this step, your WhatsApp account should be ready for Meta approval, and your chatbot should work seamlessly.

App in Development Mode Instead of Live
Your Meta app is still in development mode and needs to be switched to Live for full operation. Even after completing the API Setup, adding a payment method, configuring the webhooks, generating a token, and connecting your WhatsApp account to our platform, this final step is crucial. Without it, the chatbot might not function as expected.
How to Diagnose It?
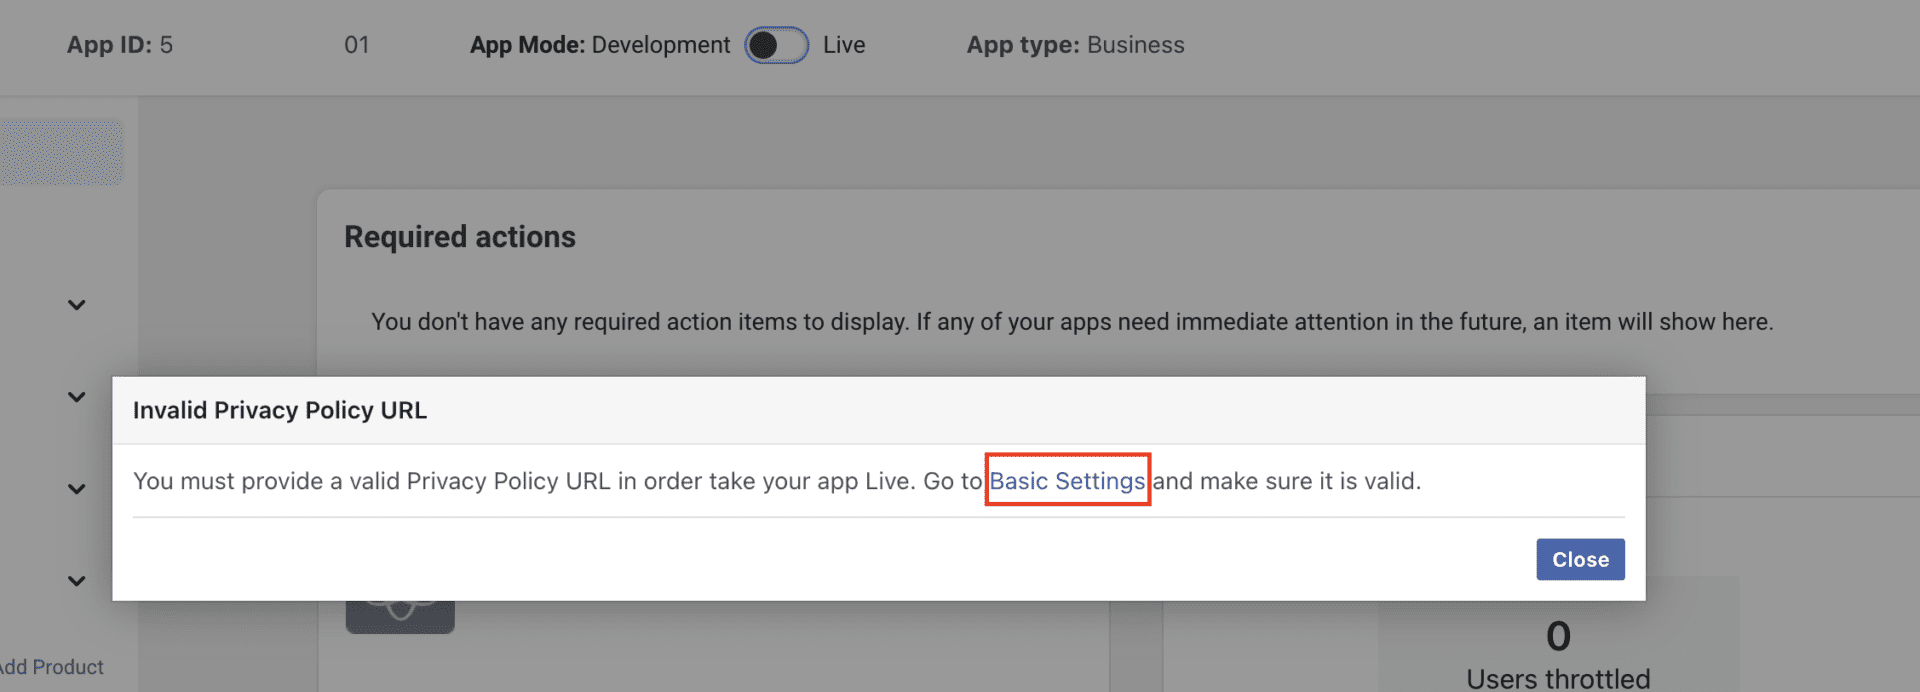
Open Meta Developers and navigate to WhatsApp > Configuration. At the top of the page, look for a toggle switch labeled Development on one side and Live on the other. If the switch is set to Development, your app is not live.

How to Fix It?
Toggle the switch from Development to Live. You will be prompted to link a Terms and Conditions and a Privacy Policy page. You can use ours:
- Terms and Conditions: https://planifyx.com/terms-and-conditions/
- Privacy Policy: https://planifyx.com/privacy-policy/
Save your changes. Wait a few minutes for Meta to approve the settings.
Once approved, you can turn the switch to Live mode. This way, your chatbot will be fully operational.

System User Token Lacking Permissions
If the System User Token you pasted on SocialPoster when connecting your account is outdated or does not have the necessary permissions, the connection won’t work. This happen be due to:
1. The token itself being improperly configured.
2. The user who created the token not having the app assigned as an asset.
How to Diagnose It?
Open Meta Business Settings and navigate to Users > System Users. Select the System User associated with your app and verify its permissions.
Check that the app is assigned to this user as an asset with the correct permissions. These are “WhatsApp Business Management” and “WhatsApp Business Messaging”. If the app is missing from the list of assets, this is likely the problem.

How to Fix It?
Click on the Assign Assets button. On the modal form, go to Apps. Select the app you created to connect your chatbot to SocialPoster. Turn on all the permissions and click on the Assign Assets button to save.

Generate a New Token. Generate a new Access Token for the system user by clicking on the Generate token button. Ensure you select expiration as Never and choose the necessary permissions: whatsapp_business_management and whatsapp_business_messaging. Copy the new token and save it somewhere safe before closing the page.

Update the Token in SocialPoster. Go to WhatsApp > Profile. Select your account and paste the new token on the corresponding field. Then, click on Update Credentials.
Once done, your WhatsApp chatbot should work seamlessly.

Common issues with QR API accounts
Accounts connected via QR Code need to renew their connection from time to time, since they operate similarly to WhatsApp Web. If the chatbot is failing, this is the most probable cause.
How to diagnose it?
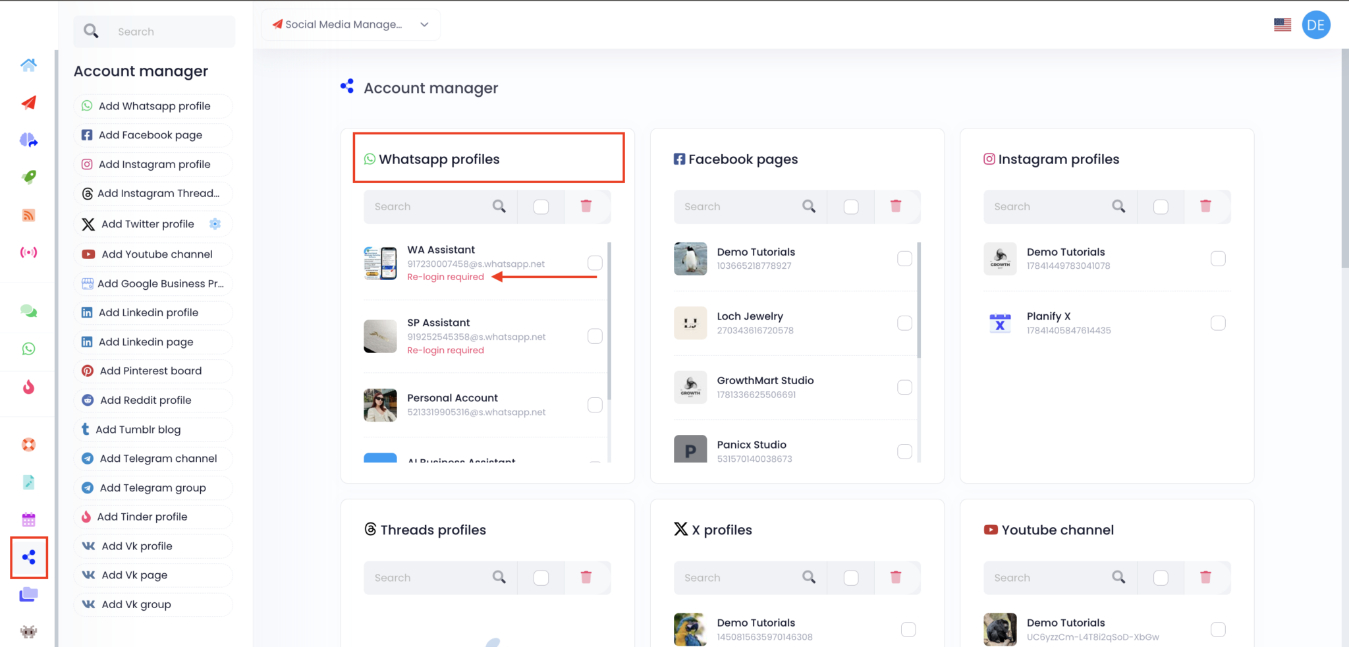
Go to the account manager on the left sidebar and look for the Account Manager. Scroll to the WhatsApp section. If your account needs a re-login, you’ll see a tag that says “Re-login required”.
How to fix it?
If you simply reconnect by scanning the QR code from scratch, your Instance ID will change. This can break your automations and even cause you to lose important data. The correct way to renew your connection without changing your Instance ID is by doing a re-login. Just follow the steps below.
Go to the Account manager. Click on the Re-login required tag.

You will see your account under the QR Code. Click on the Relogin button next to it.
Scan! Simply open your WhatsApp account on your phone. Go to Add Device and scan the QR code on the app’s screen.

That’s it! Your connection will be refreshed, and you can continue using the app without losing any data or automations.
Common issues with the AI responses
If the chatbot is answering correctly, but the AI isn’t, the method to solve it is different. Below you will find the most common causes for AI failure and how to fix them.
Insufficient Credits in OpenAI API Key
The OpenAI API Key being used for your chatbot does not have sufficient credits to process AI-related requests. If you’re using AI to respond to your messages, it is essential that you provide a valid API key from OpenAI. This key requires credits, which are used for tokens in the AI chatbot. Tokens are units of work that the AI uses to generate responses. If there are insufficient credits, the AI will not be able to process requests, and your chatbot may stop responding as expected.
How to diagnose it?
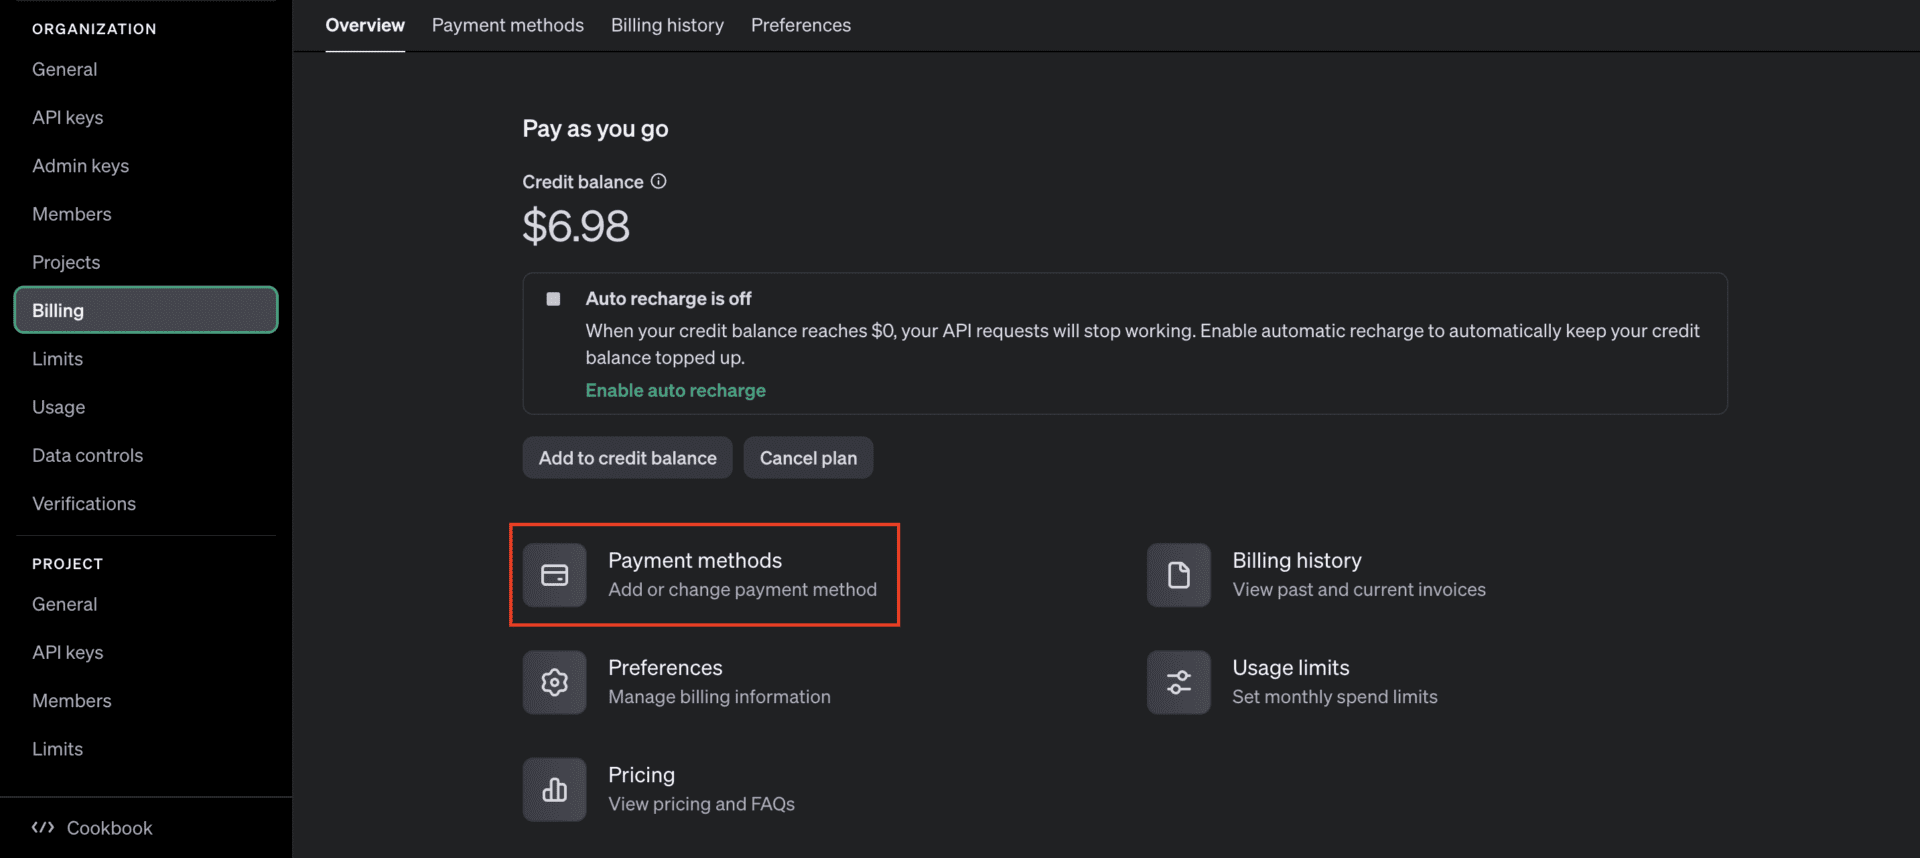
Check your OpenAI credits. Visit your OpenAI account, then go to Settings > Billing. Here, you’ll find the amount of credit available in your account. If you are out of credit, this is why the AI is not responding.
How to solve it?
Just add more credit to your OpenAI account! You can also enable auto-recharge in OpenAI settings, so your credits are automatically replenished once they reach a specified limit, ensuring this doesn’t happen again. We recommend always maintaining at least USD $10.00 in credit.
For more detailed instructions on adding credit, please check this tutorial.
AI Training is Not Set as the No Match Template
The No Match Template is used to ensure that the AI can respond to any query, regardless of the keywords used by the user. If the AI training is not set as the only No Match response of the account, it will not work correctly.
How to diagnose it?
Go to WhatsApp > Chatbot, and find the item where the AI training is located. Ensure that under the Is This No Match? field, you select Yes. Also, make sure the item is Enabled, and check that “Use AI” is selected under the caption box.

How to fix it?
If you’re setting up the No Match Template for the AI, remember to only have one No Match item enabled per account (this should be the AI). This setting allows the AI to handle responses for queries that don’t match specific keywords.
The Prompt is Too Long
Each AI model has a limit on the number of tokens it can process in a single request. If the prompt exceeds this limit, the AI will not work as expected. Different models (like GPT-3.5 and GPT-4.0 Mini) have different token limits. For example:
- GPT-3.5: Can handle up to 4,096 tokens.
- GPT-4.0 Mini: Can handle up to 8,192 tokens.
If your prompt exceeds these limits, the AI will not respond.
How to diagnose it
Use OpenAI’s tokenizer to measure the length of your prompt for the model you’re using. Check the documentation for each model to confirm the maximum input length.
How to fix it
You have two options: Shorten the prompt, or use a model with a higher input limit. To do the last, go to your chatbot’s item list. Click on the three dot menu at the top right corner, and enter the Chatbot Settings.

Under AI model, select the one you prefer. Submit to save your changes.

The prompt is incorrect
Sometimes, the AI may provide a response, but it’s not what you’re expecting (e.g., short, unhelpful responses). This usually indicates that the prompt isn’t clear or structured well.
How to fix it?
The best practice is to divide the prompt into two parts:
- First part: Instruct the AI to act as an assistant for your business, and set the expectations (e.g., response length, tone).
- Second part: Provide a sample conversation that clearly demonstrates how the AI should interact.
If the instructions aren’t clear enough, the AI might respond, but not as expected.
💡 PRO TIP: Save time and avoid frustration by hiring an expert to help you with AI best practices. An expert can assist you in training your AI chatbot to work perfectly for your business needs. Click here to get expert help and optimize your chatbot.
